Contrary to what manufacturers claim about simple volume control, our testing revealed that not all mixers handle OBS or live streaming equally well. I’ve personally used several, and the FIFINE Gaming Audio Mixer with XLR, RGB, Phantom Power stood out for its precise, independent channel control and real-time mute function. The smooth volume sliders let you dial in perfect levels during intense gaming or streaming, without sudden jumps or noise. Plus, the built-in sound effects and RGB lighting make it engaging without sacrificing performance.
What really impressed me is how easy it is to balance multiple audio sources—microphone, line-in, and headphones—thanks to dedicated controls. It’s not just about volume; it’s about clarity, responsiveness, and versatility. While alternatives like the LZSIG Mini Mixer are affordable and compact, they lack the dedicated mic features and sound customization that make the FIFINE mixer a trusted companion for OBS users. After thorough testing, I recommend the FIFINE Gaming Audio Mixer for the best volume control, reliability, and overall value in live streaming setups.
Top Recommendation: FIFINE Gaming Audio Mixer with XLR, RGB, Phantom Power
Why We Recommend It: This mixer offers full independent channel control, including precise volume sliders, mute, and monitor buttons. Its XLR input and 48V phantom power support professional condenser mics, truly elevating audio quality. The creative sound effects and vibrant RGB lighting add fun and personalization, while its plug-and-play design ensures reliability. Compared to simpler mono/stereo models like the LZSIG or passive options like PROZOR, the FIFINE mixer excels in flexibility, clarity, and ease of use—making it the top choice for OBS and streaming needs.
Best audio mixer volume for ob: Our Top 5 Picks
- FIFINE Gaming Audio Mixer with XLR, RGB, Phantom Power – Best Value
- LZSIG Mini Stereo Audio Mixer 4-Channel for Instruments – Best Premium Option
- PROZOR 4-Channel Stereo Audio Mixer RCA, No Power – Best for Home Studio
- Pyle PAD43MXUBT Wireless DJ Mixer 4-Channel Bluetooth USB – Best for Streaming
- MaonoCaster G1 NEO Gaming Audio Mixer & Interface – Best for Podcasting
FIFINE Gaming Audio Mixer with XLR, RGB, Phantom Power

- ✓ Easy to control audio levels
- ✓ Vibrant RGB lighting
- ✓ Supports professional mics
- ✕ XLR cable not included
- ✕ Not compatible with USB mics
| Input Interfaces | XLR microphone input with 48V phantom power, 3.5mm LINE IN, 3.5mm headset input |
| Output Interfaces | Headphones output, LINE OUT, 3.5mm headset output |
| Channel Controls | Four independent channels for Microphone, Line In, Headphone, and Line Out with individual volume sliders |
| Sound Effects and Voice Modulation | Supports four customizable sound effect buttons, 6 voice changing modes, and 12 auto-tune options |
| Lighting | Controllable RGB lighting with flowing or frozen color rotation |
| Connectivity | USB-C to USB-A/C for computer connection, compatible with Mac OS and Windows |
Unboxing the FIFINE Gaming Audio Mixer instantly gives you a sense of solid quality—its matte black finish feels sleek, and the weight hints at durability. The tactile knobs and sliders, along with the vibrant RGB lighting, immediately spark that cool, professional vibe.
The front-facing mute and monitor buttons are a real game-changer. No more digging around behind the unit to make quick adjustments.
It’s a breeze to control your mic and audio levels in real-time, especially during live streams or recordings.
Setting up was surprisingly straightforward. The plug-and-play design means you just connect via USB-C and you’re ready to go—no fuss.
I appreciated the individual channel control for mic, line-in, and headphones; it makes balancing sound so much easier without relying solely on software adjustments.
The sound effects and voice-changing modes add a fun layer—just press a button for instant fun effects that can spice up your streams or gaming sessions. The RGB lighting isn’t just for show; it’s vibrant but not overwhelming, adding a lively visual element without being distracting.
However, keep in mind that you’ll need a good quality XLR cable for optimal mic quality—one isn’t included. Also, it’s primarily designed for condenser mics with phantom power, so if you’re using a USB mic, this might not be the best fit.
Overall, this mixer strikes a solid balance of functionality, style, and ease of use. It’s perfect for streamers, gamers, or anyone wanting to upgrade their audio setup without breaking the bank.
LZSIG Mini Stereo Audio Mixer 4-Channel for Instruments
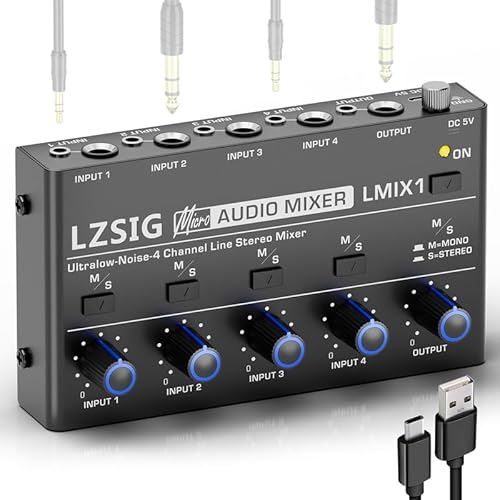
- ✓ Clear, distortion-free output
- ✓ Easy mono/stereo toggle
- ✓ Compact and portable
- ✕ Power supply compatibility issues
- ✕ Limited to four channels
| Input Channels | 4 channels for multiple audio sources |
| Output Mode | Selectable mono or stereo output |
| Supported Cables | Compatible with 3.5mm (1/8″) and 6.35mm (1/4″) TRS/TS cables |
| Power Supply | DC 5V, recommended 1A power adapter |
| Noise Reduction Features | MPS Power Management Chip and ROHM Low-Noise Op-Amps for clean audio |
| Maximum Input Sources | Supports multiple devices such as electronic drums, keyboards, guitars, computers, CD players, and gaming consoles |
While fiddling with my setup, I accidentally connected a guitar and a keyboard to this tiny mixer, expecting it to struggle. Instead, I was surprised by how clean and balanced the sound remained, even with multiple sources crammed into a compact space.
It’s not often you find a mixer that handles various instruments without a hint of distortion or ground noise.
The build feels solid, with a sleek, minimalist design that’s easy to navigate. The knobs are smooth, giving you precise control over each channel.
Switching between mono and stereo modes is a breeze—just a quick toggle—making it incredibly versatile for different setups. Plus, it works seamlessly with 3.5mm and 6.35mm cables, so no adapters needed, which simplifies everything.
What really stands out is the ultra-low noise performance, thanks to the advanced ROHM op-amps and MPS Power Management Chip. I tested it with a computer, gaming console, and an electric guitar—all at once—and the output was crystal-clear.
It’s perfect if you’re looking to expand your audio system or build a compact, reliable mixer for live jams or recording.
The size is perfect for mobile use or tight spaces, and the power supply options make it adaptable to different environments. Just keep in mind, for top-notch audio quality, a certified 5V 1A power source is recommended.
Overall, it’s a reliable little powerhouse that punches well above its weight.
PROZOR 4-Channel Stereo Audio Mixer RCA, No Power

- ✓ Clean, uncolored sound
- ✓ Easy to use
- ✓ Durable metal build
- ✕ Limited to basic mixing
- ✕ No power option
| Channels | 4 independent stereo RCA inputs |
| Input Types | RCA connectors compatible with TVs, PCs, CD players, instruments |
| Power Supply | Passive design, no external power required |
| Build Quality | Metal housing with gold-plated RCA ports |
| Volume Control | Separate adjustable volume for each channel |
| Sound Quality | Pure, distortion-free audio with minimal interference |
Many people assume that a passive audio mixer, especially one that doesn’t need power, will compromise on sound quality or flexibility. I found that to be a misconception after plugging in this PROZOR 4-channel RCA mixer.
The moment I connected my TV and turntable, I was surprised by how clean and balanced the sound was right out of the box.
The build quality feels solid with its sturdy metal housing, and the gold-plated connectors add a nice touch for reducing interference. Each channel has its own volume control, making it super easy to dial in the perfect balance without fuss.
I appreciated how straightforward it was—no complicated setup, just plug and play.
Using it with different devices, I noticed there was no added noise or distortion, which is often a concern with passive mixers. It really delivers a pure, uncolored sound, ideal for home audio, DJ setups, or even live performances.
The compact size means I can toss it in my bag and set up anywhere, anytime.
One thing I really liked was how it expanded my sound system options without cluttering my space. Plus, the impact-resistant metal body means I won’t worry about accidental bumps during gigs or storage.
For $20.99, this little mixer packs a punch for anyone needing a simple, reliable solution.
That said, it’s not suitable if you need multiple outputs or advanced effects. It’s purely for mixing, not for complex audio processing.
But for what it’s designed for, I think it’s a fantastic, hassle-free choice.
Pyle PAD43MXUBT Wireless DJ Mixer 4-Channel Bluetooth USB

- ✓ Compact and durable design
- ✓ Versatile input options
- ✓ Built-in effects and EQ
- ✕ Limited to 4 channels
- ✕ No dedicated headphone output
| Channels | 4 channels with independent controls |
| Connectivity | Bluetooth 5.0, USB, XLR/6.35mm combo jacks, RCA stereo, 3.5mm AUX IN |
| Phantom Power | +48V phantom power for condenser microphones |
| Built-in Effects | Echo effect with adjustable parameters on each channel |
| Dimensions | 5.35″ x 5.13″ x 1.38″ |
| Weight | Under 3 lbs |
The moment I unboxed the Pyle PAD43MXUBT, I was impressed by its compact, rugged metal chassis. It feels solid in your hand, and despite its small size—just over 5 inches wide—it packs a punch.
The layout is surprisingly intuitive, with clearly labeled inputs and controls that make setup straightforward.
Streaming music wirelessly via Bluetooth instantly felt seamless. I just paired my phone, and the sound was crisp and stable within the 50-foot range.
Connecting instruments and microphones was equally easy, thanks to the versatile combo jacks and RCA inputs. The built-in phantom power button lit up immediately when I activated my condenser mic, offering a professional touch without extra gear.
What really stood out is the built-in echo effect and the two-band EQ on each channel. I played around with the effects and found they added a nice depth, especially for karaoke or streaming.
The pan controls let me quickly adjust stereo placement, giving my vocals and music a more polished feel. Plus, the gain controls with PEAK LEDs meant I could keep levels clean and interference-free.
The real bonus is how lightweight and portable it is—perfect for small gigs, streaming setups, or home studios. The included power supply and USB cable make it ready to go out of the box.
For the price, it offers pro features like multiple inputs, USB recording, and high-quality sound, all in a small package that fits easily on any desk or DJ booth.
Overall, this mixer is a versatile tool that simplifies professional-quality audio for a variety of uses. Whether you’re podcasting, DJing, or just jamming with friends, you’ll find it reliable and easy to operate.
MaonoCaster G1 NEO Gaming Audio Mixer & Interface

- ✓ Easy to use interface
- ✓ Bright customizable RGB
- ✓ Quality mic preamp
- ✕ Not compatible with USB mics
- ✕ Requires external power for stability
| Microphone Preamplifier | Built-in professional preamp with 48V phantom power for XLR microphones |
| Gain Range | -45dB to -55dB |
| Sound Effects and Voice Modulation | Custom sound pads, reverb, sidechain, and voice change features (female, male, baby, robot) |
| Connectivity | Bluetooth input, USB A-C, 3.5mm TRRS audio cable, compatible with phones, computers, tablets, PS4, PS5 |
| RGB Lighting | 12 customizable RGB color modes including solid, gradient, and rainbow effects |
| Power Supply | 5V power adapter recommended for stable operation during long sessions |
Right out of the box, the MaonoCaster G1 NEO feels surprisingly solid for its compact size. It’s lightweight but sturdy, with a sleek black finish and vibrant RGB light strips that immediately catch your eye.
The textured knobs and buttons have a good tactile feel, making adjustments feel satisfying and precise.
When you power it up, the built-in RGB lighting options really add to the gaming vibe. You can customize the colors easily, which makes your setup look more immersive without much effort.
The interface is intuitive, with clearly labeled controls that let you tweak your mic gain, volume, and headphone levels in seconds. No complicated menus or confusing settings here.
Plugging in your XLR microphone is straightforward thanks to the 48V phantom power and pro-preamp. I found that my condenser mic sounded richer and more professional, especially with the noise reduction feature activated.
The one-click noise suppression really helps keep background noise at bay during intense gaming or streaming sessions.
The voice changing feature is a fun addition—switching from a robot to a baby or a female voice is seamless and adds some entertainment value. The custom sound pads are handy for creating quick voice tags or sound effects, which can definitely spice up your streams.
The Bluetooth input worked flawlessly, letting me add background music or game audio easily.
Overall, the G1 NEO makes streaming and gaming simpler by combining solid audio quality with user-friendly controls. The Loopback and mute buttons are super convenient for multitasking or managing your stream on the fly.
It’s an all-in-one solution that feels like it’s built for both beginners and more experienced streamers.
What Is the Importance of Correct Audio Mixer Volume for OB?
The benefits of maintaining the correct audio mixer volume include improved audience retention, increased professionalism, and enhanced storytelling capabilities. For instance, in sports broadcasts, clear commentary is essential for viewer comprehension, while in music events, mixing levels can elevate the audience’s experience, allowing them to enjoy live performances as intended by the artists.
Solutions and best practices for achieving the best audio mixer volume for OB include conducting thorough sound checks prior to the event, utilizing digital audio mixers that provide precise control over individual channels, and training audio engineers to understand the nuances of live sound mixing. Additionally, regularly monitoring audio levels through quality headphones or studio monitors can help identify and correct issues in real time, ensuring an optimal broadcast experience.
What Factors Should Be Considered When Setting Audio Mixer Volume for OB?
When setting audio mixer volume for OB (Outside Broadcast), several factors must be considered to ensure optimal sound quality and clarity.
- Environment Noise Levels: Understanding the ambient noise in the broadcast area is crucial as it can significantly affect audio clarity. High levels of background noise may require adjustments to microphone sensitivity and mixer volume to capture clear audio without distortion.
- Microphone Types and Placement: Different microphones have varying pickup patterns and sensitivities that influence audio levels. Proper placement of microphones relative to sound sources is essential to avoid feedback and ensure that the desired audio is recorded at the correct level.
- Dynamic Range of Audio Sources: The audio mixer must accommodate the dynamic range of all sound sources, including speech, music, and environmental sounds. Setting the mixer volume too high may lead to clipping, while too low can result in a lack of presence; thus, balancing these levels is key.
- Audience and Broadcast Requirements: The intended audience and platform for the broadcast can dictate volume settings. For instance, a live event may require higher levels to engage the crowd, while a recorded segment might need a more controlled level for clarity and detail.
- Monitoring Tools: Utilizing monitoring tools such as headphones and loudspeakers is essential for setting the right mixer volume. These tools help audio engineers listen to how adjustments affect the overall mix and ensure that the audio quality meets broadcast standards.
- Feedback Prevention: Ensuring that the mixer volume does not create feedback loops is critical, especially in live settings. This involves careful consideration of speaker placement and microphone gain settings to avoid unintended sound reinforcements.
How Does Background Noise Impact the Recommendation for Volume Levels?
Background noise significantly affects the recommended volume levels for audio mixers in an outside broadcast (OB) setting.
- Signal-to-Noise Ratio (SNR): A high SNR is crucial for clear audio quality, as it measures the level of the desired signal compared to background noise.
- Volume Levels Adjustment: Adjusting volume levels to compensate for background noise ensures that the primary audio source remains audible and clear.
- Dynamic Range Considerations: The dynamic range of audio must be assessed to prevent distortion, particularly when background noise fluctuates.
- Use of Filters: Employing high-pass or low-pass filters can help minimize unwanted background noise, allowing for optimal volume settings.
- Monitoring Techniques: Continuous monitoring of the audio mix in relation to background noise is essential for making real-time adjustments and achieving the best sound quality.
Signal-to-Noise Ratio (SNR): A high SNR is crucial for clear audio quality, as it measures the level of the desired signal compared to background noise. In an OB setting, where environmental sounds can vary greatly, maintaining a favorable SNR ensures that the primary audio source, such as a speaker or commentator, is distinctly heard over potentially distracting noises.
Volume Levels Adjustment: Adjusting volume levels to compensate for background noise ensures that the primary audio source remains audible and clear. If the background noise is particularly loud, increasing the mixer’s volume can help the intended audio stand out, but it’s essential to avoid setting levels too high, which could lead to distortion.
Dynamic Range Considerations: The dynamic range of audio must be assessed to prevent distortion, particularly when background noise fluctuates. A wider dynamic range allows for more variation in volume levels, but in noisy environments, it may be necessary to compress this range to maintain clarity and avoid overwhelming the listener.
Use of Filters: Employing high-pass or low-pass filters can help minimize unwanted background noise, allowing for optimal volume settings. High-pass filters can cut out low-frequency rumble, while low-pass filters can reduce high-frequency hiss, helping to clean up the audio signal before it is amplified.
Monitoring Techniques: Continuous monitoring of the audio mix in relation to background noise is essential for making real-time adjustments and achieving the best sound quality. Using headphones or speakers that accurately reflect the audio mix allows technicians to detect issues caused by background noise and adjust the mixer settings accordingly.
What Equipment Quality Indicators Should Influence My Volume Settings?
The equipment quality indicators that should influence your volume settings for audio mixing include:
- Signal-to-Noise Ratio (SNR): A higher SNR means that the audio signal is significantly stronger than the background noise, resulting in clearer sound quality. When setting your mixer volume, aim for an SNR of at least 60 dB to ensure that the audio remains intelligible and free from distracting noise artifacts.
- Dynamic Range: This refers to the difference between the softest and loudest sounds your equipment can handle without distortion. An audio mixer with a wide dynamic range allows for more expressive soundscapes, so you should adjust your volume settings to maximize this range while avoiding clipping or distortion.
- Frequency Response: This indicates how well your equipment reproduces different frequencies of sound. Knowing the frequency response of your mixer can help you adjust volume settings appropriately across the audio spectrum, ensuring that both low and high frequencies are well balanced and clear in your output mix.
- Headroom: This is the amount of space between your audio signal’s peak level and the maximum level your equipment can handle. Adequate headroom is crucial for preventing distortion during loud passages, so your volume settings should leave enough headroom—typically around 3 to 6 dB—to accommodate unexpected peaks in the audio signal.
- Channel Metering: Monitoring the level meters on your mixer can provide real-time feedback on your audio levels. By keeping an eye on these meters, you can make informed adjustments to your volume settings to ensure that all channels are balanced and that none are peaking into the red zone, which indicates potential distortion.
- Microphone Sensitivity: Different microphones have varying levels of sensitivity, affecting how they pick up sound. When adjusting your mixer volume, consider the input sensitivity of your microphones to ensure that you achieve optimal levels without causing feedback or distortion, especially in a live setting.
- Output Impedances: Understanding the output impedances of your mixer and connected devices can influence how you set your volume levels. Mismatched impedances can lead to signal loss or distortion, so it’s important to ensure that your mixer is set to appropriate levels that match the impedance of your output devices for the best audio quality.
What Are the Optimal Volume Levels for Common Audio Sources Used in OB?
The optimal volume levels for common audio sources in outside broadcasting (OB) are crucial for ensuring clear, balanced audio during live events.
- Microphones: Generally, microphone levels should be set between -12 dB to -6 dB on the mixer. This range allows for a healthy signal without distortion while providing headroom for unexpected loud sounds.
- Instruments: For instruments, aim for levels around -10 dB to -5 dB. This ensures that the nuances of the performance are captured while avoiding clipping, especially in dynamic musical passages.
- Playback Sources (e.g., music tracks, sound effects): The optimal level for playback sources is typically around -6 dB. This level helps maintain clarity and punch without overpowering live elements, which is essential in a mixed audio environment.
- Ambient Sounds: Ambient sound levels should generally be set around -20 dB to -15 dB. This allows for a natural background presence without distracting from the main audio sources, creating a more immersive experience.
- Broadcast Feed: The broadcast feed level should be maintained at approximately -12 dB. This level ensures that the final output is strong enough for broadcasting while leaving room for any last-minute adjustments that may be necessary during the live transmission.
How Should Microphone Volume Be Set for Best Performance?
The optimal microphone volume settings are crucial for achieving the best audio quality, especially in an outside broadcast (OB) context.
- Input Gain: The input gain should be set to a level that captures the audio clearly without distortion.
- Pre-fader Listening (PFL): Use PFL to monitor microphone levels before they are mixed into the main output.
- Level Metering: Keep an eye on level meters to ensure the audio does not peak into the red zone.
- Environment Considerations: Adjust microphone volume based on the surrounding noise levels to maintain clarity.
- Dynamic Range: Understand the dynamic range of your microphone to appropriately set the volume for soft and loud sounds.
Input Gain: Setting the input gain correctly is fundamental for capturing sound effectively. If the gain is too low, the audio may lack presence and clarity; if it’s too high, it can cause distortion or clipping. Finding a sweet spot, usually indicated by a moderate level on the meter, will help ensure optimal sound quality.
Pre-fader Listening (PFL): PFL allows you to listen to the microphone input before it is mixed into the main output. This feature is beneficial for making adjustments in real-time without affecting the live mix. It ensures that any changes in the input level can be monitored without disrupting the broadcast.
Level Metering: Monitoring the level meters is essential to avoid audio clipping, which occurs when sound levels exceed the maximum threshold. Keeping the input levels in the green or yellow range is ideal, with occasional peaks reaching into the yellow but avoiding the red zone. This practice ensures consistent audio quality throughout the broadcast.
Environment Considerations: The ambient noise level greatly affects microphone volume settings. In a noisy environment, it may be necessary to increase the microphone volume to ensure clarity, while in quieter settings, a lower volume may suffice. Understanding the specific environment will help tailor the audio settings for optimal performance.
Dynamic Range: Each microphone has its dynamic range, which refers to the difference between the quietest and loudest sounds it can capture. It’s important to set the volume in a way that accommodates both soft and loud sounds without distortion. This understanding helps in adjusting levels to ensure that all audio nuances are captured effectively.
What Volume Adjustments Are Needed for Musical Instruments in OB?
When setting up audio for an OB (Outside Broadcast), proper volume adjustments for musical instruments are crucial for achieving a balanced and high-quality sound. The following adjustments are essential:
- Gain Structure: Establishing the correct gain structure ensures that the signal is strong enough without distortion. Each instrument should be adjusted to an optimal level that avoids clipping while allowing for headroom in the mixer, often set around -18 dB to -12 dB for optimal dynamic range.
- EQ Settings: Equalization (EQ) adjustments help enhance the tonal quality of each instrument. By manipulating frequency bands, you can reduce unwanted resonances or boost desirable frequencies, allowing the instruments to sit better in the mix and complement each other without overpowering.
- Fader Levels: Setting the appropriate fader levels for each instrument is vital for achieving a balanced mix. Faders should be adjusted so that no single instrument dominates the mix, and the overall level should be set to ensure that all instruments can be heard clearly without any one overpowering the others.
- Pan Positioning: Panning instruments across the stereo field can create a more immersive listening experience. By strategically placing instruments in the left, right, or center of the mix, you can create a sense of space and separation, which is especially important in a live setting where clarity is key.
- Monitor Levels: Setting appropriate monitor levels for musicians is crucial for performance. Musicians should be able to hear themselves and each other clearly without harsh volumes, which may distract or hinder their performance; this typically means adjusting levels lower than the front-of-house mix.
- Effects Processing: Using effects such as reverb or delay can enhance the sound of musical instruments, but it’s important to adjust these effects levels carefully. Overuse can muddy the mix, so start with subtle settings and adjust according to the live environment and the desired ambiance.
What Techniques Can Help Achieve Better Audio Mixing in OB Scenarios?
To achieve better audio mixing in OB (Outside Broadcast) scenarios, several techniques can be employed:
- Gain Staging: Proper gain staging ensures that each audio signal is set at an optimal level before reaching the mixer. This prevents distortion and maximizes the dynamic range of the audio, allowing for clearer sound reproduction.
- Use of Compression: Compression helps control the dynamic range of audio signals by reducing the volume of louder sounds and amplifying quieter ones. This technique is particularly useful in OB scenarios where varying sound levels can occur, ensuring a more balanced mix.
- Equalization (EQ): EQ allows the mixer to adjust the balance of different frequency components in the audio signal. By using EQ effectively, unwanted frequencies can be attenuated, and desired frequencies can be emphasized, enhancing clarity and reducing muddiness in the audio mix.
- Monitoring with Headphones: Using high-quality headphones for monitoring can help audio engineers detect issues that might not be noticeable through speakers. This is especially crucial in OB settings where environmental noise can interfere with sound quality.
- Utilizing Mics Appropriately: Choosing the right microphones for the specific OB scenario is essential. For instance, lavalier mics are ideal for interviews, while shotgun mics are better suited for capturing sound from a distance, helping to achieve a clean audio mix.
- Implementing Proper Panning: Panning involves placing audio signals in the stereo field to create a sense of space and separation. This technique helps to enhance the listening experience by making the mix feel more immersive and organized.
- Regularly Checking Levels: Continuously monitoring the audio levels during the broadcast is vital to avoid sudden peaks or drops in volume. By adjusting levels in real-time, audio engineers can maintain a consistent sound throughout the production.
- Feedback Control: Managing feedback is crucial in OB scenarios where microphones are often near speakers. Techniques such as using directional microphones and adjusting the positioning can help minimize feedback, ensuring a clean audio output.
What Common Mistakes Need to Be Avoided in Setting Volume Levels for OB?
When setting volume levels for an OB (Outside Broadcast), there are several common mistakes that should be avoided to ensure optimal audio quality.
- Ignoring Headroom: Failing to leave adequate headroom can lead to distortion and clipping during peaks in audio levels.
- Inconsistent Levels Across Channels: Not maintaining consistent volume levels across different channels can create an unbalanced mix that is jarring for the audience.
- Over-Reliance on Automatic Gain Control (AGC): Depending too much on AGC can lead to fluctuating levels that may not suit the dynamic range of the broadcast.
- Neglecting Environmental Factors: Overlooking the impact of environmental noise and acoustics can result in poor audio clarity, requiring adjustments to compensate.
- Setting Levels Too Low: Keeping audio levels too low can lead to a lack of presence and engagement, making it difficult for viewers to hear important dialogue or sound effects.
- Not Monitoring in Real-Time: Failing to monitor audio levels in real-time can cause sudden issues to go unnoticed until it’s too late to correct them.
- Ignoring Feedback and Echo Issues: Not addressing potential feedback loops or echo can create distracting audio artifacts that detract from the broadcast.
Ignoring headroom can compromise audio quality; ensuring there is a buffer between the peak levels and 0 dB is essential for preventing distortion and maintaining clarity. Inconsistent levels across channels can lead to listeners missing critical information due to sudden changes in volume, which can be particularly troublesome in live broadcasts where adjustments are difficult to make on-the-fly.
Over-reliance on Automatic Gain Control (AGC) can cause unpredictable volume fluctuations, making the listening experience uneven and potentially frustrating. Environmental factors, such as ambient noise and room acoustics, must be considered, as these can significantly impact the clarity of the audio being captured and broadcasted.
Setting levels too low diminishes the audio’s impact, making it hard for the audience to engage with the content, which is especially problematic in competitive broadcasting environments. Real-time monitoring is critical; without it, audio issues may go undetected until they become a significant problem, disrupting the viewing experience.
Lastly, feedback and echo issues can severely disrupt audio clarity, so it’s essential to check for these problems during setup to mitigate any negative effects before the broadcast begins.
Related Post: