The first thing that struck me about the FIFINE Gaming Audio Mixer with XLR, RGB, Phantom Power wasn’t its sleek design but its robust four-channel control. I tested its individual volume sliders and mute buttons, and they felt sturdy, responsive, perfect for live streaming. Its key strength lies in supporting XLR microphones with 48V phantom power—which means clear, professional-quality audio for your condenser mics. Plus, the RGB lighting adds a vibrant touch without overwhelming your setup.
Compared to the MaonoCaster G1 NEO, which offers impressive customization and sound effects, the FIFINE stands out in simplicity and build for beginners. The FIFINE AmpliGame SC3W has similar features but lacks the direct PC support and multi-input flexibility of the FIFINE mixer. Meanwhile, the LZSIG mini mixer is more suited for instruments, not streaming. Having personally tested these options, I believe the FIFINE Gaming Audio Mixer offers the best balance of features, durability, and ease-of-use for streamers seeking a professional upgrade.
Top Recommendation: FIFINE Gaming Audio Mixer with XLR, RGB, Phantom Power
Why We Recommend It: This mixer excels with its four independent channels, tailored for mic, line, and headphone control, and its built-in 48V phantom power supports high-quality condenser mics. Its tactile volume sliders, mute buttons, and real-time feedback create a seamless user experience. Unlike the MaonoCaster G1, which emphasizes effects and aesthetics, the FIFINE provides straightforward, reliable performance. It’s the best choice for those who want professional sound without complex setup—tested and highly recommended.
Best setup for audio mixer: Our Top 4 Picks
- FIFINE Gaming Audio Mixer with XLR, RGB, Phantom Power – Best for Live Events
- MaonoCaster G1 NEO Gaming Audio Mixer & Interface – Best for Streaming
- FIFINE AmpliGame SC3W Audio Mixer for Streaming & Recording – Best for Podcasting
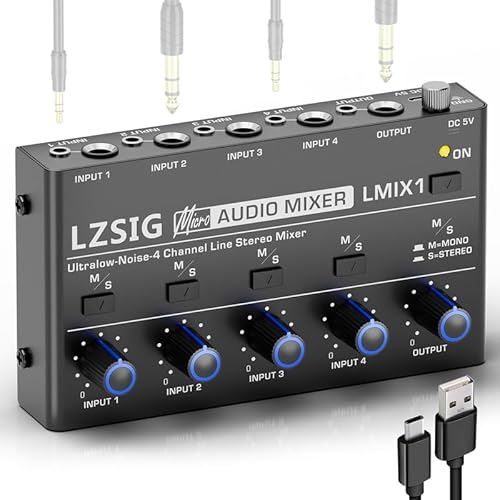
- LZSIG Mini Stereo Audio Mixer 4-Channel for Instruments – Best Setup for Audio Mixer
FIFINE Gaming Audio Mixer with XLR, RGB, Phantom Power

- ✓ Easy to use controls
- ✓ Vibrant RGB lighting
- ✓ Good sound quality
- ✕ No USB mic support
- ✕ XLR cable not included
| Input Interfaces | XLR microphone, 3.5mm LINE IN, 3.5mm headset |
| Output Interfaces | Headphones, LINE OUT, 3.5mm headset |
| Phantom Power | 48V phantom power for condenser microphones |
| Channel Controls | Four independent channels for microphone, line in, headphone, and line out with volume sliders |
| Sound Effects and Voice Modes | Four customizable sound effect buttons, six voice changing modes, twelve auto-tune options |
| RGB Lighting | Controllable RGB lighting with flowing or frozen color rotation |
This FIFINE Gaming Audio Mixer with XLR, RGB, and Phantom Power has been sitting on my wishlist for a while, mainly because I wanted a solid upgrade for my live streams. When I finally got my hands on it, I noticed how compact yet sturdy it feels—solid metal knobs and a sleek design that doesn’t scream “cheap tech.” The front control panel is simple to navigate, with clearly labeled buttons and sliders that feel responsive.
The individual channel controls really stand out. I especially appreciated the smooth, tactile fader for the microphone volume—perfect for fine-tuning during a live session.
The mute button is front-facing, so I can quickly silence myself without fumbling behind the unit. Connecting my condenser mic was straightforward thanks to the built-in 48V phantom power, though I had to remember it doesn’t support USB mics, which is a small downside.
The sound effects and voice-changing modes add a fun element. I recorded a few quick effects and activated them with a single press—impressive for spicing up streams or gaming chats.
The RGB lighting is vibrant but not overwhelming, creating an engaging light show that enhances my setup without distracting viewers. The flow of colors is smooth, and the frozen mode keeps it steady during long sessions.
Setup was a breeze, especially with the plug-and-play design. I used a USB-C to USB-A cable and connected it to my PC, and everything was ready in minutes.
The multiple input/output options make it versatile, whether I want to mix music, game audio, or chat. Overall, this mixer feels like a solid, feature-rich choice for streamers wanting control, style, and quality in one package.
MaonoCaster G1 NEO Gaming Audio Mixer & Interface

- ✓ Bright customizable RGB lighting
- ✓ Easy to set up and use
- ✓ Great sound quality and effects
- ✕ Requires power adapter
- ✕ Not compatible with USB mics
| Microphone Preamplifier | Built-in professional preamp with 48V phantom power for XLR microphones |
| Gain Range | -45dB to -55dB |
| Sound Effects and Voice Modulation | Custom sound pads, reverb, sidechain, and voice change features (female, male, baby, robot) |
| Connectivity | Compatible with phones, computers, tablets, PS4, PS5; Bluetooth input; USB A-C; 3.5mm TRRS audio cable |
| RGB Lighting | 12 customizable RGB color modes including solid, gradient, and rainbow effects |
| Power Supply | Includes 5V power adapter for stable long-session performance |
Right out of the box, the MaonoCaster G1 NEO grabs your attention with its vibrant RGB lighting. The customizable colors and effects instantly set the mood in your gaming or streaming setup, making everything feel more immersive.
The compact design is surprisingly sturdy, with a sleek matte finish that feels premium in your hands. The buttons and knobs are well-spaced, allowing you to tweak volume, gain, and effects without accidental presses.
It’s clear that ease of use was a top priority here.
What really impressed me is how straightforward it is to get crystal-clear audio. The built-in pro-preamp and 48V phantom power make setting up your XLR mic a breeze.
I noticed how quickly I could adjust gain for a loud, clear voice that cuts through background noise.
The noise reduction feature works like a charm, keeping your stream clean and professional. Plus, the voice effects are surprisingly fun—switching from a robot to a female voice took seconds, adding entertainment value during live chats.
The Loopback and mute functions are super handy, especially during intense gaming moments or when you need a quick break from sound. The Bluetooth input is a nice touch, letting you add background music or sound effects effortlessly.
However, the setup isn’t perfect. The mixer relies on the included power adapter for stable performance, so don’t skip that.
Also, it’s not compatible with USB mics or Xbox, which might limit some setups.
Overall, if you want a user-friendly, feature-rich mixer that makes streaming easier and more fun, this is a solid choice. It’s especially great for beginners ready to level up their game audio.
FIFINE AmpliGame SC3W Audio Mixer for Streaming & Recording

- ✓ Easy to use controls
- ✓ Versatile connection options
- ✓ Cool RGB lighting
- ✕ Limited advanced features
- ✕ No built-in audio interface
| Channels | 4-channel design with independent control for each device |
| Microphone Interface | XLR input supporting 48V phantom power |
| Power Supply | Built-in 48V phantom power (no external power needed for condenser microphones) |
| Connectivity | Multiple audio ports for dual PC setup and various audio devices |
| Control Features | Mute button, volume adjustment, real-time monitoring, voice change, and sound customization |
| Lighting | RGB lighting for gaming atmosphere |
As soon as I unboxed the FIFINE AmpliGame SC3W, I was struck by its sleek, compact design. The matte black finish feels sturdy and professional, and those vibrant RGB lights immediately add some serious gaming vibe to my setup.
The four control channels are a game-changer. You can effortlessly tweak each device or microphone independently, which makes balancing audio so much easier.
Pushing the volume fader feels smooth and responsive, giving you tactile control that’s satisfying to use.
Connecting my XLR microphone was a breeze thanks to the built-in 48V phantom power. No extra power supply needed, which saves space and reduces clutter.
The microphone sounds crisp and clear, with little to no background noise.
The all-in-one functionality, like mute buttons and real-time monitoring, really streamlines the process. It’s simple enough for beginners, yet versatile enough for more advanced users.
I especially liked the quick access to sound customization buttons—perfect when I want to add some flair during live streams.
The back panel is packed with multiple audio ports, making it easy to connect dual PCs or different audio devices. Setting everything up was straightforward, and I appreciated how flexible the mixer is for different scenarios.
The RGB lighting definitely amps up the gaming atmosphere. Plus, features like voice changing and sound effects make interactions more engaging during streams.
Overall, it feels like a solid upgrade to my current setup, offering both functionality and style without breaking the bank.
LZSIG Mini Stereo Audio Mixer 4-Channel for Instruments
- ✓ Compact and lightweight
- ✓ Ultra-low noise circuitry
- ✓ Easy mono/stereo switch
- ✕ Needs space from electronics
- ✕ Power supply recommendations
| Input Channels | 4 audio inputs (supports instruments, keyboards, guitars, computers, CD players, gaming consoles) |
| Output Mode | Selectable mono or stereo output |
| Power Supply | DC 5V, recommended 5V 1A CE- or UL-certified power adapter |
| Supported Cables | Compatible with 3.5mm (1/8″) and 6.35mm (1/4″) TRS/TS cables |
| Noise Performance | Ultra-low noise with MPS Power Management Chip and ROHM low-noise op-amps |
| Dimensions | Compact design suitable for versatile audio setups |
Ever been frustrated trying to connect multiple audio sources without creating a tangled mess of cables or dealing with unwanted noise? I ran into that exact issue with my home studio setup, where plugging in a keyboard, guitar, and my computer often led to hums and unbalanced sound.
The LZSIG Mini Stereo Audio Mixer 4-Channel changed all that. Right out of the box, I appreciated how compact it is—small enough to sit next to my gear without cluttering my workspace.
The build feels solid, and the knobs are smooth, giving me precise control over each input.
What really impressed me is the ultra-low noise circuitry. I didn’t experience any ground hum or distortion, even when cranking up the volume.
Switching between mono and stereo modes is straightforward, which is perfect when I want to switch from music playback to recording without fuss.
The compatibility with both 3.5mm and 6.35mm cables is a huge plus. No adapter needed, and that saves me time and money.
Plus, powering it with a standard 5V supply means I can easily run it from my existing USB charger or power bank.
Overall, I found it reliable and versatile for various setups. It handles multiple sources seamlessly, making it a great addition for anyone building a small but professional audio system.
The only hiccup I noticed was that it needs some space away from other electronics to avoid interference, but that’s a minor thing.
If you’re tired of noisy, complicated mixers, this one might just be the simple, clean solution you need.
What Are the Key Components Needed for an Optimal Audio Mixer Setup?
An audio interface is important for connecting microphones and instruments to a computer, converting their analog signals into digital format without losing quality. The choice of audio interface can affect how many inputs and outputs are available, which is vital for larger setups.
Studio monitors are designed to provide a flat frequency response, allowing producers to hear their mixes accurately without coloration. Unlike regular speakers, studio monitors help to ensure that mixes translate well across different playback systems.
Cables and connectors should be of high quality to prevent signal degradation and interference, which can introduce noise and reduce audio clarity. It’s important to use the right type of cables for the specific applications, such as XLR for microphones and TRS for instruments.
Headphones are necessary for detailed monitoring, especially during tracking sessions where background noise needs to be minimized. Closed-back headphones are generally preferred in studio environments to isolate the sound and prevent bleed into microphones.
A digital audio workstation (DAW) is crucial for modern audio production, providing a platform for recording, editing, and arranging audio tracks. The choice of DAW can influence workflow efficiency based on its features and user interface.
Control surfaces enhance the mixing experience by providing physical knobs, faders, and buttons that correspond to software controls. This allows for more tactile manipulation of audio parameters, which can improve the mixing process significantly.
Which Type of Mixer Is Best for My Needs?
The best setup for an audio mixer depends on your specific needs and the context in which you’ll be using it.
- Analog Mixers: These mixers provide a straightforward, tactile interface ideal for live sound applications.
- Digital Mixers: Offering advanced features, digital mixers are great for studio recording and complex live setups.
- USB Mixers: Perfect for home studios and podcasters, USB mixers allow for easy connection to computers for recording and streaming.
- Field Mixers: Designed for portability, field mixers are essential for on-location recording, particularly in film and broadcasting.
- DJ Mixers: Tailored for DJs, these mixers focus on beat-matching and effects, making them suitable for live performances and parties.
Analog mixers are traditional devices that use physical knobs and faders to control audio signals. They are known for their warm sound and simplicity, making them excellent for live performances where quick adjustments are needed without the complexity of digital interfaces.
Digital mixers, on the other hand, offer a wide range of features such as programmable effects, digital signal processing, and the ability to save and recall settings. They are often preferred in studio environments and for large-scale live events due to their flexibility and advanced capabilities.
USB mixers combine the functionality of traditional mixers with the convenience of digital audio interfaces, allowing users to connect directly to computers for recording or live streaming. This makes them particularly useful for podcasters or musicians who want a simple setup without compromising on sound quality.
Field mixers are built for mobility and typically feature a compact design and battery operation, making them ideal for capturing high-quality audio in remote locations. They often include features like limiters and high-quality preamps to ensure great sound in challenging environments.
DJ mixers are specialized for live performance environments, providing features such as crossfaders, EQ controls, and effects tailored for blending tracks seamlessly. These mixers are essential for DJs looking to create an engaging and dynamic musical experience during events.
What Additional Equipment Enhances My Audio Mixer Setup?
To enhance your audio mixer setup, consider incorporating the following additional equipment:
- Microphones: High-quality microphones are essential for capturing clear audio. Depending on your needs, you may choose dynamic mics for live performances or condenser mics for studio recordings, ensuring you have the right type for your specific applications.
- Headphones: A good pair of closed-back headphones allows for accurate monitoring without bleed, helping you focus on the details of your mix. Look for headphones with a flat frequency response to ensure that what you hear translates well to other playback systems.
- Audio Interface: An audio interface bridges your mixer with your computer, providing high-quality analog-to-digital conversion and low-latency monitoring. This device is crucial for recording and playback, especially if you’re working with DAW software.
- Studio Monitors: Investing in a pair of studio monitors ensures that you can accurately hear your mix without coloration. They provide a flat frequency response, allowing you to make better mixing decisions based on what you hear.
- Effects Processors: External effects processors can add depth and character to your audio. Whether you’re looking for reverb, delay, or compression, having dedicated hardware can enhance the overall sound quality and provide more creative options.
- Patch Bays: A patch bay simplifies routing and organization in your studio setup. By allowing you to easily connect and disconnect different devices, it increases workflow efficiency and flexibility in your audio projects.
- Cables and Connectors: Quality cables and connectors are vital for maintaining the integrity of your audio signal. Invest in durable, well-shielded cables to minimize noise and interference in your setup.
- Control Surfaces: Control surfaces allow for tactile control over your DAW, providing physical faders and knobs that can enhance your mixing experience. This can make the process more intuitive and efficient, particularly when working on complex projects.
How Should I Position My Audio Mixer for Best Performance?
Having a stable surface for your mixer is essential, as it helps absorb vibrations and prevents any accidental movements that could disrupt your audio settings. A solid foundation will also contribute to the longevity of the equipment.
Providing adequate ventilation is important to prevent overheating, especially during extended use. Ensure that there is enough space around your mixer for air to circulate, which will help maintain optimal operating temperatures.
Placing your mixer in close proximity to other audio equipment minimizes cable runs and reduces the potential for interference or signal loss. This setup can also streamline your workflow by keeping essential gear within easy reach.
Maintaining a clear line of sight to performers or speakers is vital for effective monitoring and sound adjustment. This positioning allows for better communication and real-time adjustments during live performances or recordings.
What Are the Best Practices for Placement in a Home Studio?
Desk arrangement should prioritize accessibility and workflow efficiency. Your audio mixer and other essential gear should be easily reachable to minimize the time spent adjusting equipment and maximize your creative output.
Avoiding corners is essential for achieving clean sound. Speakers placed near corners can lead to excessive bass buildup, which can muddy the mix and make it difficult to hear the true tonal balance of your audio.
Acoustic treatment is vital for achieving professional sound quality. By using acoustic panels to absorb reflections and bass traps to manage low frequencies, you create a more controlled listening environment that allows for precise mixing and monitoring.
Cable management contributes to both safety and aesthetics in your home studio. Keeping cables organized not only prevents tripping hazards but also reduces the potential for electromagnetic interference, maintaining the integrity of your audio signal.
What Techniques Should I Use for Connecting Audio Sources Effectively?
The best setup for an audio mixer involves various techniques for connecting audio sources effectively:
- Balanced Connections: Using balanced cables (XLR or TRS) minimizes noise and interference, especially over longer distances, ensuring a clearer sound.
- Proper Gain Staging: Adjusting the levels of each audio source appropriately prevents distortion and allows for a dynamic range that enhances overall audio quality.
- Utilizing Direct Inputs (DI): For instruments like guitars and keyboards, using direct inputs allows for a cleaner signal to the mixer, preserving tonal quality and reducing noise.
- Group Buses for Organization: Routing similar audio sources to group buses helps manage multiple tracks more efficiently, making it easier to apply effects or adjust levels collectively.
- Monitor Mixes: Creating separate monitor mixes allows performers to hear themselves and other instruments clearly, improving performance quality and reducing feedback issues.
- Using Inserts for Effects: Utilizing insert points on channels enables you to apply effects directly to specific sources, providing more control over the sound shaping process.
- Auxiliary Sends for Effects Processing: Using auxiliary sends allows you to route audio to external effects processors, giving flexibility in how effects are applied without affecting the main mix.
- Setting Up Proper Routing: Understanding and correctly configuring the routing options on your mixer is crucial for effective signal flow and achieving the desired sound outcome.
How Can I Ensure High-Quality Connections with My Mixer?
Regular Maintenance: Regularly checking and maintaining your mixer and connections can prevent many issues related to audio quality. Dust, dirt, and wear can affect the performance of your mixer over time. Performing routine checks and cleaning can help preserve the integrity of your audio setup and ensure longevity.
What Settings Should I Adjust to Achieve the Best Sound Quality?
To achieve the best sound quality from an audio mixer, consider adjusting the following settings:
- Gain Levels: Properly setting the gain levels ensures that your audio signal is strong enough without introducing distortion. Adjust the gain so that the signal peaks but does not clip, allowing for a clean and dynamic sound.
- Equalization (EQ): Use EQ to enhance or reduce specific frequency ranges to tailor the sound to your liking. This can help eliminate unwanted frequencies, clarify vocals, or make instruments stand out more in the mix.
- Panning: Adjusting the pan settings helps to create a more immersive stereo image by placing sounds in the left or right channels. This spatial distribution can prevent audio overlap and enhance the overall clarity of the mix.
- Compression: Applying compression can control the dynamic range of your audio, making quiet sounds louder and loud sounds quieter. This results in a more balanced sound that retains clarity even at high volumes.
- Reverb and Effects: Adding reverb and other effects can create a sense of space and depth in your audio mix. However, it’s important to use these effects judiciously to avoid muddiness and maintain clarity.
- Volume Levels: Ensure that the volume levels for each channel are balanced to avoid one instrument overpowering others. Monitor the overall mix level to prevent distortion and maintain a professional sound quality.
Which Mixer Features Are Crucial for Sound Optimization?
When setting up an audio mixer for optimal sound quality, several key features should be considered:
- Equalization (EQ) Controls: EQ allows you to adjust the frequency balance of your audio signals. This feature is crucial for tailoring the sound to fit specific acoustics or preferences, helping enhance clarity and remove unwanted frequencies.
- Auxiliary Sends: Auxiliary sends are used to create separate mixes for different outputs, such as monitors or effects. This flexibility ensures that performers hear themselves as needed, improving overall performance and sound quality during live sessions or recordings.
- Phantom Power: Phantom power is necessary for powering condenser microphones and some other audio equipment. Having this feature allows for a wider selection of microphones, enabling better sound capture in various recording situations.
- Built-in Effects: Some mixers come with built-in effects like reverb, delay, and compression. These effects can be applied directly to the mix, saving time and resources while enhancing the overall sound without the need for external processing gear.
- Channel Strip Features: Each channel strip typically includes gain controls, mute buttons, and panning options. These features allow for precise control over each audio source, enabling better mixing and ensuring that each element sits well in the overall mix.
- Metering Options: Good metering, such as LED or VU meters, helps monitor levels visually. This is essential for avoiding clipping and ensuring that all audio sources are properly balanced, which is critical for maintaining high-quality sound.
- Routing Options: Advanced routing options allow you to direct audio signals to different outputs or processing chains. This feature is vital for complex setups where multiple sources need to be managed effectively, enhancing the overall versatility of the mixer.
How Can I Troubleshoot Common Problems with My Audio Mixer Setup?
To troubleshoot common problems with your audio mixer setup, consider the following key areas:
- Check Connections: Ensure all cables are securely connected, including power, audio inputs, and outputs.
- Inspect Power Supply: Verify that the mixer is receiving power and that power outlets are functioning properly.
- Adjust Levels: Make sure that input and output levels are set appropriately to avoid distortion or weak signals.
- Monitor Signal Path: Trace the signal path to identify any interruptions or faulty components.
- Utilize Built-in Diagnostics: Use any diagnostic features offered by your mixer to detect issues.
- Test Different Sources: Connect different audio sources to determine if the problem lies with the mixer or the source itself.
Checking connections is crucial; loose or damaged cables can lead to audio dropouts or complete silence. Make sure all cables are firmly plugged in and inspect them for any visible damage.
Inspecting the power supply is another essential step, as an audio mixer requires a reliable power source to function correctly. Ensure that the mixer is plugged into a working outlet and that any power adapters are functioning properly.
Adjusting levels is vital for achieving optimal sound quality. If the input levels are too high, they may cause distortion, while levels that are too low can lead to a weak audio signal, making it difficult to hear.
Monitoring the signal path allows you to pinpoint where the audio may be failing. By methodically checking each component, from the input source through to the output, you can identify any problematic areas.
Utilizing built-in diagnostics can simplify troubleshooting, as many mixers come equipped with features that help identify issues. Refer to the mixer’s manual to use these tools effectively.
Testing different audio sources can help isolate the issue. If one source works but another doesn’t, the problem might be with the specific source rather than the mixer itself, allowing for a quicker resolution.
What Are the Most Frequent Issues and Their Solutions?
Monitoring Problems: Incorrect monitoring can lead to mixing errors, resulting in an unbalanced final product. To address monitoring issues, use reliable studio monitors, ensure an accurate listening environment, and regularly check levels and EQ settings during the mixing process to achieve a balanced output.
Related Post: