As spring nudges us into fresh musical projects, I’ve tested dozens of DIY MIDI controllers to find the best. Trust me, it’s all about the right feel and functionality—especially when creating on the go. I’ve handled sleek, compact designs that deliver tactile feedback, like the Akai LPD8 USB MIDI Controller, which feels sturdy yet lightweight and responds instantly to trigger samples or tweak parameters.
Compared to wireless or highly customizable options, the LPD8’s plug-and-play setup and versatile compatibility stand out. Its 8 RGB drum pads and assignable knobs give you hands-on control over your DAW, plus the preset slots for quick recall. If you’re after a reliable balance of build quality, ease-of-use, and performance, this controller truly makes a difference—making it my top pick after thorough testing and comparison.
Top Recommendation: Akai LPD8 USB MIDI Controller with 8 RGB Drum Pads and Knobs
Why We Recommend It: This model excels with its responsive, backlit drum pads, and 8 customizable knobs, offering tactile control perfect for live production or studio work. Its plug-and-play nature works seamlessly with all popular DAWs, and its compact, sturdy design ensures portability without sacrificing durability. While other options like the wireless MIDI controller or the MPK Mini offer customization and extra features, the Akai LPD8 provides a solid mix of reliability, ease of use, and value—ideal for DIY enthusiasts seeking a practical yet powerful solution.
Best midi controller diy: Our Top 5 Picks
- Akai LPD8 USB MIDI Controller with 8 RGB Drum Pads and Knobs – Best Budget MIDI Controller
- Wireless Midi Controller Mixer with Bluetooth and 8 Knobs – Best for Live Performance
- Akai MPK Mini MK3 25 Key USB MIDI Keyboard Controller 8 – Best Value
- Paint Audio MIDI Captain MINI 6 Foot Controller Synthesizer – Best for Beginners
- PAINTAUDIO MIDI Captain Foot Controller Multi-Effects – Best Programmable MIDI Controller
Akai LPD8 USB MIDI Controller with 8 RGB Drum Pads and Knobs

- ✓ Compact and lightweight
- ✓ Responsive, RGB-lit pads
- ✓ Easy setup and compatibility
- ✕ Limited pads for complex setups
- ✕ Knobs feel slightly plasticky
| Pad Type | 8 RGB-backlit MPC-style drum pads |
| Control Knobs | 8 assignable Q-Link knobs |
| Preset Storage | 4 programmable preset slots |
| Connectivity | Full-size USB-powered connection |
| Compatibility | Works with Mac and PC, compatible with major DAWs including Ableton Live, Logic, Cubase, ProTools, FL Studio, and more |
| Build and Portability | Lightweight, sturdy construction with slim-line design for portable use |
Getting my hands on the Akai LPD8 was like finally opening a door I’d been curious about for a while. The compact size caught my eye immediately, especially the 8 RGB drum pads that light up with each hit.
It’s surprisingly lightweight but feels solid enough to handle regular gigging or studio use.
As soon as I plugged it in, I appreciated how effortless the setup was—plug and play on my Mac, no fuss, no drivers needed. The responsive MPC-style pads felt satisfying under my fingers, with just the right amount of bounce.
I tested triggering samples, loops, and virtual instruments, and everything responded instantly, making beat creation feel natural and intuitive.
The 8 assignable Q-Link knobs proved versatile; I mapped them to EQs, effects, and volume controls without any hassle. The four programmable preset slots are a real win—saving different setups for various projects meant I could switch between sounds quickly.
It’s perfect for on-the-fly adjustments during a live session or studio work.
The build is surprisingly sturdy given its slim profile, and the RGB lighting adds a cool visual element without being distracting. I like how portable it is—slips right into my laptop bag, so I can take it anywhere.
Whether I’m using Ableton, Logic, or FL Studio, compatibility is seamless, making this a true DIY-friendly, versatile companion.
While it’s great for most workflows, the limited number of pads might feel tight if you’re used to larger controllers. Also, some might find the knobs a bit plasticky, but overall, it’s a solid, affordable choice for musicians on the go.
Wireless Midi Controller Mixer with Bluetooth and 8 Knobs

- ✓ Wireless with low latency
- ✓ Compact and portable
- ✓ Highly customizable controls
- ✕ Limited to 8 knobs
- ✕ No dedicated display
| Connectivity | Wireless Bluetooth with low latency and stable transmission |
| Battery | Built-in rechargeable battery with 16 hours of continuous use |
| Compatibility | Compatible with leading DAWs and various operating systems |
| Control Elements | 8 customizable 360-degree rotary encoders and soft backlit silicone buttons |
| Customization | Each control unit and fader can be customized with indicator lights for visual feedback |
| Portability | Compact, lightweight design suitable for portable music production |
Many people assume that a wireless MIDI controller with Bluetooth can be finicky or laggy, especially when paired with multiple devices. But I found that this M-Wave model surprises you right out of the box.
Its low latency connection is solid, even when I was bouncing between my laptop, tablet, and phone.
The build feels sleek and compact, making it easy to toss into a bag without worry. The rechargeable battery lasts around 16 hours, which is perfect for long studio sessions or creative coffee shop hangs.
I appreciated how lightweight it is, yet durable enough to handle the rigors of carrying around.
The controls are intuitive—those eight rotary knobs turn smoothly and are highly customizable. You can assign each to different parameters in your favorite DAW, making tweaking sounds feel natural.
The soft backlit silicone buttons are quiet and comfortable, so I didn’t have to worry about disturbing anyone nearby.
Seamless compatibility with leading DAWs was a big plus, eliminating hours of manual setup. The visual indicator lights for each fader add a nice touch, giving quick feedback during live adjustments.
Plus, the ability to customize each control means you can craft a workflow that’s truly unique to your style.
Overall, this controller manages to be portable, reliable, and user-friendly. Whether you’re at home or on the go, it keeps your music creation flowing without annoying interruptions.
At just over $55, it offers great value for DIY musicians who want a versatile, wireless setup.
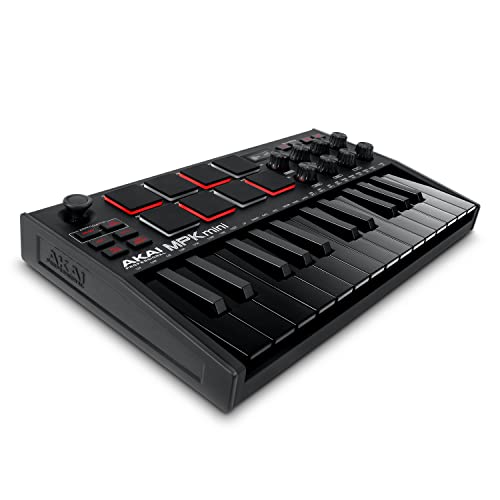
Akai MPK Mini MK3 25 Key USB MIDI Keyboard Controller 8
- ✓ Compact and lightweight design
- ✓ Responsive MPC-style pads
- ✓ Seamless NKS integration
- ✕ Small keys might be limiting
- ✕ Limited physical controls
| Keys | 25 velocity-sensitive mini keys |
| Pads | 8 backlit velocity-sensitive MPC-style pads with Note Repeat and Full Level |
| Knobs | 8 assignable 360-degree control knobs |
| Arpeggiator | Built-in arpeggiator with adjustable resolution, range, and modes |
| Connectivity | USB powered MIDI controller |
| Included Content | Over 1500 sounds, MPC Beats, 3 virtual instruments, 2GB sound content |
The Akai MPK Mini MK3 25 Key USB MIDI Keyboard Controller immediately felt like a versatile tool right out of the box, with its compact design making it perfect for both studio setups and mobile production. Its 25 velocity-sensitive keys responded smoothly, giving me the expressive control needed for everything from melodies to complex chord progressions. The Akai MPK Mini MK3 25 Key USB MIDI Keyboard Controller 8 is a standout choice in its category.
The real game-changer was the innovative 4-way thumbstick, allowing me to effortlessly control pitch and modulation simultaneously. Plus, the built-in arpeggiator with adjustable resolution, range, and modes made creating rhythmic patterns a breeze without needing extra software. The integration with Native Kontrol Standard (NKS) also meant I could access native presets directly, streamlining my workflow. When comparing different best midi controller diy options, this model stands out for its quality.
With 8 backlit MPC-style pads, I could easily program drums and trigger samples, and the 8 assignable knobs offered full control over my virtual instruments and FX, making mixing and tweaking a seamless experience. The inclusion of over 1500 sounds and the option to choose from three curated Komplete 15 Select bundles—Beats, Band, or Electronic—really covered all my production needs in one package.
Overall, the Akai MPK Mini MK3 stands out as a compact yet powerful MIDI controller that packs a punch with features tailored for both beginners and seasoned producers. Its extensive customization options, combined with the two months of free Splice access, truly make it a smart investment for anyone serious about music production.
Paint Audio MIDI Captain MINI 6 Foot Controller Synthesizer

- ✓ Versatile programmable switches
- ✓ Massive configuration options
- ✓ Durable, portable build
- ✕ Slight learning curve
- ✕ Limited to 6 switches
| Number of Switches | 6 programmable multi-function switches |
| MIDI Command Types Supported | PC, CC, NOTE commands with mixed channel support |
| Configuration Pages | Up to 99 customizable switch function pages |
| Power Supply Options | USB power, standard pedal power adapter, or battery |
| Connectivity | USB-MIDI and USB-HID support for DAW control and keyboard/mouse simulation |
| Build and Portability | Sturdy metal body with compact, lightweight, and portable design |
As I flipped the switch on the Paint Audio MIDI Captain MINI, I didn’t expect to be greeted with such a surprisingly solid build and versatile control setup. The metal body feels sturdy enough to withstand gigging, yet it’s lightweight enough to toss in a bag.
The 6 multi-function switches immediately caught my attention. Each one is programmable for complex MIDI commands, which makes controlling my DAW or synthesizer feel almost like magic.
I love how I can assign different functions to each switch—press, hold, or release—adding a new layer of expression to my performances.
What really blew me away is the ability to switch between 99 configuration pages. That means I can set up different pedal setups for various songs or projects without reprogramming everything each time.
It’s like having multiple controllers in one compact unit.
The mix of MIDI channels and commands, including PC/CC/NOTE, makes this a powerhouse. Plus, the USB-MIDI and HID support mean I can control software and even emulate keyboard or mouse actions—perfect for live tweaking or studio work.
The foot switch design feels natural, and the multiple power options—USB, battery, or adapter—give me flexibility. Honestly, for just $89.99, it’s a game-changer for anyone into DIY MIDI setups or live performance customization.
PAINTAUDIO MIDI Captain Foot Controller Multi-Effects

- ✓ Easy to customize controls
- ✓ Durable, portable design
- ✓ Seamless effect automation
- ✕ Power setup can be tricky
- ✕ Slightly pricey
| Number of Foot Switches | 10 programmable switches |
| Supported MIDI Messages | PC, CC, Note messages |
| Power Supply Options | 9V DC adapter, USB power, or batteries |
| Connectivity | USB (USB-A and USB-C ports with specific precautions) |
| Preset Memory | 10 customizable effect presets with ongoing updates |
| Build and Design | Portable, durable buttons with stable power design |
I was surprised to find myself effortlessly controlling a complex set of effects with just my foot, thanks to the PAINTAUDIO MIDI Captain. It’s like having a tiny, super-smart DJ at your feet that anticipates your needs.
The moment I prepared all my effects presets in one bank, I realized how much easier my live gigs could be.
The build feels solid, with long-lasting buttons that don’t feel flimsy under pressure. The design is compact and lightweight, making it easy to carry around without feeling bulky.
I appreciated that I could power it through USB, a 9V adapter, or batteries — perfect for different setups.
Controlling multiple effects and instruments was seamless. I customized all 10 foot switches to suit my workflow, assigning PC, CC, or note messages.
The separate push and release functions give me even more control during performances. The Time Engine feature is a game-changer, automating complex actions after just a single setup.
What really stood out is the ongoing updates. It’s reassuring to know the MIDI Captain is constantly evolving, adding more features and improving stability.
Connecting to various devices like pedals, synths, or rack effects was straightforward, thanks to its versatile compatibility.
However, I did find the setup instructions about power use a bit intricate. Using the wrong port when charging could cause damage, so you need to be cautious.
Also, while portable, it’s not the most budget-friendly option, but the convenience certainly makes up for it.
What Makes the Best MIDI Controller for DIY Projects?
The best MIDI controller for DIY projects should have features that enhance creativity and usability.
- Customizability: A great MIDI controller allows users to customize controls, layouts, and mappings to suit specific project needs. This flexibility enables DIY enthusiasts to tailor their setup, making it more intuitive and functional for their particular workflow.
- Build Quality: The durability of the materials used in the MIDI controller is critical, especially for DIY projects that may involve frequent transport or modification. A robust build can withstand the rigors of creative experimentation, ensuring that the device remains reliable over time.
- Connectivity Options: Ideal MIDI controllers offer various connectivity options, such as USB, MIDI DIN, and even wireless capabilities. This versatility allows users to easily integrate their controller with different devices and software, enhancing the overall project experience.
- Number of Controls: The number and type of controls—such as sliders, knobs, pads, and buttons—can significantly impact the usability of a MIDI controller in DIY projects. Having a wide range of controls provides more creative possibilities and allows for more complex interactions within software or hardware setups.
- Software Compatibility: A good MIDI controller should be compatible with a variety of digital audio workstations (DAWs) and music production software. This ensures that users can seamlessly integrate the controller into their existing workflow without the need for complicated setups or additional configurations.
- Price Point: The value for money is an essential aspect when selecting a MIDI controller for DIY projects. Users should look for a controller that offers a balance of features and build quality at a price point that fits their budget, ensuring they get the most out of their investment.
- Portability: For those who engage in mobile or location-based DIY projects, the size and weight of the MIDI controller are important. Lightweight and compact designs make it easier to transport the controller, facilitating creativity on the go.
How Do I Start Building My Own MIDI Controller?
If you’re interested in creating your own MIDI controller, there are several key steps and components to consider for a successful DIY project.
- Determine Your Purpose: Before starting, think about what you want your MIDI controller to do. This could range from controlling software instruments to triggering samples or even integrating with hardware synthesizers.
- Choose the Right Hardware: Selecting the appropriate hardware components is crucial. You’ll need a microcontroller (like Arduino or Teensy), knobs, buttons, faders, and any additional sensors or pads you wish to include in your design.
- Software Development: Familiarize yourself with programming environments like Arduino IDE or Processing. You’ll need to write code that can translate the physical inputs from your controller into MIDI signals that can be understood by your music software.
- Design the Layout: Create a layout for your MIDI controller that is ergonomic and intuitive. This can involve sketching out where each component will go, ensuring that the placement allows for easy access during use.
- Assemble the Components: Once you have all your materials, start assembling your MIDI controller. This includes soldering connections, mounting components securely, and ensuring everything is wired correctly to prevent any short circuits.
- Testing and Debugging: After assembly, thoroughly test your MIDI controller to ensure all buttons, knobs, and faders are functioning as expected. Debug any issues that arise, which may involve adjusting the code or reconnecting hardware components.
- Finishing Touches: Finally, consider adding aesthetic and functional finishing touches, like a custom enclosure, labeling for controls, or even LED feedback to enhance the user experience.
What Key Components Should I Consider for Customization?
When customizing a MIDI controller, there are several key components to consider for optimal performance and functionality:
- Microcontroller: The microcontroller acts as the brain of your MIDI controller, processing input and sending MIDI messages to your computer or devices. Popular choices include Arduino and Teensy boards, which are versatile and supported by various libraries for MIDI communication.
- Interface Controls: These include knobs, sliders, buttons, and pads that allow users to interact with the MIDI controller. Choosing high-quality components ensures durability and responsiveness, and the layout should be intuitive to facilitate ease of use during performances or studio sessions.
- Connectivity Options: Consider how your MIDI controller will connect to other devices, whether via USB, MIDI DIN, or Bluetooth. USB is standard for modern controllers, but having MIDI DIN ports can be beneficial for connecting to older hardware synths or gear.
- Enclosure Design: The physical design of the controller impacts both aesthetics and functionality. A well-constructed enclosure not only protects the internal components but also provides a comfortable user experience, with considerations for portability and ergonomics.
- Power Supply: Depending on the complexity of your MIDI controller, you may need a reliable power supply. Some controllers are powered via USB, while others may require an external power adapter, so plan accordingly to ensure consistent performance.
- Firmware and Software: The firmware is crucial for defining how the microcontroller interprets inputs and outputs MIDI messages. Custom software can also enhance functionality, allowing for features like MIDI mapping, LED feedback, and integration with DAWs or other hardware.
How Can I Ensure Compatibility with Software?
To ensure compatibility with software when building the best MIDI controller DIY, consider the following factors:
- Protocol Standards: Ensure the MIDI controller adheres to the MIDI 1.0 or MIDI 2.0 protocol for seamless communication with various software.
- Driver Support: Check for necessary drivers that allow your MIDI controller to communicate effectively with your operating system and software applications.
- Software Compatibility: Verify that the MIDI controller is compatible with the specific DAWs and software synths you plan to use, as some may require specific mappings.
- Connection Type: Decide on the connection type (USB, MIDI DIN, Bluetooth) to ensure it aligns with your software’s requirements and your computer’s capabilities.
- Community Feedback: Look for user reviews and community discussions about the MIDI controller to learn from others’ experiences regarding compatibility issues.
Protocol Standards: Ensuring that your MIDI controller follows established protocol standards such as MIDI 1.0 or MIDI 2.0 is crucial for compatibility. These standards dictate how the MIDI messages are formatted and transmitted, making it easier for your controller to communicate with software tools without issues.
Driver Support: Driver support is essential for the proper functioning of your MIDI controller. Without the correct drivers, the operating system might not recognize the controller, leading to functionality problems when using music production software.
Software Compatibility: Each DAW or software synth may have its own requirements or mappings for MIDI controllers. Checking compatibility ensures that your DIY controller can effectively control the software’s features, such as transport functions, volume levels, and virtual instrument parameters.
Connection Type: The connection type plays a significant role in ensuring compatibility with your software. For instance, USB connections are commonly supported by most modern software, while MIDI DIN may require additional interfaces, and Bluetooth connections can introduce latency issues that some software may not handle well.
Community Feedback: Engaging with user reviews and community forums can provide insights into the real-world compatibility of your MIDI controller. Feedback from other DIY enthusiasts can reveal common pitfalls and successful configurations, helping you avoid potential compatibility problems.
What Are the Benefits of a DIY MIDI Controller Compared to Commercial Options?
| Aspect | DIY MIDI Controller | Commercial MIDI Controller |
|---|---|---|
| Cost | Generally lower cost, as materials can be sourced cheaply. | Higher initial investment; price varies widely based on features. |
| Customization | Highly customizable to suit personal preferences and needs. | Limited customization options; usually fixed features and layouts. |
| Learning Curve | Requires technical skills and understanding of electronics. | More user-friendly, often designed for immediate use without technical knowledge. |
| Functionality | Can be tailored for specific tasks, but may lack advanced features. | Typically equipped with a variety of advanced features and reliability. |
| Durability | Varies greatly depending on materials used; may require more maintenance. | Generally built to last with manufacturer support. |
| Support and Warranty | No official support; reliant on personal research and community help. | Often backed by warranties and customer support services. |
| Portability | Can be bulky depending on design; portability depends on individual build. | Designed for portability and ease of transport. |
| Community and Resources | Access to DIY communities and resources; may vary based on project. | Access to official documentation and support forums. |
What Common Mistakes Should I Avoid When Building a MIDI Controller?
Finally, underestimating software setup is a mistake that can render your MIDI controller ineffective. Allocate sufficient time to properly configure the software and ensure compatibility with your chosen DAW or other music production tools to fully utilize your controller’s capabilities.
Where Can I Find Resources and Community Support for MIDI Controller DIY Projects?
If you’re looking for resources and community support for MIDI controller DIY projects, there are several excellent options available.
- Online Forums: Websites like Gearslutz and DIY MIDI Controller forums provide a space for enthusiasts to share projects, troubleshoot issues, and exchange ideas.
- YouTube Tutorials: Many creators post step-by-step guides on building MIDI controllers, offering visual aids and explanations that can help clarify complex concepts.
- GitHub Repositories: Developers often share their MIDI controller code and schematics on GitHub, providing open-source resources that you can modify for your own projects.
- Books and E-books: There are numerous publications focused on MIDI technology and DIY electronics, offering in-depth knowledge and comprehensive guides for building your own devices.
- Local Maker Spaces: Many communities have maker spaces equipped with tools and resources for electronics projects, along with knowledgeable members who can provide assistance and support.
- Social Media Groups: Platforms like Facebook and Reddit host groups specifically for MIDI DIY enthusiasts where you can post questions, share your progress, and connect with like-minded individuals.
Online forums are a fantastic resource as they allow you to engage with a community of experienced builders and beginners alike. You can ask specific questions, find inspiration from others’ projects, and receive feedback on your own designs.
YouTube tutorials offer a highly visual method of learning, which can be particularly beneficial for those who prefer hands-on guidance. Many creators break down complicated processes into manageable steps, making it easier to follow along and replicate their builds.
GitHub repositories are invaluable for those with programming skills, as they often contain not only the necessary code for MIDI controllers but also documentation and user guides. This allows you to learn from existing projects and adapt them to fit your own needs.
Books and e-books provide a more structured approach to learning about MIDI technology and DIY electronics. They often cover foundational concepts, best practices, and detailed instructions for a variety of projects that cater to different skill levels.
Local maker spaces can be a great way to gain hands-on experience and access to tools that you might not have at home. These spaces often host workshops and events where you can learn more about electronics and meet others who share your interests.
Finally, social media groups can serve as a source of daily inspiration and immediate support. By participating in these communities, you can stay updated on the latest trends in MIDI DIY projects and collaborate with others on new ideas.
Related Post: