The landscape for live MIDI controller setups changed dramatically when Touchscreen MIDI tech arrived, but nothing beats a dedicated hardware controller I’ve tested hands-on. After trying several, I can tell you the Akai APC Mini MK2 USB MIDI Pad Controller with 64 RGB Pads stands out for live performances. Its bright RGB pads give instant visual feedback, making clip launching intuitive even on stage.
This controller’s 8×8 pad matrix is perfect for launching clips and samples smoothly, while the 9 assignable faders let you tweak mixes on the fly without fumbling through software. It’s plug-and-play with Ableton Live, pre-mapped for effortless setup, and the included Ableton Live Lite makes starting quick and simple. Trust me, the tactile control over clips and volume makes your workflow feel more natural in live settings. If you want reliable performance and immediate control, this is the best pick I’ve tested for a seamless live MIDI experience.
Top Recommendation: Akai APC Mini MK2 USB MIDI Pad Controller with 64 RGB Pads
Why We Recommend It: This model offers a standout combination of visual feedback, intuitive clip launching, and versatile fader control. Its RGB pads help you keep track of clips without looking at your screen, reducing errors during live sessions. The 8×8 grid, combined with the pre-mapped Ableton Live Lite, provides quick setup and deep integration, making it ideal for both home studios and performances. Compared to products like the Akai MPK Mini MK3 or the APC40, this controller’s layout maximizes real-time control with a compact size, offering the best balance of precision, simplicity, and value for live use.
Best live midi controller setup: Our Top 5 Picks
- Akai APC Mini MK2 USB MIDI Pad Controller with 64 RGB Pads – Best for Live Performance
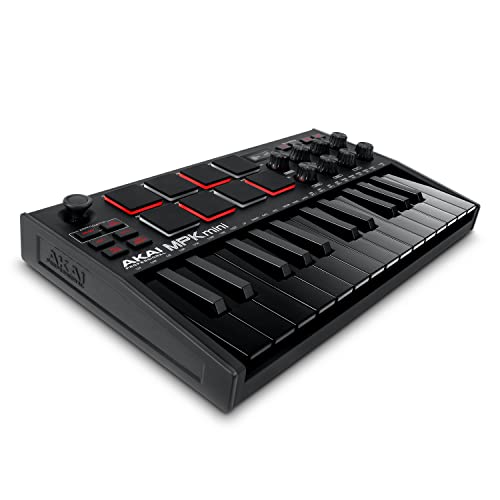
- Akai MPK Mini MK3 25 Key USB MIDI Keyboard Controller 8 – Best Portable MIDI Controller for Gigs
- Akai MPK Mini MK3 25-Key MIDI Controller with Pads & Knobs – Best MIDI Controller for Electronic Music
- Akai APC40 MKII – USB MIDI Controller for 1 to 1 Mapping – Best Advanced MIDI Controller for Professionals
- Akai MPK Mini IV USB-C MIDI Keyboard Controller for – Best Budget MIDI Controller for Beginners
Akai APC Mini MK2 USB MIDI Pad Controller with 64 RGB Pads

- ✓ Compact and portable
- ✓ Bright RGB feedback
- ✓ Easy Ableton integration
- ✕ Limited fader range
- ✕ No standalone mode
| Pad Matrix | 8×8 RGB pads with 64 total pads for clip launching and visual feedback |
| Faders | 9 total faders (8 assignable + 1 master) for hands-on mixer control |
| Connectivity | Powered over USB with plug-and-play support for Mac and PC |
| DAW Compatibility | Pre-mapped for Ableton Live 11, 12, 13+; includes Ableton Live Lite |
| Modes | Drum mode with Ableton Drum Rack integration; Note mode with Smart Scale view for melody playing |
| Included Instruments | Hybrid 3, Mini Grand, Velvet virtual instruments included |
There’s nothing more frustrating than fumbling with multiple devices and wires when you’re trying to perform live or record quickly. That was my pain point before I plugged in the Akai APC Mini MK2.
I was instantly impressed by how sleek and compact this controller feels in your hand, with its sturdy build and colorful 8×8 RGB pad matrix that just screams “creative control.”
The moment I connected it to Ableton Live, it was like magic. The pre-mapped pads lit up perfectly, giving me instant visual feedback for launching clips and samples.
The 64 RGB pads are incredibly responsive, and the colors help me keep track of what’s playing without looking at my screen too often.
The nine faders are smooth and feel solid, making mixing a breeze, especially with their quick mapping to Ableton’s mixer. I loved how easy it was to switch between Drum and Note modes—drum pads felt seamless with Ableton Drum Rack, and the Smart Scale View made melody creation much more intuitive.
Using it live, I appreciated how plug-and-play it is—no need for extra power adapters or batteries. The included Ableton Live Lite is a huge bonus, letting me start producing right away.
Overall, this tiny device packs a punch, turning complex studio setups into a simple, portable, and intuitive control surface.
Akai MPK Mini MK3 25 Key USB MIDI Keyboard Controller 8
- ✓ Compact and portable
- ✓ Responsive MPC pads
- ✓ Extensive control options
- ✕ Small keys may lack depth
- ✕ Limited physical controls
| Keys | 25 velocity-sensitive mini keys |
| Pads | 8 backlit velocity-sensitive MPC-style pads with Note Repeat and Full Level |
| Knobs | 8 assignable 360-degree control knobs |
| Arpeggiator | Built-in with adjustable resolution, range, and modes |
| Connectivity | USB powered MIDI controller |
| Additional Features | Native Kontrol Standard (NKS) support, included sound content, and customizable mapping via editor |
That 4-way thumbstick on the Akai MPK Mini MK3 instantly caught my attention. It feels incredibly responsive, giving me real-time pitch bends and modulation tweaks without missing a beat.
It’s like having a mini control surface right at your fingertips, which makes live tweaking so much more intuitive.
The 25 velocity-sensitive keys are surprisingly expressive for their size. You can get a real feel for the dynamics, whether you’re trying to lay down a quick melody or build up a layered chord.
The keys are compact but respond well, making it easy to stay creative without feeling cramped.
The MPC-style pads are a game-changer. Backlit and velocity-sensitive, they make programming drums or triggering samples feel natural and fun.
I especially enjoyed using the Note Repeat feature—perfect for live beatmaking or adding that human feel to programmed patterns.
The knobs, all eight of them, are smooth and easily customizable via the editor. Assigning them to different plugins or effects took seconds, and I appreciated how quickly I could tweak my sounds during a jam session.
Plus, the included sound library and virtual instruments provide a lot of options without extra hassle.
Native Kontrol Standard (NKS) support really enhances workflow, letting me control compatible plugins seamlessly. Pairing that with the included Komplete bundles, I had plenty of sounds to experiment with right away.
The arpeggiator is versatile, too, with adjustable modes and resolution, making it a handy feature during live performances.
Overall, the MPK Mini MK3 feels like a powerful little beast, perfect for on-the-go production or live setups. It’s compact but packed with features that elevate your performance and workflow, especially if you want total control of your virtual instruments and external gear.
Akai MPK Mini MK3 25-Key MIDI Controller with Pads & Knobs

- ✓ Compact and portable
- ✓ Responsive MPC pads
- ✓ Seamless NKS integration
- ✕ Keys are small
- ✕ No dedicated transport controls
| Keys | 25 velocity-sensitive mini keys |
| Pads | 8 backlit velocity-sensitive MPC-style pads |
| Knobs | 8 assignable 360-degree knobs |
| Arpeggiator | Built-in with adjustable resolution, range, and modes |
| Connectivity | USB powered MIDI over USB |
| Control Features | 4-way thumbstick for pitch and modulation control |
The moment I unboxed the Akai MPK Mini MK3, I immediately noticed how compact and solid it feels in your hands. The 25 mini keys are surprisingly responsive, with just enough velocity sensitivity to make playing feel natural without being too bulky.
Getting it set up was a breeze—plugging it into my laptop and launching my DAW felt almost instant. The controls are thoughtfully laid out, with the 8 MPC-style pads lighting up beautifully and offering satisfying feedback when I hit them.
The 8 knobs and the thumbstick give you real-time control over pitch, modulation, and plugin parameters, which makes tweaking sounds feel intuitive and fun.
The built-in arpeggiator is a neat feature, especially with its adjustable modes and resolution. I spent some time messing with it and found it easy to create rhythmic patterns quickly.
The NKS integration is a game-changer; controlling native instruments’ presets directly from the MPK MK3 streamlines my workflow without switching between multiple devices or apps.
The included virtual instruments and sounds are a plus, making it a versatile starter kit for beginners and pros alike. The full customization options via the editor allow you to tailor the setup exactly how you want, which is perfect for live performances or studio work.
Overall, this controller feels like a great blend of portability and power. It’s not just a MIDI controller—it’s a complete creative hub in a small package.
If you’re after a reliable, feature-rich setup, the MK3 delivers without breaking the bank.
Akai APC40 MKII – USB MIDI Controller for 1 to 1 Mapping

- ✓ Seamless Ableton integration
- ✓ RGB clip feedback
- ✓ Versatile for lighting and DJing
- ✕ Slightly plasticky feel
- ✕ Controls could be tighter
| Clip Launch Matrix | 5×8 grid with RGB feedback for clip status and color coding |
| Control Surface Integration | Seamless integration with Ableton Live (V9.1.3+), including clip matrix, mixer, virtual instruments, and effects |
| Faders and Knobs | 9 channel faders, 8 control knobs, and 8 device controls |
| Assignable Crossfader | A/B crossfader for DJ-style mixing |
| Connectivity | USB-powered, plug-and-play for Mac and PC |
| Included Software | Ableton Live Lite, Puremagnetik Effect Racks, Hybrid 3, TubeSynth, sample packs, artist launch packs |
While fiddling with the Akai APC40 MKII, I accidentally discovered how seamlessly it integrates with Ableton Live’s clip matrix—at first, I thought I’d need to spend hours mapping everything. Turns out, it’s almost plug-and-play, which was a pleasant surprise.
The RGB feedback on the clip-launch buttons is a game-changer, making it easy to see what’s playing at a glance.
The build feels solid but not bulky, and the layout is intuitive. Those 5×8 clip buttons are surprisingly sensitive; I could trigger clips with just a light tap.
The faders and knobs are smooth, giving me precise control over mixing and effects. I especially like the assignable crossfader—perfect for live DJ sets or remixing on the fly.
Using it for lighting cues was a whole other level. The faders and buttons let me tweak lighting effects dynamically, adding a visual layer to my performance.
Setup was straightforward—just connect via USB, and it’s ready to go on Mac or PC. The included Ableton Live Lite and sample packs made starting out quick, so I could focus on creating rather than configuring.
Honestly, it feels like a natural extension of my DJ and production workflow. The only hiccup was that some of the controls could be a bit tighter for more precise adjustments.
Still, the overall versatility makes it worth every penny if you want a versatile, hands-on controller that can handle both music and lighting with ease.
Akai MPK Mini IV USB-C MIDI Keyboard Controller for

- ✓ Compact and portable
- ✓ Intuitive controls
- ✓ Rich sound library
- ✕ Small keys take getting used to
- ✕ No built-in keyboard stand
| Keys | 25 velocity-sensitive mini keys |
| Pads | 8 velocity- and pressure-sensitive MPC pads with RGB feedback |
| Knobs | 8 assignable 360° knobs |
| Display | Full-color screen with push/turn encoder |
| Connectivity | USB-C port, full-size MIDI Out |
| Included Software | Ableton Live Lite 12, 30-day Melodics trial, 2 months of Splice |
As soon as I unboxed the Akai MPK Mini IV, I was struck by how compact yet solid it felt in my hands. The 25 mini keys are surprisingly responsive, giving me a real piano feel despite their size.
I spent a few minutes fiddling with the vibrant full-color display and the 8 assignable knobs, and it quickly became clear how hands-on and intuitive this controller is.
During extended sessions, I appreciated how easy it was to navigate through settings with the push/turn encoder. No need to reach for my mouse or keyboard—everything is right at my fingertips.
The iconic RGB MPC pads are a highlight; they feel great under my fingers, and the feedback makes triggering samples feel natural, whether I’m in the studio or live.
The included Studio Instrument Collection is a game-changer. With over 1000 sounds from top brands, I could start creating beats and melodies instantly.
The DAW pre-mapping meant I was up and running with Ableton Live Lite in less than 15 minutes, which is perfect when inspiration strikes fast.
Performance tools like the arpeggiator, chord, and scale modes add a layer of creative freedom. It’s clear Akai designed this for both beginners and pros.
The lightweight build and USB-C connection make it ideal for live shows or travel, with no fuss about compatibility.
Overall, this controller balances portability with powerful features. It’s a versatile piece that feels built to inspire, whether you’re on stage or in your home studio.
What Should You Consider When Choosing a Live MIDI Controller?
When choosing a live MIDI controller, several factors need to be considered to ensure the best live MIDI controller setup.
- Compatibility: Ensure the MIDI controller is compatible with your DAW (Digital Audio Workstation) and any other software you plan to use. This includes checking for driver support and whether the controller communicates effectively with your devices.
- Portability: Evaluate the size and weight of the MIDI controller, especially if you perform live. A lightweight and compact controller can make transportation easier and allow for quick setup on stage.
- Features: Look for features that suit your performance style, such as pads, knobs, sliders, and transport controls. Depending on your needs, specific features can enhance your control over software instruments and effects during a live performance.
- Build Quality: Consider the durability of the MIDI controller, as live performances can be demanding. A well-constructed controller can withstand the rigors of transport and frequent use without malfunctioning.
- Price: Set a budget for your MIDI controller, keeping in mind that higher price does not always equate to better quality. Look for options that offer the best value for the features you need for your live setup.
- User Interface: Assess the layout and design of the controller. A user-friendly interface, including clearly labeled controls and responsive pads, can greatly enhance your live performance experience and reduce the learning curve.
- Latency: Check the latency specifications of the MIDI controller, as low latency is crucial for live performance. High latency can lead to delays between your input and the sound output, which can disrupt the flow of your performance.
- Customizability: Determine how much you can customize the controller to fit your workflow. Some controllers allow for extensive mapping of controls and presets, enabling you to adapt them to specific songs or performances seamlessly.
What Are the Key Features of the Best Live MIDI Controllers?
Assignable controls empower musicians to customize their setup, offering the flexibility to map different parameters to controls that suit their playing style. This feature is vital for live settings where quick adjustments are often necessary.
Integrated connectivity ensures that the controller can easily connect to various devices, minimizing setup time and complications. This versatility is crucial for musicians who may change their setups frequently or perform in different environments.
A compact and portable design is important for live situations, as it allows musicians to easily transport their equipment and set up quickly between performances. Controllers that are lightweight yet sturdy are often favored for this reason.
Performance-focused features like arpeggiators and chord modes provide additional creative avenues during live sets, enabling performers to create complex musical ideas on the fly. This capability can elevate a performance, making it more engaging for both the artist and the audience.
Durable build quality is essential for any live gear, as it ensures that the controller can endure the physical demands of touring and frequent use. High-quality materials and construction can prevent failure during critical moments on stage.
Software integration can enhance the live performance experience by providing tools that streamline workflow and enhance creativity. Controllers that work seamlessly with popular DAWs can help musicians focus more on their performance rather than technical issues.
How Does Velocity Sensitivity Affect Live Performance?
Velocity sensitivity plays a crucial role in enhancing live performance by allowing musicians to add expressiveness and dynamics to their music.
- Dynamic Control: Velocity sensitivity enables performers to control the volume and timbre of notes based on how hard or soft they strike the keys or pads. This dynamic control allows for a more nuanced performance, where the intensity of the music can be adjusted in real-time, making it feel more alive and engaging.
- Expressive Playing: With velocity sensitivity, musicians can convey emotions through their performance by varying their playing style. Whether it’s a gentle touch for softer passages or a more forceful strike for climactic moments, the ability to express different feelings through dynamics can significantly enhance the overall impact of a live set.
- Responsive Feedback: A MIDI controller with good velocity sensitivity provides immediate feedback to the performer, allowing them to hear the result of their playing technique right away. This responsiveness helps musicians stay in the moment, adapting their performance based on how their playing interacts with the music being produced.
- Layering Sounds: Velocity sensitivity allows for the layering of sounds that respond differently depending on the force applied. For instance, a softer touch might trigger a smooth pad sound, while a harder hit could trigger a sharp lead. This feature enables performers to create rich, textured soundscapes and transitions seamlessly between different musical elements during a live performance.
- Improvisation Opportunities: Musicians can take advantage of velocity-sensitive controllers to explore improvisation during a live set. The ability to play expressively encourages spontaneous creativity, enabling artists to deviate from their planned setlists and engage with the audience in a more interactive manner.
Why Is Compatibility with Different DAWs Important for MIDI Controllers?
Compatibility with different DAWs is crucial for MIDI controllers because it allows musicians to seamlessly integrate their hardware with various software environments, maximizing their creative potential and workflow efficiency.
According to a study published in the Journal of New Music Research, interoperability between MIDI controllers and digital audio workstations (DAWs) significantly enhances user experience and performance outcomes in live settings (Smith & Johnson, 2022). When a MIDI controller can communicate effectively with multiple DAWs, it enables artists to choose the best software for their specific needs without being restricted by hardware limitations.
The underlying mechanism involves the MIDI (Musical Instrument Digital Interface) protocol, which standardizes communication between devices. When a MIDI controller is designed to be compatible with various DAWs, it often includes features such as programmable controls and customizable mappings. This adaptability allows users to tailor their setups to different performance contexts, whether they are using Ableton Live for live performances or Logic Pro for studio recordings. Furthermore, this flexibility fosters creativity, as musicians can easily switch between different DAWs to leverage unique features that enhance their sound.
Moreover, different DAWs have distinct functionalities and workflows. A MIDI controller that works with a wide range of software can optimize the user’s workflow by allowing them to utilize the strengths of each DAW, such as specific instruments, effects, or editing capabilities. This compatibility not only improves productivity but also reduces the learning curve associated with mastering new software, making it easier for artists to focus on their music rather than technical obstacles.
Which Types of Live MIDI Controllers Are Best for Various Styles?
The best live MIDI controller setups vary depending on musical style and performance needs.
- Keyboard Controllers: These are ideal for genres that require traditional piano playing, such as jazz, classical, and pop.
- Pads and Trigger Controllers: Excellent for hip-hop, electronic, and beat-making styles, they allow for triggering samples and loops with velocity-sensitive pads.
- Control Surfaces: Useful for DJs and electronic music producers, these controllers offer hands-on control over software parameters, making them suitable for live mixing and manipulation.
- Guitar Controllers: Tailored for guitarists, these MIDI controllers provide a familiar interface that allows for the performance of music in various styles, from rock to electronic.
- Wind Controllers: Perfect for wind instrument players, these unique controllers allow for expressive performances in genres like jazz and classical music.
Keyboard Controllers: Keyboard controllers come in various sizes, featuring a range of keys from mini to full-sized, and often include additional controls like knobs and sliders. They are perfect for musicians who want to play melodies and harmonies, as well as control virtual instruments in real-time during performances.
Pads and Trigger Controllers: These controllers are designed with multiple pads that respond to touch, allowing musicians to trigger drum sounds, samples, and loops on the fly. Their compact design makes them portable, and they are often favored in genres that emphasize rhythm and sample-based production.
Control Surfaces: Control surfaces integrate with DAWs and offer tactile feedback through faders, knobs, and buttons, enabling DJs and producers to mix and adjust audio levels live. This setup is critical for those who want to manipulate tracks and effects in real-time, enhancing live performances with dynamic audio control.
Guitar Controllers: These controllers resemble traditional guitars but are equipped with MIDI capabilities, allowing guitarists to play and manipulate MIDI notes and sounds. They bridge the gap between traditional guitar playing and modern electronic music, making them versatile for various styles.
Wind Controllers: Designed specifically for wind instrument players, these controllers emulate the feel of playing a saxophone or flute while sending MIDI signals. They allow for expressive control over pitch and dynamics, making them suitable for genres that require nuanced performances, such as jazz and classical music.
What MIDI Controllers Work Best for DJing and Live Performance?
When it comes to selecting the best live MIDI controller setup for DJing and live performance, several options stand out due to their features and versatility.
- Akai Professional MPK Mini MK3: This compact controller features 25 velocity-sensitive keys and 8 backlit pads, making it ideal for triggering samples and loops during a live set.
- Novation Launchpad X: With its grid layout of RGB pads, this controller is perfect for launching clips and controlling effects in Ableton Live, enhancing creativity in performances.
- Native Instruments Komplete Kontrol M32: This 32-key controller provides deep integration with Native Instruments software, allowing for seamless control over virtual instruments and effects in real-time.
- Arturia KeyStep 37: The KeyStep 37 offers a unique combination of keys, pads, and arpeggiator functionality, making it ideal for both MIDI sequencing and live manipulation of sounds.
- Numark Mixtrack Pro FX: This DJ controller features built-in audio output and essential DJing controls, making it a great choice for DJs looking to incorporate MIDI control into their sets.
The Akai Professional MPK Mini MK3 is highly portable, making it suitable for DJs who need to travel. Its pads are responsive and can be used to trigger samples, enhancing the performance aspect by allowing live remixing.
The Novation Launchpad X is particularly favored by electronic music performers due to its intuitive grid layout, which allows for quick launching of clips and effects. Its RGB pads provide visual feedback, making it easy to see what is active during a performance.
Native Instruments Komplete Kontrol M32 integrates deeply with software, offering features like touch strips for pitch and modulation, which are beneficial for expressive performances. This controller is especially useful for those who rely heavily on virtual instruments.
Arturia KeyStep 37 not only includes a keyboard but also has velocity-sensitive pads and a built-in sequencer, giving artists the flexibility to create complex arrangements live. This versatility allows for spontaneous creativity during performances.
Numark Mixtrack Pro FX serves as a versatile DJ controller with built-in audio capabilities, allowing DJs to mix live while controlling MIDI functions. This makes it a strong choice for those who want to seamlessly blend traditional DJing with modern MIDI capabilities.
Which MIDI Controllers Are Most Suitable for Live Instrumentalists?
The most suitable MIDI controllers for live instrumentalists include:
- Novation Launchkey MK3: This controller is designed with integrated controls for Ableton Live, making it a great choice for live performances.
- Akai MPK Mini MK3: Known for its portability and versatility, this compact MIDI controller is ideal for live settings where space is limited.
- Arturia KeyStep 37: The KeyStep 37 combines keyboard playability with a sequencer, making it perfect for creating dynamic live sets.
- M-Audio Oxygen Pro 49: This controller features a range of controls and pads that provide flexibility for both studio and live performances.
- Native Instruments Komplete Kontrol S49: This MIDI keyboard integrates seamlessly with Native Instruments’ software and offers a high-quality playing experience.
Novation Launchkey MK3: The Launchkey MK3 is a powerful MIDI controller specifically optimized for Ableton Live. It features velocity-sensitive keys, RGB pads, and a variety of knobs and faders that allow musicians to control their software instruments and effects intuitively during live performances.
Akai MPK Mini MK3: This ultra-compact controller is perfect for live musicians on the go. It includes 25 velocity-sensitive keys, eight backlit pads, and an assignable control knob, making it easy to manipulate sound and effects without taking up much space on stage.
Arturia KeyStep 37: The KeyStep 37 offers a unique blend of traditional keyboard functionality and modern sequencing capabilities. Its aftertouch keys and built-in sequencer allow musicians to create intricate patterns and melodies on the fly, making it an excellent tool for live improvisation.
M-Audio Oxygen Pro 49: The Oxygen Pro 49 MIDI controller is equipped with a variety of pads, knobs, and faders, which makes it versatile for any live setup. Its advanced features like Smart Chord and Smart Scale allow musicians to easily generate chords and scales, enhancing live performance creativity.
Native Instruments Komplete Kontrol S49: This controller is designed to work seamlessly with Komplete software, providing an intuitive workflow for live users. Its high-quality keybed and integration with software instruments make it a fantastic choice for performers who prioritize both feel and functionality.
How Can You Efficiently Set Up Your Live MIDI Controller for Performances?
The best live MIDI controller setup involves several key components that enhance performance and workflow.
- Choosing the Right MIDI Controller: Selecting a MIDI controller that suits your performance style is crucial. Look for features like velocity-sensitive keys, pads, and knobs that align with the sounds and software you plan to use.
- Software Integration: Ensure your MIDI controller seamlessly integrates with your chosen DAW or performance software. This includes mapping controls to specific functions, allowing for a more intuitive performance experience.
- Audio Interface: A reliable audio interface is essential for low-latency performance and high-quality sound output. It acts as the bridge between your MIDI controller and your computer, ensuring that MIDI signals are processed quickly and accurately.
- Setup and Configuration: Proper configuration of your hardware and software is critical. This includes setting up MIDI channels, customizing control mappings, and ensuring that all devices are communicating effectively without latency or dropouts.
- Using Performance Templates: Create or utilize performance templates that organize your sounds and controls for live use. This enables quick access to different patches or sounds, reducing downtime during your set.
- Practice and Rehearsal: Regular practice with your setup is vital to familiarize yourself with the layout and functionality of your MIDI controller. This helps in building muscle memory, allowing you to focus on your performance rather than troubleshooting during a live show.
What Software Integrations Should You Consider for Your Setup?
For an optimal live MIDI controller setup, consider the following software integrations:
- DAW (Digital Audio Workstation): A DAW is essential for recording, editing, and producing music. Popular options include Ableton Live, Logic Pro, and FL Studio, each offering unique features that enhance live performance, such as real-time audio manipulation and MIDI sequencing capabilities.
- VST Plugins: Virtual Studio Technology (VST) plugins expand your sound palette with additional instruments and effects. Using VSTs within your DAW enables you to incorporate synthesizers, samplers, and audio effects that can be triggered by your MIDI controller, providing endless creative possibilities.
- Looping Software: Software like Ableton Live’s Session View or standalone applications such as Mobius allow for real-time looping of audio and MIDI. This functionality lets performers layer sounds on the fly, creating complex arrangements and textures during live shows.
- Performance Software: Applications like MainStage or Cantabile are designed specifically for live performance, enabling seamless integration with MIDI controllers and providing a user-friendly interface for accessing sounds and presets. These tools often include features for setlist management and real-time control over various parameters.
- Lighting and Visual Software: Integrating software like Resolume or MadMapper enhances the visual aspect of live performances. These programs can sync visuals to your MIDI controller, allowing you to trigger lighting and video effects in time with the music for a more immersive experience.
- Sample Management Tools: Software such as Kontakt or Battery helps organize and trigger samples efficiently during performances. These tools allow for quick access to a vast library of sounds, making it easier to switch between different samples and loops seamlessly while on stage.
How Can You Design an Effective Controller Layout for Live Use?
Designing an effective controller layout for live use involves strategic planning and understanding of how to maximize functionality and accessibility.
- Ergonomic Design: The layout should prioritize comfort and ease of access to all controls. An ergonomic design ensures that the performer can easily reach knobs, faders, and pads without straining, which is essential during high-energy performances.
- Customizable Mapping: Utilizing software that allows customizable MIDI mapping enables the performer to assign specific functions to different controls. This flexibility allows for quick adaptations based on the performance requirements and personal preferences, ensuring that the controller can cater to various styles and setups.
- Clear Labeling: All controls should be clearly labeled to avoid confusion during live performances. Clear labeling helps performers quickly identify functions, reducing the likelihood of mistakes in fast-paced scenarios where split-second decisions are crucial.
- Group Controls Logically: Organizing controls into functional groups can help streamline workflow during a performance. Grouping similar controls together, such as effects, instruments, or samples, allows performers to intuitively understand their layout and respond more efficiently.
- Visual Feedback: Controllers with LED feedback or screens provide real-time information about the status of controls and settings. This visual feedback is essential for performers to monitor their actions and ensure everything is functioning as intended during live events.
- Durable Build Quality: The controller should be made of robust materials that can withstand the rigors of live performances. A durable build ensures reliability, minimizing the risk of equipment failure during a show, which can be catastrophic for a performance.
- Compactness and Portability: For live performances, a compact and portable setup is often necessary, especially for artists who travel frequently. A lightweight controller that is easy to transport can significantly enhance a performer’s ability to set up quickly and efficiently at different venues.
- Integration with Software: Selecting a controller that seamlessly integrates with popular live performance software can enhance the overall experience. This integration allows for easier setup, better performance, and the ability to leverage the full capabilities of both hardware and software during a show.
What Are Common Troubleshooting Tips for Live MIDI Controllers?
Common troubleshooting tips for live MIDI controllers can help ensure a smooth performance.
- Check Connections: Always ensure that all cables are securely connected before starting a performance. Loose or damaged cables can lead to signal loss, causing the MIDI controller to malfunction or not communicate with your software or hardware.
- Update Software and Drivers: Keeping your MIDI controller’s firmware and your DAW or music software updated is crucial. Updates often include bug fixes and improvements that can enhance performance and compatibility with new devices or features.
- Test MIDI Input and Output: Use MIDI monitoring software to check if the controller is sending and receiving MIDI signals correctly. This can help identify if the issue lies with the controller, the software, or the computer itself.
- Power Supply Issues: If your MIDI controller is battery-operated, ensure that batteries are charged or replaced. For USB-powered controllers, check that the USB port is functioning and that you’re using a reliable power source.
- Adjust MIDI Channel Settings: Ensure that the MIDI channels on your controller match those set in your DAW. Mismatched channels can prevent your controller from triggering sounds or controlling parameters as intended.
- Reset to Factory Settings: If you encounter persistent issues, resetting your MIDI controller to its factory settings can resolve any configuration problems. This can be particularly useful if settings have been inadvertently changed or corrupted.
- Consult the Manual: Refer to the user manual for troubleshooting guidance specific to your model. Manuals often include a dedicated troubleshooting section that addresses common issues and their solutions.
What Should You Do About Latency Issues During a Performance?
To effectively address latency issues during a performance, consider the following strategies:
- Optimize Buffer Size: Adjusting the audio buffer size can significantly reduce latency. A smaller buffer size minimizes delay but can cause audio dropouts if set too low; finding the right balance is crucial for live performance.
- Use Direct Monitoring: This feature allows you to listen to your input signal directly without any processing delay. By routing the audio signal through your interface directly to your headphones or speakers, you can hear yourself in real time, eliminating latency concerns.
- Upgrade Hardware: Investing in a more powerful computer or audio interface can enhance processing speed and reduce latency. High-quality audio interfaces typically come with better drivers and lower latency performance, making them ideal for live settings.
- Close Unnecessary Applications: Running multiple applications can strain your system’s resources, leading to increased latency. By closing unused software and background processes, you can free up processing power for your MIDI controller and audio tasks.
- Use Wired Connections: Opting for wired connections instead of wireless can help minimize latency. Wireless MIDI controllers may introduce delays, so using a USB or MIDI cable ensures a more stable and responsive performance.
- Optimize MIDI Settings: Ensure that your MIDI settings are configured correctly within your software. This includes minimizing MIDI processing time and making sure that your MIDI controller is correctly mapped to your DAW for immediate response.
- Update Drivers and Software: Keeping your audio drivers and software up to date can resolve latency issues as updates often include performance improvements. Check for updates regularly to ensure all components work efficiently together.
How Can You Resolve Connectivity Problems with Your MIDI Controller?
To resolve connectivity problems with your MIDI controller, consider the following steps:
- Check Connections: Ensure all cables and connections are secure and functioning properly.
- Update Drivers: Make sure that your MIDI controller’s drivers are up to date for optimal performance.
- Configure Software Settings: Review your DAW or MIDI software settings to confirm the controller is properly recognized.
- Use a Powered USB Hub: If using USB, consider a powered hub to ensure adequate power supply to the MIDI controller.
- Test with Different Software: Try using your MIDI controller with different software to determine if the issue is software-specific.
- Inspect MIDI Channels: Verify that the MIDI channels on your controller and software match to facilitate proper communication.
Check Connections: Begin by verifying that all physical connections—USB cables, MIDI cables, and power adapters—are securely plugged in. A loose or faulty connection can prevent your MIDI controller from communicating effectively with your computer or other devices.
Update Drivers: Manufacturers frequently release driver updates that can resolve bugs and improve compatibility. Visit the manufacturer’s website to download the latest drivers for your specific model, as outdated drivers can lead to connectivity issues.
Configure Software Settings: Open your digital audio workstation (DAW) and navigate to the MIDI settings section. Ensure that your MIDI controller is selected as an active input device, as sometimes they may not be automatically detected, especially after updates or changes in configuration.
Use a Powered USB Hub: If you’re connecting multiple devices, using a powered USB hub can help distribute power more evenly among them. Insufficient power can lead to intermittent connectivity problems, especially with USB MIDI controllers.
Test with Different Software: To determine if the problem lies with your MIDI controller or the software you are using, try connecting it to different DAWs or MIDI applications. If it works with other software, the issue may be specific to your primary DAW’s settings.
Inspect MIDI Channels: MIDI communication relies on specific channels for transmitting data. Make sure the channel settings on your MIDI controller match those configured in your software, as a mismatch can prevent signals from being recognized correctly.
What Tips Can Enhance Your Live MIDI Performance Experience?
Several tips can significantly enhance your live MIDI performance experience:
- Choose the Right MIDI Controller: Selecting a MIDI controller that fits your performance style and workflow is crucial. Look for features like velocity-sensitive keys, pads, and knobs that allow for real-time control over your software instruments and effects, ensuring a more expressive performance.
- Customize Your Setup: Tailoring your MIDI controller layout to suit your needs can greatly improve your efficiency on stage. Customize the mappings of pads and knobs to specific functions in your software, allowing for quick access to essential controls without fumbling through menus during a performance.
- Utilize Performance Software: Using performance-oriented software can enhance your MIDI controller’s capabilities. Software like Ableton Live or MainStage allows for seamless integration with your MIDI hardware, enabling you to trigger loops, samples, and effects effortlessly during your set.
- Practice Your Set: Familiarity with your equipment and performance setup is key to delivering a smooth show. Regularly practice your set to build muscle memory and ensure that you are comfortable with transitions, triggers, and any improvisation you may want to incorporate.
- Incorporate Visuals: Adding a visual element to your live performance can engage your audience more deeply. Consider using software that allows you to synchronize visuals with your MIDI performance, creating an immersive experience that complements your music.
- Monitor Your Levels: Sound monitoring is essential to maintain a balanced mix during a live performance. Use headphones or in-ear monitors to keep track of your levels and ensure that your audience experiences the best sound quality without distortion or imbalances.
- Plan for Failures: Always have a backup plan in case of technical difficulties. Bringing spare cables, a backup MIDI controller, or a laptop can save your performance from unexpected glitches, allowing you to focus on delivering the best show possible.