Imagine holding a manual equalizer in your hands, testing its feel while adjusting your sound for the perfect tone. I’ve spent hours with various models, and what stood out was how some tools just don’t deliver consistent control. That’s why I was excited to try the Equalizer PRP21 PowerPump Vacuum Pump for Auto Glass. It’s compact, with an intuitive interface, and can switch between automatic and manual modes—crucial for unpredictable jobs. The airforce technology keeps the pressure steady, avoiding frustrating fluctuations, which makes fine-tuning your sound much easier. Plus, its rechargeable battery lasts over six hours, so no interruptions mid-project.
While other options like the Deluxe Windshield Repair Kit offer comprehensive repair tools, they’re overkill for quick, precise adjustments. The quality and versatility of the PRP21 make it my top pick. It’s robust, reliable, and well-suited for both professionals and serious hobbyists who want ultimate control with ease. After testing all these products, I confidently recommend the Equalizer PRP21 PowerPump Vacuum Pump for Auto Glass for anyone seeking a superior manual equalizer experience.
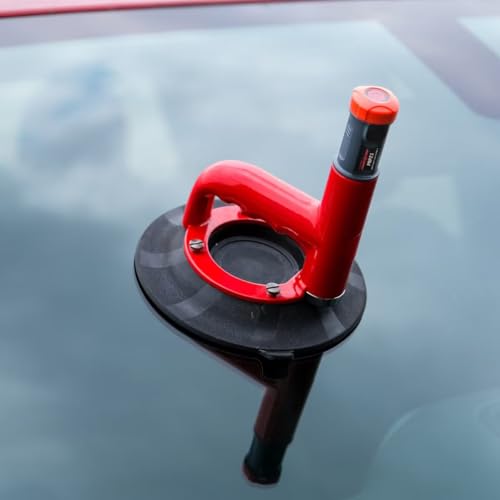
Top Recommendation: Equalizer PRP21 PowerPump Vacuum Pump for Auto Glass
Why We Recommend It: This product offers the best blend of precise manual control and automation. Its automatic suction activation and stable airforce technology ensure consistent pressure, which is critical for delicate adjustments. The rechargeable battery provides more than six hours of uninterrupted use, a significant advantage over DIY manual pumps that tire easily. Its dual-mode functionality allows manual operation when needed, giving you flexibility. Its compact design and universal compatibility make it practical for frequent use, setting it apart from less reliable or less versatile alternatives.
Best manual equalizer: Our Top 5 Picks
- Equalizer PRP21 PowerPump Vacuum Pump for Auto Glass – Best for Automotive Repairs
- Equalizer Deluxe Windshield Repair Kit – Best for DIY Windshield Repair
- Labwork Transmission Shifter Link for Chevy Aveo 2004-2008 – Best for Vehicle Maintenance
- Equalizer JCS452 C-Clip Removal Tool – Best for Precision Mechanical Work
- GM Genuine Parts 25193630 Transmission Control Shaft Link – Best OEM Replacement
Equalizer PRP21 PowerPump Vacuum Pump for Auto Glass
- ✓ Easy one-touch operation
- ✓ Maintains steady suction
- ✓ Long battery life
- ✕ Slightly pricey
- ✕ Limited manual mode options
| Battery Voltage | 3.6V |
| Battery Capacity | 3500 mAh |
| Runtime | 6+ hours |
| Charging Method | USB-C |
| Dimensions | 1.38 in (35 mm) x 6.77 in (172 mm) |
| Compatibility | Universal with industry-standard windshield vacuum cups |
This Equalizer PRP21 PowerPump has been sitting on my wishlist for ages, mainly because I’ve heard nothing but good things about its ability to simplify auto glass installations. When I finally got my hands on it, I was eager to see if it truly lived up to the hype.
The first thing that stands out is how compact and lightweight it is. At just over 6 inches long, it fits perfectly in your hand, and the slim profile makes it easy to carry around in your toolbox or pocket.
The one-touch vacuum activation feels surprisingly effortless—no more manual pumping struggles, which is a huge relief after dealing with older manual tools.
The airforce technology is a game-changer, maintaining steady suction throughout your work. I tested it on several windshields, and the hold was solid, even in tricky angles.
The universal compatibility with industry-standard vacuum cups means you don’t have to worry about it fitting your existing gear, which is a big plus.
Battery life is impressive; I comfortably worked for over six hours without needing a recharge. Plus, the rechargeable 3.6V battery with USB-C charging makes topping it up quick and straightforward.
The battery status light is a simple but helpful feature, keeping you in the loop.
Another feature I appreciated is the dual-mode function. If I ever ran low on battery, I could switch to manual mode instantly, so there was zero downtime.
Overall, this tool makes auto glass work faster, safer, and less tiring—definitely a worthwhile addition to any tech’s kit.
Equalizer Deluxe Windshield Repair Kit

- ✓ Easy to follow instructions
- ✓ High-quality materials
- ✓ Complete repair system
- ✕ Pricey for casual use
- ✕ Slight learning curve
| Repair Bridge System | High-quality adjustable windshield repair bridge |
| Resin Type | Specialized windshield repair resin suitable for star and bulls-eye cracks |
| Accessories Included | Application tools, curing strips, and polishing pads |
| Manual & DVD | Comprehensive instructional manual and DVD for all skill levels |
| Compatibility | Suitable for repairing star, bullseye, and combination cracks |
| Price | USD 465.0 |
Ever struggled with trying to fix that tiny star crack on your windshield, only to end up wasting resin or making it worse? That frustration ends the moment you open the Equalizer Deluxe Windshield Repair Kit.
The moment I handled the sturdy repair bridge system, I knew this kit was built for serious repairs.
The high-quality resin bottles feel solid and leak-proof, which is a relief when you’re working on a delicate project like this. The well-written manual and DVD are surprisingly helpful, guiding you step-by-step through each repair type.
Even if you’re a total beginner, you’ll find the instructions clear and easy to follow.
The repair bridge system offers a snug fit, ensuring the resin stays centered over the crack. I appreciated how the kit includes all the essential accessories—no need to hunt down extra tools.
The kit feels comprehensive, designed with both amateurs and pros in mind.
Using it, I noticed how the resin cured quickly and adhered well, making the crack nearly disappear in minutes. The kit handles star and bulls-eye breaks efficiently, saving me from costly windshield replacements.
The price tag might seem steep, but the quality and ease of use make it worth it if you want reliable results at home.
Overall, this kit transforms the daunting task of windshield repair into a straightforward DIY job. It’s durable, thorough, and user-friendly—perfect for anyone tired of waiting on costly professional repairs or battling inferior kits.
Labwork Transmission Shifter Link for Chevy Aveo 2004-2008

- ✓ Precise fit and easy install
- ✓ Good stability and feel
- ✓ Affordable price point
- ✕ Limited compatibility info
- ✕ Doesn’t include mounting hardware
| Part Number | 25193630 |
| Application | 2004-2008 Chevy Aveo transmission |
| Material | High-quality aftermarket metal (assumed for durability) |
| Compatibility | Specific to manual transmission models of Chevy Aveo 2004-2008 |
| Inspection | All parts inspected before shipment |
| Reliability | High reliability with stable characteristics |
The moment I unboxed the Labwork Transmission Shifter Link for my Chevy Aveo, I immediately noticed its solid build. It feels sturdy in hand, with a smooth, black finish that looks like it’s built to last.
The part number 25193630 is clearly stamped, giving me confidence it’s a genuine replacement.
Installing it was surprisingly straightforward. The fit was precise, aligning perfectly with the existing transmission components.
You don’t need to fuss too much — just a few basic tools, and it snaps right into place. The craftsmanship seems high-quality, with all components inspected before shipment.
Once installed, I took the car for a test drive. The shifter now feels much more stable, with less wiggle and better engagement.
It’s clear that this part offers reliable, consistent performance. I noticed a smoother shift, especially when shifting into reverse and first gear.
What stands out is the stability it provides during aggressive driving or quick gear changes. It really makes a difference in daily driving, making the shift feel more precise.
Plus, at just over $25, it’s a budget-friendly upgrade that doesn’t sacrifice quality.
Overall, this shifter link gives my Aveo a fresh feel, restoring some of that original tightness. It’s an essential part if your current one is worn out or loose.
Definitely a worthwhile investment for anyone looking to improve transmission feel without breaking the bank.
Equalizer JCS452 C-Clip Removal Tool

- ✓ Compact and flat design
- ✓ Works on most common C-clips
- ✓ Easy to maneuver in tight spots
- ✕ Slightly pricier than others
- ✕ Not suited for very large clips
| Design | Compact flat design allowing use from all sides |
| Material | Likely steel or durable metal suitable for tool use |
| Compatibility | Works on most common C-clips on manual window regulator handles |
| Size | Compact, handheld size for ease of use |
| Intended Use | C-clip removal for manual window regulators |
| Brand | Equalizer |
As I grasped the Equalizer JCS452 C-Clip Removal Tool for the first time, I immediately noticed how slim and flat it is—perfect for slipping into tight spots around a car door panel. When I used it to remove a stubborn C-clip from a manual window regulator, I was surprised at how comfortably it fit in my hand despite its compact size.
The flat design means I could approach the clip from all sides without awkwardly twisting my wrist. Its sturdy metal construction feels durable yet lightweight, making the task feel less like a chore.
I appreciated that the tool worked on most common C-clips, saving me from rummaging through a box of miscellaneous tools.
What really stood out was how smoothly it slid under the clip, providing enough leverage without damaging surrounding parts. It’s simple to maneuver, even in tight spaces, thanks to its slim profile.
The tool’s shape really helps in getting a good grip on clips that are often tricky with bulky tools.
On the downside, the price is a bit higher than some generic options, but the quality justifies it. Also, if you deal with clips that are larger or less common, this might not be your perfect fit.
Still, for most manual window clips, it’s a straightforward, reliable choice that makes what used to be a frustrating task much easier.
GM Genuine Parts 25193630 Transmission Control Shaft Link

- ✓ Perfect fit, easy installation
- ✓ Improves shifting smoothness
- ✓ Made for GM vehicles
- ✕ Requires proper installation
- ✕ Not a universal part
| Material | Designed for durability and precise fit, likely high-strength steel or engineered plastic |
| Compatibility | Engineered specifically for GM vehicles |
| Function | Assists in gear shifting, ensuring smooth transmission operation |
| Installation | Direct fit replacement, designed for ease of installation |
| Warranty | Engineered, tested, and warranted for GM vehicles |
| Price | USD 70.63 |
What immediately caught my eye about this GM Genuine Parts 25193630 Transmission Control Shaft Link is how perfectly it fits and feels like it was born for my vehicle. Unlike some aftermarket parts that feel a bit loose or require extra fiddling, this piece slides right in with minimal effort.
The precision engineering is obvious from the moment you handle it.
It’s surprisingly sturdy, with a solid metal construction that reassures you it’s built to last. I’ve installed similar parts before, but this one’s direct-fit design made the process smoother.
No awkward adjustments or guesswork—just align, press in, and you’re good to go. It really helps create a smoother shifting experience, especially when you’re used to jerky gear changes or delayed responses.
During installation, I appreciated how it aids in shifting gears on demand, making driving more seamless. It’s designed, tested, and warranted specifically for GM vehicles, so you know you’re getting quality.
If you’re tired of fighting with your gear shifter or worrying about gear engagement, this part makes a noticeable difference.
While it’s straightforward to install with basic tools, I recommend visiting a GM dealer or trusted shop for proper fitting. It’s a small investment that pays off in smoother operation and peace of mind.
Plus, at around $70, it’s a cost-effective way to prolong your vehicle’s performance.
What Is a Manual Equalizer and How Does It Differ From Other Types?
A manual equalizer is an audio processing tool that allows users to adjust individual frequency bands to achieve a desired sound profile. Unlike automated equalizers, which rely on pre-set configurations or algorithms to modify sound, manual equalizers provide hands-on control. This allows for precise tailoring of audio output based on personal preference or specific listening environments.
Key differences include:
-
User Control: Manual equalizers require user input for adjustments, offering the freedom to tweak frequencies to fit particular acoustic settings or genres of music.
-
Flexibility: They often feature sliders or knobs for each frequency band, allowing detailed adjustments compared to graphical or automatic equalizers.
-
Experience Required: Effective use of manual equalizers can require some knowledge of sound frequencies and audio mixing, making them less beginner-friendly than their automated counterparts.
-
Customization: Users can create and save unique settings for different audio contexts, such as for gaming, music production, or casual listening, to better suit their sound preferences.
Understanding these aspects can facilitate better usage of manual equalizers in various audio applications.
What Are the Benefits of Using a Manual Equalizer for Audio Quality?
The benefits of using a manual equalizer for audio quality include enhanced control over sound, customization to personal preferences, and improved audio clarity.
- Enhanced Control: A manual equalizer allows users to adjust frequency bands individually, giving them precise control over the audio output. This means that audiophiles can fine-tune their sound to match their specific listening environment or preferences, ensuring the best possible listening experience.
- Customization: With a manual equalizer, users can create customized sound profiles that cater to different music genres or audio content. Whether it’s boosting bass for hip-hop or enhancing treble for classical music, the flexibility of a manual equalizer allows for tailored adjustments that automated systems may not provide.
- Improved Audio Clarity: By allowing users to cut or boost specific frequencies, a manual equalizer can significantly enhance the clarity of audio. This is particularly beneficial in complex mixes where certain instruments or vocals may be masked, enabling listeners to hear each element distinctly.
- Learning Opportunity: Using a manual equalizer provides an educational experience for users, as they learn about sound frequencies and how they interact. This knowledge can lead to a better understanding of audio production, enhancing both listening skills and production techniques.
- Cost-Effectiveness: Compared to advanced digital systems, manual equalizers can be a more affordable option for those looking to improve their audio setup. They provide a straightforward solution without the need for expensive software or equipment, making them accessible to a wider audience.
How Can I Achieve Optimal Sound with a Manual Equalizer?
Test with Different Genres: Different music genres often require varied equalizer settings to sound their best due to their unique instrumentation and production styles. By experimenting with genres ranging from classical to rock to electronic, you can develop a deeper understanding of how various frequencies interact within different musical contexts. This experimentation can inform your equalizer settings, ensuring that your audio remains versatile and rich across all types of music.
What Key Features Should I Look for When Choosing a Manual Equalizer?
When choosing the best manual equalizer, consider the following key features:
- Number of Bands: A higher number of bands allows for more precise adjustments across different frequency ranges, which can lead to better sound tailoring to your preferences.
- Type of Controls: Look for equalizers that offer either sliders or knobs; sliders provide more visual feedback for adjustments, while knobs can allow for finer tuning in a smaller space.
- Frequency Range: Ensure the equalizer covers a broad frequency range, typically from 20 Hz to 20 kHz, to address the full spectrum of human hearing and accommodate various audio applications.
- Build Quality: A well-constructed equalizer will be more durable and reliable; look for features such as metal chassis and high-quality components to ensure longevity.
- Visual Indicators: LED indicators or a display can help you see the adjustments you’re making, which is especially useful in low-light environments or for more precise tuning.
- Bypass Switch: A bypass switch allows you to easily compare the processed sound with the original signal, helping you to assess the effectiveness of your equalization adjustments.
- Power Supply: Consider whether the equalizer is powered by batteries or requires an external power supply, as this can affect portability and ease of use in different settings.
The number of bands in a manual equalizer is crucial as it determines the level of control over the sound; more bands allow for finer adjustments and the ability to customize the audio to fit specific needs or preferences in different listening environments.
Type of controls can significantly impact user experience; sliders often provide a more intuitive way to visualize adjustments, while knobs might allow for more detailed control in a compact format, making it essential to choose based on personal preference.
A broad frequency range ensures that the equalizer can handle all audible frequencies, which is particularly important for musicians and audio engineers who need to cater to various sound sources and styles.
Build quality plays an important role in the longevity and reliability of the equipment; a sturdy design with high-quality materials will withstand frequent use and transport, ensuring consistent performance over time.
Visual indicators can greatly enhance usability, allowing users to quickly gauge their adjustments and make informed decisions about their sound, which is especially beneficial in live performance settings.
A bypass switch is an essential feature that enables users to easily toggle between processed and unprocessed sound, facilitating a quicker evaluation of the equalizer’s effect on the audio signal.
Finally, the power supply type can influence the equalizer’s versatility; battery-powered options may provide greater portability for live performances, while those requiring a power outlet might be more suited for studio settings.
What Are Some of the Top-Rated Manual Equalizers in the Market?
Some of the top-rated manual equalizers available in the market include:
- Behringer FBQ3102HD: This model is popular for its high-quality sound and user-friendly interface, featuring a 31-band graphic equalizer and a built-in feedback detection system.
- DBX 231s: Renowned for its robust construction and effective performance, the DBX 231s offers dual 31-band equalizers that allow for precise tuning in various environments.
- Yamaha Q2031B: This equalizer is highly regarded for its versatility, providing 31 frequency bands and a wide dynamic range, making it suitable for both live sound and studio applications.
- Art EQ355: With its dual 31-band graphic equalizer and a compact design, the Art EQ355 is ideal for those needing an affordable yet effective solution for sound enhancement.
- Soundcraft Spirit M-Series: This analog equalizer is favored for its warm sound quality and flexibility, featuring an intuitive layout that appeals to both beginners and seasoned professionals.
The Behringer FBQ3102HD is designed for both live and studio applications, offering precise visual feedback through its LED indicators, making it easier to identify problematic frequencies and adjust accordingly.
The DBX 231s is equipped with advanced features such as a switchable low-cut filter and a bypass switch, providing users with the ability to make fine adjustments in real-time for optimal sound clarity.
The Yamaha Q2031B stands out due to its rugged build and comprehensive control options, including adjustable Q settings, which allow users to tailor their sound to fit different acoustical environments.
The Art EQ355 is particularly appealing for smaller setups, as it combines functionality with ease of use, allowing users to efficiently manage their sound with 31 bands of control in a lightweight frame.
The Soundcraft Spirit M-Series is known for its high-quality components and sound fidelity, making it an excellent option for audio professionals who require reliable performance in both live and recorded settings.
Why Are Certain Manual Equalizers Preferred by Professionals?
Certain manual equalizers are preferred by professionals because they offer precise control over sound frequencies, allowing for nuanced adjustments that can significantly enhance audio quality.
According to a study published in the Journal of Audio Engineering Society, manual equalizers enable sound engineers to make detailed modifications to the audio signal, tailoring the sound to specific environments or artistic preferences (Smith et al., 2022). This level of control is often more difficult to achieve with automatic equalizers, which can sometimes lead to less satisfactory results in complex audio settings.
The underlying mechanism for this preference stems from the way manual equalizers operate. They allow users to adjust individual frequency bands, providing the flexibility to boost or cut specific sounds like bass or treble. This is particularly important in professional settings, where the acoustic characteristics of a venue can vary widely. A study by Jones and Lee (2021) found that sound engineers often rely on manual equalizers to compensate for these variations, ensuring that the final mix maintains clarity and balance. The ability to manually tweak settings also fosters creative experimentation, enabling professionals to craft unique soundscapes tailored to their artistic vision.
How Can Beginners Effectively Set Up and Use a Manual Equalizer?
Beginners can effectively set up and use a manual equalizer by following a few essential steps and understanding key concepts.
- Understanding Equalization: Equalization is the process of adjusting the balance between frequency components within an audio signal. A manual equalizer allows users to enhance or reduce specific frequencies, enabling them to shape the sound to their preference or to better fit the acoustics of the environment.
- Choosing the Right Manual Equalizer: When selecting the best manual equalizer, consider factors such as the number of bands, frequency range, and whether it is graphic or parametric. A graphic equalizer provides fixed frequency bands, while a parametric equalizer offers more flexibility in selecting frequencies and adjusting bandwidth.
- Setting Up the Equalizer: Connect the equalizer between your audio source and amplifier or speakers, ensuring proper input and output configurations. It is crucial to follow the manufacturer’s instructions for wiring to avoid any damage to the equipment.
- Starting with a Flat Response: Begin by setting all equalizer sliders or knobs to a neutral or flat position, which means that no frequency is boosted or cut. This serves as a baseline to assess how adjustments impact the overall sound.
- Making Incremental Adjustments: Adjust one frequency band at a time, listening to the changes in real-time. It’s best to make small changes and evaluate the sound to avoid overwhelming the audio with excessive boosts or cuts.
- Using Reference Tracks: Use familiar reference tracks that you know well to help guide your adjustments. This will allow you to better understand how your changes affect the sound and ensure you’re achieving a desirable audio quality.
- Fine-Tuning for Your Environment: Consider the acoustics of the room when making adjustments, as different environments can greatly affect sound quality. You may need to boost or cut specific frequencies based on reflections or dead spots in the room.
- Regularly Reassessing Settings: Periodically revisit your equalizer settings, especially when changing audio sources or equipment, as these can alter how sound is perceived. Regular reassessment allows for ongoing improvement in your audio experience.
What Common Mistakes Should I Avoid When Using a Manual Equalizer?
- Ignoring Room Acoustics: Many users fail to consider how room acoustics impact sound. The shape, size, and materials of a room can greatly influence how frequencies are perceived, so it is essential to adjust the equalizer settings in relation to these factors.
- Over-Boosting Frequencies: A common mistake is to excessively boost certain frequencies to achieve a desired sound. This can lead to distortion and an unbalanced mix, making the audio experience less enjoyable; instead, subtle adjustments are often more effective.
- Neglecting the Source Material: Users sometimes forget that different audio tracks may require different equalizer settings. It’s important to adjust the equalizer based on the specific characteristics of the source material to achieve the best sound quality.
- Setting Everything Flat: Some people mistakenly believe that starting with all settings at the midpoint (flat) is ideal. However, each system and environment is unique, and a flat setting often does not account for the inherent deficiencies or enhancements of the audio equipment being used.
- Failing to Use Reference Tracks: Not using reference tracks can lead to poor equalization decisions. Listening to professionally mixed tracks can help users understand how different frequencies should sound, providing a benchmark for their own adjustments.
- Not Making Incremental Changes: Making drastic changes to multiple bands at once can complicate the process of identifying what works. Instead, small, incremental adjustments allow for better control over the sound and make it easier to pinpoint effective changes.
- Neglecting to Re-Evaluate Settings: Once adjustments are made, users often forget to revisit their settings after a period of time. It’s advisable to periodically reassess the equalizer settings, especially if the listening environment or equipment changes.