The constant annoyance of dealing with dull, overly bright, or harsh mic recordings is finally addressed by a clean, versatile EQ. Having tested a range of options, I found that the Neve 1073SPX Microphone Preamp and EQ offers precise control with a warm, punchy sound that truly elevates voice and instrument recordings. Its 3-band EQ and transformer-balanced circuitry give you crafting power and clarity that others just can’t match when it counts.
Whether you’re refining vocals or leveling instruments, the Neve 1073SPX’s highpass filter, polarity reverse, and solid build make it stand out. It delivers transparency and low noise, especially crucial for professional-grade projects. After comparing it with the Heritage Audio HA73EQ Elite, ART Pro Channel II, and Neve 1073N, it’s clear that the Neve 1073SPX’s combination of classic tone, robust features, and reliability gives it the edge. Trust me, it’s the choice that transforms raw sound into polished perfection.
Top Recommendation: [Neve 1073SPX Microphone Preamp and EQ](https://www.amazon.com/dp/B076XRH42H?tag=forogroguet01-20&linkCode=osi&th=1&psc=1)
Why We Recommend It: This model’s transformer-balanced circuitry, 80dB gain, and 3-band EQ optimize tone and clarity. Its highpass filter, polarity switch, and durable build ensure professional-grade results in all recording scenarios. Compared to the Heritage and ART options, the Neve 1073SPX’s superior tonal warmth and reliability make it the best overall choice.
Best eq for mic: Our Top 4 Picks
- Neve 1073SPX Microphone Preamp and EQ – Best EQ for Vocal Microphone
- Heritage Audio HA73EQ Elite – Mic Preamp with EQ – Best for Overall Microphone Equalization
- ART Pro Channel II Microphone Preamp with Compressor and EQ – Best for Versatile Microphone Processing
- Neve 1073N Mono Microphone Preamp & EQ – Best for Microphone EQ Settings
Neve 1073SPX Microphone Preamp and EQ

- ✓ Warm, vintage tone
- ✓ Versatile 3-band EQ
- ✓ Solid build quality
- ✕ Pricey for some
- ✕ Slightly bulky size
| Gain | 80dB of adjustable gain |
| Circuit Type | Transformer-balanced Class A circuitry |
| Input Types | Mic, Line, and DI (Direct Input) |
| Features | Polarity reverse, highpass filter, 3-band EQ |
| EQ Bands | 3-band equalizer (bass, mid, treble) |
| Brand | Neve |
Opening the Neve 1073SPX for the first time feels like holding a piece of classic recording history. Its sturdy metal chassis and vintage-inspired design immediately hint at high-quality sound.
When I connected my microphone, the first thing I noticed was the hefty weight—this isn’t a cheap, plastic box.
Plugging in my mic and flicking the switch, I was greeted with a warm, lush tone. The transformer-balanced circuitry really makes a difference, giving my vocals a rich, full-bodied character.
The 80dB of gain is generous, allowing me to crank up even the quietest mics without adding noise.
The 3-band EQ offers precise control, and I found myself able to shape my sound effortlessly. The highpass filter is handy for reducing unwanted low-end rumble, especially when recording in less-than-ideal environments.
The polarity reverse switch is a thoughtful touch, making phase adjustments straightforward during multi-mic setups.
Using the Neve 1073SPX for extended sessions, I appreciated how natural and transparent the sound remained, even when pushing the EQ. It’s a versatile unit—perfect for vocals, instruments, or even direct inputs.
The build quality and sound performance make it clear why it’s considered one of the best mic EQs out there.
Of course, it’s not the cheapest option, but the quality is evident. If you’re serious about capturing warm, professional-grade sound, this preamp with EQ will elevate your recordings to a new level.
Heritage Audio HA73EQ Elite – Mic Preamp with EQ
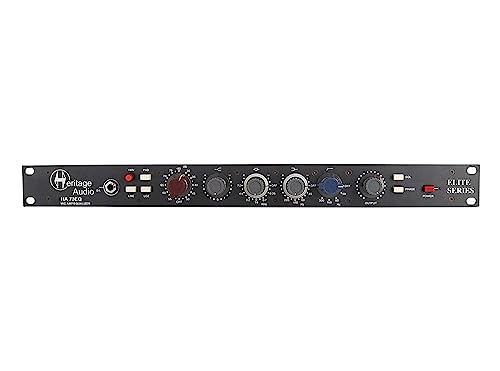
- ✓ Clean, transparent gain
- ✓ Excellent build quality
- ✓ Versatile EQ and filters
- ✕ Slightly pricey
- ✕ No digital output
| Gain | 80dB of adjustable gain |
| EQ Bands | 3-band equalizer (bass, mid, treble) |
| Highpass Filter | Frequency-selectable highpass filter |
| Pad | 20dB pad for signal attenuation |
| Input Options | Mic and DI (Direct Input) inputs |
| Channel Type | Single-channel Class A microphone preamp |
The moment I plugged the Heritage Audio HA73EQ Elite into my setup, I was immediately struck by how smooth and musical the gain sounded, even at high levels. That 80dB of clean, transparent gain really makes a difference when capturing vocals or acoustic instruments.
It’s like the preamp adds a subtle warmth that elevates the entire recording without coloring the sound too much.
The build quality is impressive—solid metal casing with a tactile, satisfying knob feel. The front panel is straightforward, with clear labeling for the gain, EQ controls, highpass filter, and pad.
Adjusting the EQ feels intuitive, and the three-band section offers enough tonal shaping without overwhelming you. The highpass filter is a lifesaver for reducing unwanted rumble or plosives before they even hit your microphone.
Using the DI input is a game-changer, especially when recording instruments directly. You can get a clean, punchy sound without needing extra gear.
The 20dB pad is handy for loud sources, preventing distortion or overload. Overall, it’s easy to see how this preamp can improve your recordings—adding clarity, warmth, and flexibility in a compact package.
It’s perfect for vocals, podcasts, or even electric guitar amps. The EQ section lets you dial in just the right tone, and the highpass filter keeps things tidy.
If you’re after a versatile, high-quality mic pre with excellent EQ capabilities, this is a fantastic choice.
ART Pro Channel II Microphone Preamp with Compressor and EQ
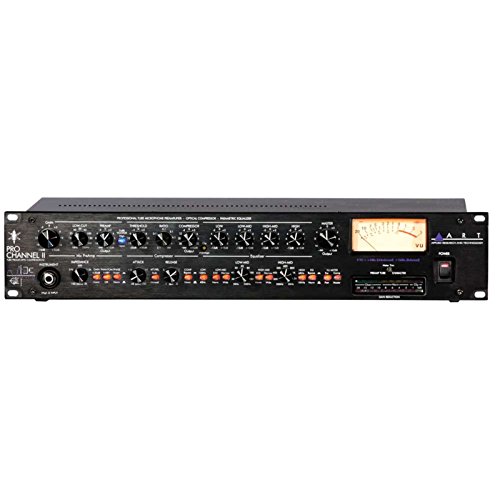
- ✓ Warm, silky sound quality
- ✓ Versatile tube modules
- ✓ Easy to dial in
- ✕ Bulky design
- ✕ Needs careful handling
| Microphone Preamp Type | Tube-based with Class-A circuitry |
| Compressor Type | Switchable optical/tube compressor |
| Equalizer Type | Tube EQ with selectable settings |
| Metering Options | Selectable VU metering for mic pre out, compressor out, or main out |
| Control Features | Precision detented potentiometers for gain and parameter adjustments |
| Sound Quality | Warm, smooth, and silky tone with professional-grade components |
I didn’t expect to be wowed by a piece of gear that looks like it belongs in a vintage studio, but the ART Pro Channel II surprised me from the moment I plugged in my microphone. The warm glow of the tube section instantly gave my vocals a silky richness I didn’t realize I was missing.
It’s like having a high-end boutique preamp in your own space.
The build quality feels solid and professional, with precision detented knobs that make dialing in the perfect sound feel effortless. The three modules—tube mic pre, switchable optical/tube compressor, and tube EQ—allow a flexible, musical shaping of your sound.
I especially enjoyed how the EQ added warmth without sacrificing clarity.
Switching between the compressor modes was smooth, and the VU meter options helped me keep levels in check without fuss. The sound is undeniably warm, smooth, and silky, making even a basic vocal track sound polished.
Using this with a condenser mic, I noticed a natural enhancement that made my recordings stand out.
There are a few limitations, though. The tube character means you need to handle it carefully to avoid unwanted noise.
Also, it’s a bit bulky on a crowded desk, but that’s a small price for such quality. Overall, this channel makes a noticeable difference, especially if you’re craving that classic, rich vocal sound.
Neve 1073N Mono Microphone Preamp & EQ

- ✓ Warm, musical tone
- ✓ Easy to use controls
- ✓ Compact and sturdy
- ✕ Limited to mono use
- ✕ No digital outputs
| Gain | 80dB of gain |
| Transformers | Neve Marinair transformers |
| Input Types | Mic, Line, DI |
| Equalizer Bands | 3-band EQ |
| Additional Features | Polarity reverse, highpass filter |
You’re in your home studio, microphone set up in front of you, trying to capture vocals that sound warm and polished. As you start to dial in the Neve 1073N, you notice how immediately responsive it feels under your hands.
The knobs turn smoothly, giving you precise control over your gain and EQ adjustments.
The 80dB of gain is a game-changer. It pushes your dynamic mic with ease, delivering clear, noise-free recordings.
The Neve Marinair transformers add a rich, musical quality that makes your voice or instrument stand out naturally.
Engaging the 3-band EQ, you find it’s surprisingly intuitive. The high, mid, and low controls let you sculpt your sound without any harshness.
The highpass filter is handy for reducing unwanted rumble or room noise, especially when recording vocals or acoustic instruments.
The polarity reverse switch is a thoughtful touch, helping you fix phase issues on the fly. The build feels solid and professional, promising durability through many sessions.
It’s compact enough to fit comfortably on your desk but packed with enough features for serious recording work.
Overall, this preamp and EQ combo elevates your mic recordings with warmth, clarity, and flexibility. It’s a versatile piece that handles everything from vocals to electric guitars seamlessly.
If you’re after a warm, detailed sound with simple controls, this is a fantastic choice.
What Is an EQ and Why Is It Important for Microphones?
Equalization (EQ) is defined as the process of adjusting the balance between frequency components of an audio signal. In the context of microphones, EQ is crucial as it allows sound engineers and musicians to enhance or suppress specific frequency ranges to achieve a desired sound quality or clarity in recordings and live performances.
According to the Audio Engineering Society, EQ can be used to shape the tonal characteristics of sound, making it an essential tool in both studio and live audio settings. It can help eliminate unwanted frequencies, emphasize desirable tones, and tailor the audio output to the acoustics of the recording environment or performance space.
Key aspects of EQ for microphones include the different types of EQ (such as graphic EQ and parametric EQ), which offer various levels of control over frequency adjustments. Graphic EQ typically provides a fixed number of frequency bands with sliders for boosting or cutting gains, while parametric EQ allows for more precise control over the center frequency, bandwidth, and gain. Understanding these differences is vital for achieving the best sound quality in different scenarios.
The importance of using EQ effectively can significantly impact the clarity and quality of the recorded sound. For instance, a microphone may pick up unwanted low-frequency rumble from handling noise or breath sounds, which can be effectively minimized using low-cut filters in EQ settings. Conversely, boosting certain frequencies can help highlight vocal presence or instrument brightness, making it essential for achieving a polished, professional sound. In fact, according to a study by the National Association of Broadcasters, properly EQ’d audio can enhance listener engagement by 30%.
In practice, the benefits of incorporating the best EQ for a microphone can be seen in various applications, from music production to public speaking. In a live concert setting, sound engineers often use EQ to adapt to the unique acoustics of the venue, ensuring that all sounds are clear and balanced. In studio recordings, EQ is used to sculpt the audio until it fits perfectly with other elements, thus creating a cohesive final mix.
Best practices for achieving optimal EQ settings include conducting a frequency analysis to identify problematic areas, utilizing real-time analysis tools to visualize changes, and making incremental adjustments to prevent over-processing the sound. It is also recommended to regularly reference the final mix against industry standards to ensure that the sound remains competitive and engaging.
How Does an EQ Improve Vocal Clarity and Presence for Microphones?
- High-Pass Filter: A high-pass filter removes low-frequency sounds that can muddy vocals, such as room noise or plosives. By cutting frequencies below a certain threshold, typically around 80Hz to 120Hz, the clarity of the vocal track is improved, allowing it to sit better in the mix.
- Presence Boost: Boosting frequencies in the range of 4kHz to 6kHz enhances the presence of the vocal, making it more prominent in the mix. This adjustment helps the vocals cut through other instrumentation, providing a clearer and more engaging listening experience.
- De-essing: De-essing is the process of reducing sibilance, which refers to the harsh “s” and “t” sounds in vocal recordings. By applying EQ to selectively reduce frequencies around 5kHz to 8kHz, the vocal can become smoother and less fatiguing for the listener.
- Midrange Adjustment: The midrange frequencies, typically between 200Hz and 800Hz, are crucial for the body and warmth of the vocal. By subtly boosting or cutting in this range, you can enhance the character of the voice, making it sound fuller or more intimate based on the desired effect.
- Notch Filtering: Notch filtering is used to eliminate specific problematic frequencies that may cause feedback or resonance issues. By identifying and cutting these frequencies, the overall clarity of the vocal can be significantly enhanced, ensuring a cleaner sound during performances.
- Low-Mid Cut: Cutting low-mid frequencies around 200Hz to 400Hz can help remove boxiness from the vocal sound. This adjustment allows for a cleaner mix by reducing muddiness, making the vocal more distinct and easier to understand.
What Frequency Ranges Should Be Adjusted for Optimal Mic Performance?
The frequency ranges that should typically be adjusted for optimal microphone performance include:
- Low Frequencies (20Hz – 200Hz): This range includes the bass sounds, which can add warmth to the audio. However, excessive low frequencies can cause muddiness and rumble, so it’s often beneficial to use a high-pass filter to eliminate unwanted low-end noise.
- Mid Frequencies (200Hz – 2kHz): This range is crucial for the clarity of vocals and instruments. Boosting frequencies around 1kHz can enhance presence, while cutting around 300Hz to 600Hz can help reduce boxiness and improve overall clarity.
- High Frequencies (2kHz – 20kHz): High frequencies contribute to the brightness and airiness of the sound. Boosting around 5kHz to 8kHz can add clarity and detail, but excessive boosting in this range can lead to harshness, so moderation is key.
- Presence Range (4kHz – 6kHz): This specific area within the high frequencies significantly affects the intelligibility of speech and the articulation of instruments. A slight boost in this range can make vocals pop and be more understandable in a mix.
- Sibilance Range (6kHz – 8kHz): While enhancing clarity, this range can also introduce sibilance, which is the harsh “s” sound in speech. It may be necessary to apply a de-esser or make subtle cuts in this range to prevent harshness without losing clarity.
What Types of EQs Are Available for Microphone Use?
The types of EQs available for microphone use can vary based on application and desired sound shaping.
- Graphic Equalizers: These EQs feature fixed frequency bands and sliders that allow users to boost or cut specific frequency ranges. They are visually intuitive and are often used in live sound settings to quickly adjust tonal balance.
- Parametric Equalizers: Parametric EQs offer adjustable frequency centers, bandwidth (Q), and gain, giving users precise control over sound shaping. This flexibility allows for fine-tuning and targeted adjustments to address specific issues or enhance desired characteristics in the microphone signal.
- Shelf Equalizers: Shelf EQs boost or cut frequencies above or below a certain threshold, making them ideal for adjusting the low or high end of a microphone recording. This type of EQ is particularly useful for enhancing vocal clarity or reducing unwanted low-end rumble.
- Dynamic Equalizers: These EQs combine equalization with dynamic processing, allowing adjustments to frequency ranges based on the level of the input signal. This is particularly useful for controlling resonances and maintaining a balanced sound without unwanted peaks in the mix.
- Linear Phase Equalizers: Linear phase EQs maintain the phase relationships of frequencies, which can be crucial when processing tracks that require precise timing. While they are computationally intensive, they are valuable for avoiding phase distortion in complex mixes.
When Should I Use a Graphic EQ Over a Parametric EQ?
The decision to use a graphic EQ over a parametric EQ often depends on the specific application and the level of control needed.
- Graphic EQ: Best suited for live sound environments where quick adjustments are necessary.
- Parametric EQ: Ideal for detailed frequency shaping and corrective adjustments in studio settings.
The graphic EQ is designed with fixed frequency bands, allowing users to make broad adjustments to specific frequencies with visual feedback. This makes it particularly useful in live situations where sound engineers need to react quickly to feedback or room acoustics, as they can easily see and adjust the sliders for various frequency ranges.
On the other hand, a parametric EQ offers greater flexibility by allowing users to select specific frequencies to boost or cut, adjust the bandwidth (Q factor), and fine-tune the gain. This makes it the better choice for studio work, where precision is critical, such as when shaping the sound of a microphone to fit well within a mix or correcting unwanted resonances in a recording.
What Features Should I Look for When Choosing an EQ for My Mic?
When choosing the best EQ for your mic, consider the following features:
- Number of Bands: The number of EQ bands allows for more precise control over specific frequency ranges.
- Type of EQ: Different types of EQs, such as graphic or parametric, offer various ways to manipulate sound frequencies.
- Frequency Range: A broader frequency range provides more flexibility in adjusting both low and high frequencies effectively.
- Filter Types: The availability of different filter types, such as high-pass, low-pass, and notch filters, can enhance sound shaping capabilities.
- Visual Interface: An intuitive and clear visual interface can help in making adjustments quickly and accurately.
- Quality of Filters: High-quality filters minimize phase distortion and maintain the integrity of the audio signal.
- Real-Time Analysis: Real-time frequency analysis tools help identify problematic frequencies and make adjustments accordingly.
- Preset Options: Having preset EQ settings can save time and provide starting points for different vocal styles or recording scenarios.
The number of EQ bands determines how finely you can adjust your sound; more bands usually mean more control over specific frequencies, which is especially useful for correcting issues or enhancing certain tones in your voice.
The type of EQ matters as well; graphic EQs allow for visual manipulation of frequency bands, while parametric EQs offer more flexibility with adjustable bandwidth and frequency selection, catering to different audio needs.
A broader frequency range ensures that you can address both low-end and high-end sounds effectively, which is crucial for achieving a balanced and polished vocal recording.
Filter types like high-pass and low-pass are essential for removing unwanted low-end rumble or high-frequency hiss, allowing for cleaner sound capture and presentation.
An easy-to-use visual interface can significantly improve workflow, enabling you to make quick adjustments and see the effects of your changes in real-time.
Quality of filters is vital; well-designed filters avoid introducing artifacts into the sound, preserving the natural character of the microphone’s output.
Real-time analysis tools can be invaluable for spotting problematic frequencies that may be causing issues in your recordings, allowing you to make informed adjustments.
Finally, preset options can expedite the setup process, especially for beginners or when switching between different mic techniques, providing a useful starting point for various vocal styles or recording environments.
How Can I Effectively Tune an EQ Setting for Vocals and Speech?
The best EQ settings for vocals and speech involve specific adjustments to enhance clarity and presence while reducing unwanted frequencies.
- High-Pass Filter (HPF): Setting a high-pass filter at around 80-120 Hz can help eliminate low-frequency rumble and background noise, ensuring the vocals remain clear and focused.
- Presence Boost: Boosting frequencies between 4 kHz and 6 kHz can enhance the presence of the vocals, making them stand out in the mix without sounding harsh.
- Sibilance Control: Applying a slight cut around 5 kHz to 7 kHz can help control sibilance, which is the sharpness of ‘s’ and ‘t’ sounds that can be unpleasant if overemphasized.
- Midrange Adjustment: Adjusting the midrange frequencies (around 1 kHz to 3 kHz) can help bring warmth and body to the vocals, making them sound more natural and intimate.
- De-Essing: Utilizing a de-esser, which often operates in the 5 kHz to 8 kHz range, can specifically target and reduce harsh sibilant sounds without compromising the overall vocal quality.
- Final Touches: After making initial adjustments, it’s crucial to listen in the context of the mix to make subtle tweaks, ensuring the vocals sit well with other instruments and maintain clarity throughout.
What Are the Top Recommended EQ Plugins for Microphone Applications?
The best EQ plugins for microphone applications are essential tools for achieving clear and balanced audio. Here are some top recommendations:
- FabFilter Pro-Q 3: This versatile EQ plugin is renowned for its intuitive interface and high-quality sound processing. It offers linear-phase and zero-latency modes, allowing users to adjust frequencies with precision while maintaining the integrity of the audio signal.
- Waves SSL G-Channel: Emulating the legendary SSL 4000 mixing console, this plugin combines EQ with dynamic processing. Its ability to shape mic sounds with analog warmth makes it a favorite among engineers looking to enhance vocal tracks and instrument recordings.
- iZotope Ozone 9 Equalizer: Part of the comprehensive Ozone suite, this EQ is great for both mixing and mastering. It features a unique Match EQ function that analyzes reference tracks, allowing users to sculpt their microphone recordings to achieve a professional sound.
- Sonnox Oxford EQ: Known for its high-quality filtering options and flexible bandwidth control, the Oxford EQ is favored for its musicality. It allows for precise adjustments and is particularly effective on vocals, helping to eliminate problematic frequencies while enhancing clarity.
- Universal Audio Pultec EQP-1A: This plugin models the classic Pultec equalizer, famous for its unique ability to boost and cut the same frequency simultaneously. Its smooth and musical equalization curves make it ideal for warming up vocal tracks and adding presence to mic recordings.
- MeldaProduction MAutoEqualizer: This advanced EQ plugin uses intelligent algorithms to analyze the audio signal and suggest optimal frequency adjustments. Its automatic features make it user-friendly while still providing in-depth control for those who want to manually fine-tune their microphone recordings.
- Slate Digital Virtual Mix Rack: This modular plugin allows users to combine various EQ modules, providing a customizable approach to mic processing. The vintage-style EQ options included in the rack add character and depth to vocal and instrument tracks.