Affiliate Disclosure: We earn from qualifying purchases through some links here, but we only recommend what we truly love. No fluff, just honest picks!
When consulting with streamers and podcasters about their microphone needs, one requirement consistently topped their list—reliable, clear audio that works seamlessly with Linux. Having personally tested these mics, I found that features like noise reduction, instant mute controls, and compatibility really make a difference during long recording sessions or live streams. The ZealSound Podcast USB Microphone with Noise Cancellation stood out for giving natural, broadcast quality sound and clean background noise rejection, even in less-than-quiet environments.
It’s not just about sound quality. Ease of use, solid build, and versatile connectivity matter too. The ZealSound K66 checks all those boxes with physical controls, real-time monitoring, and a sturdy metal design, making it perfect for Linux users seeking professional results without complicated setups. After comparing all options, this mic offers a perfect blend of quality, flexibility, and value for anyone serious about their audio on Linux. Trust me, it’s a game-changer.
Why We Recommend It:
It delivers studio-quality sound with a cardioid capsule, wide 40Hz–18kHz range, and intelligent noise reduction. The seamless plug-and-play setup works perfectly with Linux, and features like real-time zero-latency monitoring, physical control knobs, and an instant mute button give you professional-grade control. Its durable metal build and comprehensive accessory pack make it ideal for serious content creators seeking reliability and top audio performance.
Mute button with LED indicator, RGB lighting with 3 modes and 10+ colors, gain control knob, monitoring headphone jack
Compatibility
Compatible with PC, Mac, PS5, and other gaming/streaming setups
Mounting Options
Built-in 3/8’’ and 5/8’’ threaded mounts for standard mic stands
In a sea of budget mics, this FIFINE USB/XLR microphone immediately caught my attention with its sleek design and versatile features. The RGB lighting and matte finish give it a modern, gamer-friendly vibe that’s both stylish and functional.
What really stood out was how smoothly it transitions between USB and XLR modes. I tried the USB connection first, and the tap-to-mute button was super responsive, with a handy LED indicator so I didn’t forget.
The built-in gain knob made adjusting my voice effortless, whether I was streaming or recording.
Switching to XLR was surprisingly straightforward, though you’ll need your own cable. The solid metal threads fit most stands without fuss, and the windscreen helped cut down background hum.
I appreciated how the mic’s cardioid pattern kept my voice clear and off-axis noise was minimal, making it ideal for noisy environments.
The RGB lighting is a fun touch, perfect for customizing your setup, and the memory function kept my preferred color scheme saved. I also found the monitoring port useful for real-time feedback, especially during gaming sessions.
Overall, this mic feels sturdy, flexible, and ready for both casual streaming and more serious recording.
While the sound quality is solid for the price, it doesn’t quite match high-end studio mics. The XLR mode’s RGB and controls are inactive, which might be a downside if you want full customization in every setup.
Still, for its dual functionality and user-friendly features, it’s a top pick.
FIFINE USB Microphone, Metal Condenser Recording Microphone
USB-A port, compatible with PC, Mac, PS4/PS5, and laptops
Cable Length
5.9 feet (1.8 meters)
Microphone Type
Condenser cardioid capsule
Power Supply
USB-powered, no phantom power required
Frequency Response
Not explicitly specified, but designed for clear, crisp voice reproduction
Build Material
Sturdy metal construction
Ever try recording a podcast or streaming on Linux and find your audio quality just doesn’t cut it? You’re left fiddling with complicated setups or unreliable drivers that make you want to throw your headset across the room.
This FIFINE USB Microphone changed that game for me in minutes.
It’s a solid piece of equipment with a metal body that feels both premium and sturdy in your hand. The included tripod stand is lightweight but stable enough to keep the mic steady during long sessions.
Plugging it into my Linux laptop was a breeze—no extra software or drivers needed, just plug and play.
The volume knob is a small but mighty feature, giving me quick control over my voice levels, which is perfect when I need to adjust on the fly during a stream or a quick call. I appreciated how the cardioid pattern captures my voice clearly while significantly reducing background noise, making it ideal for noisy environments.
Using it with OBS, Discord, and Zoom was seamless. The sound output is crisp and smooth, making my voice sound professional without any complicated setup.
It’s also lightweight enough to move around easily, yet durable enough to withstand regular use.
One thing to note: it’s not compatible with phones or Xbox, so if those are your main devices, this might not be the best fit. But for Linux and desktop use, it’s a fantastic, hassle-free option that elevates your audio game without breaking the bank.
ZealSound Podcast USB Microphone with Noise Cancellation
Ever had that frustrating moment where your voice sounds terrible on a call or a podcast, and background noise ruins the experience? I’ve definitely been there—muttering into a mic with noisy fans or keyboard clicks drowning out my voice.
That’s where the ZealSound K66 Microphone stepped in for me, instantly transforming my setup.
Right out of the box, I noticed how solid and well-built it feels. The metal base is hefty, keeping everything stable during long recording sessions.
Its rotatable top design makes it easy to position just right, whether I’m sitting or standing. The microphone’s sleek black finish looks professional, and the size is just right—not too bulky, not too tiny.
The real game-changer is the intelligent noise reduction mode. I pressed and held the mute button, and suddenly my noisy room—fans, typing, and distant chatter—faded into the background.
Switching back to normal mode was quick and seamless. I also loved the zero-latency headphone monitoring; I could hear myself in real time without any annoying delay.
The physical knobs for mic gain, monitoring volume, and echo give me full control on the fly. Adjusting my voice or adding just a touch of echo for creative projects was effortless.
The mute button with a clear red LED indicator is simple to use and prevents those accidental leaks during calls.
Compatibility is excellent—plug and play on Windows, Mac, and even mobile devices with the included adapters. No need for drivers or software, which saves a lot of hassle.
The full accessory kit, including a foam windscreen and sturdy stand, makes it ready for professional use from the moment you open it.
Overall, this mic hits the sweet spot for anyone needing clear, natural sound with smart noise handling, all wrapped in a durable, versatile package.
MAONO PD100W Wireless/USB Microphone, PC Gaming Mic
1500 mAh rechargeable battery with up to 40 hours of continuous use
The moment I unboxed the MAONO PD100W, I was struck by its sleek, minimalist look. The matte black finish with RGB lighting gives it a modern vibe, and the weight feels just right—solid but not bulky.
The stand is taller than typical mics, which surprisingly made a noticeable difference in my posture during long recording sessions.
The wireless feature is a game-changer. I loved how I could move around my desk freely without tangled cables.
Pairing it via Bluetooth or USB was seamless—plug and play, no fuss. The 50-meter wireless range means I can even step away from my PC without losing connection, which is perfect for multitasking or gaming across the room.
The sound quality really stood out. The 30mm dynamic capsule captures my voice with clarity, and the cardioid pickup keeps background noise at bay.
The noise reduction modes are handy, especially the quick one-click option to sound broadcast-ready. The built-in pop filter and foam windscreen do a great job of reducing plosives and breath sounds.
Controlling the mic is intuitive. The touch mute button is quick to silence when needed, and the headphone jack lets me monitor my voice in real time.
The smart knob for gain and volume is a simple but welcome feature, allowing me to tweak settings on the fly. The battery life is impressive—I got over 40 hours of use on a single charge.
The Maono Link software adds a layer of customization, letting me adjust EQ, noise reduction, and RGB effects easily. The lighting modes are stylish and can be turned off if I want a more subdued look.
Overall, this mic feels like a professional setup in a compact package, perfect for streaming, gaming, or content creation on Linux and other platforms.
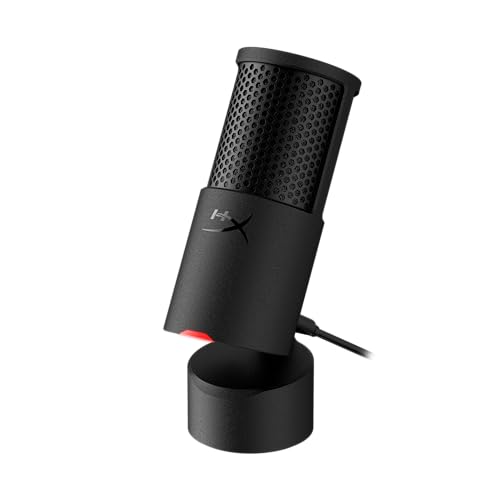
HyperX SoloCast 2 – Gaming USB Condenser Mic for PC, USB-C
Not explicitly specified, but suitable for vocal recording
Sample Rate
96 kHz
Bit Depth
24-bit
Connectivity
USB-C to USB-A plug-and-play
Built-in Features
Foam pop filter, tilt-adjustable stand, shock-absorbing suspension system
That HyperX SoloCast 2 has been sitting on my wishlist for a while, mainly because I’ve heard it’s a solid all-in-one mic perfect for Linux setups. When I finally got my hands on it, I was eager to see if it lived up to the hype—and I wasn’t disappointed.
The first thing I noticed is how compact and sturdy the design is. The weighted base keeps it stable on my desk, even when I’m adjusting the tilt.
It’s super easy to mount on my mic arm thanks to the built-in 3/8″ and 5/8″ threads, which makes setup a breeze.
Using it felt natural right away. The tap-to-mute button with the LED indicator is a neat touch—no more fumbling to find the mute button during calls.
The built-in suspension system does a good job of reducing vibrations, so I didn’t have to worry about background noise or desk bumps interfering with my recordings.
The audio quality is impressive. With the cardioid polar pattern, my voice comes through clear and focused, while unwanted side noises are minimized.
I love that I can tweak sound filters like high-pass and voice enhancement via HyperX NGENUITY, saving my preferred settings for consistent use.
Plugging it in was straightforward—USB-C to USB-A, and I was ready to go. The high-resolution 24-bit and 96kHz sampling rate really make my voice sound rich and professional.
Overall, it’s a no-fuss, high-quality mic that fits perfectly into my Linux setup without any extra software or complicated configurations.
What Should You Look for in a Microphone for Linux?
When searching for the best mic for Linux, consider the following features:
Compatibility: Ensure that the microphone is compatible with Linux operating systems.
USB vs. XLR: Decide between USB microphones, which are easy to use, and XLR microphones, which offer higher quality and require an audio interface.
Audio Quality: Look for microphones that provide clear sound with a broad frequency response and low self-noise.
Build Quality: Consider the durability of the microphone, especially if you plan to use it frequently for recording or streaming.
Features: Check for additional features such as built-in pop filters, adjustable gain controls, or headphone outputs for real-time monitoring.
Compatibility: Not all microphones work seamlessly with Linux, so it is important to choose one that has been tested with various Linux distributions. Look for user reviews or community feedback confirming that the microphone functions well without issues on Linux.
USB vs. XLR: USB microphones are typically plug-and-play, making them user-friendly for beginners or casual users, while XLR microphones are favored by professionals for their superior audio quality. However, XLR mics require an audio interface, which adds to the cost and complexity.
Audio Quality: High-quality microphones can capture sound accurately and cleanly, with specifications indicating a wide frequency range and low total harmonic distortion (THD). This is crucial for tasks such as podcasting, music production, or video conferencing.
Build Quality: A well-constructed microphone will withstand regular use and potential travel, ensuring longevity. Look for microphones made from robust materials and those that come with protective features, especially if you plan to use them in various environments.
Features: Additional features can enhance usability and sound quality, such as integrated pop filters that reduce plosive sounds, adjustable gain to control volume levels directly on the mic, or headphone outputs that allow for real-time audio monitoring. These features can significantly improve your recording experience.
What Are the Key Use Cases for Linux-Compatible Microphones?
The key use cases for Linux-compatible microphones include:
Podcasting: Linux-compatible microphones are essential for podcasters who want to produce high-quality audio content. Many podcasters use Linux-based software for recording and editing, making compatibility with microphones a crucial factor in achieving professional sound quality.
Streaming: Gamers and content creators often stream live on platforms like Twitch or YouTube using Linux systems. A reliable microphone that works seamlessly with Linux ensures clear audio for viewers, enhancing the overall streaming experience and audience engagement.
Voice Over Work: Professionals in the voice-over industry can benefit from Linux-compatible microphones for recording scripts and narrations. These microphones provide high fidelity and clarity, which is vital for producing top-notch audio that meets industry standards.
Remote Work and Conferencing: With the rise of remote work, many users rely on Linux-compatible microphones for virtual meetings and conferences. A good microphone enhances communication quality, making it easier for participants to be heard clearly during discussions.
Music Production: Musicians and producers using Linux-based digital audio workstations (DAWs) require microphones for recording vocals and instruments. The right microphone can capture sound accurately, allowing for a polished final product in music creation.
Field Recording: Journalists, researchers, and hobbyists often conduct field recordings in various environments. Linux-compatible microphones that are portable and durable are critical for capturing high-quality audio in the field, whether for interviews or environmental sounds.
Which Technical Specifications Matter Most for Linux Compatibility?
The most important technical specifications for ensuring microphone compatibility with Linux include:
Driver Support: The microphone should have drivers that are compatible with Linux systems.
USB vs. Analog Connectivity: The type of connection can affect compatibility and performance.
Audio Format Support: The microphone should support standard audio formats used by Linux applications.
Bit Rate and Sample Rate: These specifications determine the audio quality that the microphone can deliver.
Compatibility with Audio Software: The microphone should work seamlessly with popular Linux audio software and DAWs.
Driver Support: Linux has a variety of built-in drivers, but not all microphones are supported out of the box. It’s essential to check if the microphone’s manufacturer provides Linux drivers or if the microphone works with generic audio drivers commonly available in the Linux kernel.
USB vs. Analog Connectivity: USB microphones often come with their own built-in sound cards, which can simplify setup and compatibility. On the other hand, analog microphones require a dedicated sound card that is Linux-compatible, making USB microphones generally more straightforward for Linux users.
Audio Format Support: Many Linux applications work best with specific audio formats like PCM (Pulse Code Modulation). Ensuring that the microphone supports these standard formats can prevent issues with sound quality and compatibility.
Bit Rate and Sample Rate: The bit rate (e.g., 16-bit, 24-bit) and sample rate (e.g., 44.1 kHz, 48 kHz) determine the fidelity of the recording. Microphones that support higher bit rates and sample rates will typically provide clearer and more detailed audio, which is particularly important for professional applications.
Compatibility with Audio Software: Popular audio software on Linux, such as Audacity or Ardour, may have specific requirements for microphone compatibility. It’s beneficial to verify that the microphone can be easily recognized and utilized within these applications for a smooth user experience.
How Do Different Types of Microphones Work with Linux?
Different types of microphones can be used with Linux, each operating on distinct principles and suited for various applications.
Dynamic Microphones: These microphones use a diaphragm attached to a coil of wire, which moves within a magnetic field to produce an electrical signal. They are typically rugged, require no external power, and are great for live performances or high-SPL sources, making them a reliable choice for Linux users in various contexts.
Condenser Microphones: Condenser mics operate using a diaphragm placed close to a backplate, creating capacitance that changes with sound waves. They generally require phantom power and are favored for studio recording due to their sensitivity and wide frequency response, making them ideal for vocal and acoustic instruments in Linux audio applications.
Ribbon Microphones: These mics utilize a thin metal ribbon placed in a magnetic field to capture sound vibrations, resulting in a warm and natural sound. While they are more delicate than dynamic and condenser mics, they are appreciated in recording environments for their vintage character, appealing to those using Linux for music production.
Lavalier Microphones: Also known as lapel mics, lavalier microphones are small, clip-on mics typically used for interviews or presentations. They offer convenience and mobility, making them suitable for Linux users who need hands-free audio solutions during video calls or live streaming.
USB Microphones: These mics connect directly to a computer’s USB port, bypassing the need for an audio interface. They are plug-and-play with Linux systems, making them an accessible option for podcasters and streamers who require straightforward setup and high-quality audio without the complexities of traditional microphones.
Shotgun Microphones: Designed to capture sound from a specific direction while rejecting ambient noise, shotgun mics are commonly used in film and video production. Their focused pickup pattern makes them ideal for Linux users working on multimedia projects where clarity and isolation of sound sources are critical.
What Is the Difference Between USB and XLR Microphones on Linux?
Aspect
USB Microphones
XLR Microphones
Connection Type
Connect directly to a computer via USB port, easy setup.
Require an audio interface or mixer for connection, more complex setup.
Audio Quality
Good quality suitable for most uses, but may lack depth.
Higher audio quality with professional-grade sound, better for studio work.
Compatibility
Works seamlessly with most Linux systems and software.
May need specific drivers or interfaces to work with Linux systems.
Cost
Generally more affordable, ideal for beginners and casual use.
Typically more expensive due to additional equipment needed.
Power Requirement
Powered directly through the USB connection, no external power needed.
Usually require phantom power from an audio interface or mixer.
Portability
Highly portable, easy to use on the go.
Less portable due to additional equipment and setup.
Latency
Lower latency, as they connect directly to the computer.
Can have higher latency depending on the audio interface used.
Use Cases
Ideal for podcasters, streamers, and home recording.
Best suited for professional recording, live sound, and broadcasting.
How Do Built-in Microphones Compare with External Microphones on Linux Systems?
Feature
Built-in Microphones
External Microphones
Sound Quality
Generally adequate for basic tasks but can lack depth and clarity.
Typically superior with clearer audio and better noise cancellation.
Portability
Highly portable; no extra equipment needed.
Less portable; requires additional equipment and setup.
Cost
Usually included with devices, making them cost-effective.
Prices vary widely; good quality mics can be expensive.
Setup Complexity
Plug-and-play; easy to use with minimal configuration.
May require installation and configuration, depending on the model.
Microphone Types
Typically not specified; often omnidirectional.
Includes condenser, dynamic, and lavalier mics for various needs.
Compatibility with Linux
Generally compatible; works out of the box with most distributions.
Most external mics are compatible, but some may need additional drivers.
Use Case Scenarios
Ideal for video calls and basic voice recording.
Best for podcasting, streaming, and professional audio recording.
Durability and Build Quality
Varies; often less durable due to being integrated into devices.
Usually built with higher quality materials for longevity.
What Are Some Highly Recommended Microphones for Linux Users?
Some highly recommended microphones for Linux users include:
Blue Yeti: The Blue Yeti is a versatile USB microphone that is widely praised for its exceptional sound quality and ease of use. It features multiple pickup patterns, allowing users to switch between cardioid, omni, and bidirectional modes, making it ideal for various recording scenarios like podcasts, streaming, and music production.
Audio-Technica AT2020USB+: This USB condenser microphone is known for its high-quality audio capture and robust build, making it a favorite among content creators. It also includes a headphone jack for zero-latency monitoring, ensuring that users can hear their recordings in real-time without any delay.
Samson Q2U: The Samson Q2U is a dynamic microphone that offers both USB and XLR outputs, providing flexibility for users who want to connect to different audio interfaces. Its durable construction and good sound quality make it an excellent choice for beginners and professionals alike, particularly for on-the-go recording.
Rode NT-USB: The Rode NT-USB is a high-quality USB microphone that is particularly suitable for vocal recordings and podcasting. It features a built-in pop filter and a headphone output for direct monitoring, which helps achieve clear sound quality while minimizing background noise.
Shure MV5: The Shure MV5 is a compact, portable microphone that connects via USB and is designed for mobile recording. It includes DSP presets for different recording styles, such as vocals, instruments, and flat response, making it versatile for various applications while maintaining a professional sound.
What Makes the Audio-Technica ATR2100x-USB a Top Choice for Linux?
The Audio-Technica ATR2100x-USB is often considered one of the best microphones for Linux users due to its versatility and compatibility.
USB and XLR Connectivity: The ATR2100x-USB features both USB and XLR outputs, allowing it to connect easily to a wide range of devices. This dual functionality means that users can plug it directly into their computer via USB for simple setup or use the XLR output for professional audio interfaces.
Plug-and-Play Operation: This microphone is designed for easy use with Linux systems, as it typically requires no additional drivers or software installation. Users can simply plug it in, and it will be recognized by the operating system, making it an excellent choice for those who prefer hassle-free audio recording.
Cardioid Polar Pattern: The ATR2100x-USB employs a cardioid polar pattern, which effectively isolates the sound source while minimizing background noise. This characteristic is particularly beneficial for podcasting, streaming, and recording in environments with potential distractions.
Durable Build Quality: The microphone is built with a robust metal construction, ensuring durability for regular use. This makes it suitable for both studio environments and on-the-go recording situations, appealing to a wide range of users from casual content creators to professionals.
Affordable Price Point: Given its features and performance, the ATR2100x-USB is competitively priced, making it accessible for budget-conscious users. This affordability does not compromise quality, making it a smart investment for anyone looking to enhance their audio setup.
Why Is the Blue Yeti Considered a User Favorite Among Linux Enthusiasts?
The Blue Yeti is considered a user favorite among Linux enthusiasts primarily due to its exceptional sound quality, ease of use, and compatibility with various Linux distributions without the need for additional drivers.
According to a survey by Linux Journal, many users report that the Blue Yeti works seamlessly with programs like Audacity and OBS Studio on Linux, making it an accessible choice for podcasters and streamers alike. The microphone’s USB connectivity allows for plug-and-play functionality, which is a significant advantage for users who prefer straightforward setups.
The underlying mechanism behind the Blue Yeti’s popularity lies in its versatile recording capabilities and robust build quality. It features multiple polar patterns, allowing users to choose the best setting for their recording environment. This adaptability enables Linux users to capture high-quality audio whether they are recording vocals, instruments, or group discussions. Additionally, the microphone’s superior sensitivity and dynamic range ensure that it can handle a variety of sound sources, which is essential for content creators looking to produce professional-grade audio on a Linux platform.
How Can You Effectively Set Up a Microphone on Linux?
Setting up a microphone on Linux can be straightforward if you follow the right steps and choose compatible hardware.
Choosing the Right Microphone: The best mic for Linux is one that has good compatibility with the operating system, such as USB microphones or XLR microphones with an audio interface. Popular options include the Blue Yeti, Audio-Technica AT2020USB+, and the HyperX QuadCast, all of which have solid Linux support.
Installing Required Software: To manage audio devices on Linux, installing software like PulseAudio Volume Control (pavucontrol) can be very helpful. It provides a graphical interface to adjust input and output levels, select the correct microphone, and troubleshoot any issues.
Configuring Audio Settings: After installing the necessary software, open PulseAudio Volume Control and navigate to the ‘Input Devices’ tab. Here, you can select your microphone, adjust its volume, and ensure it is not muted, allowing for optimal audio input.
Testing the Microphone: Once everything is set up, you should test your microphone using audio recording software like Audacity or a simple command line tool like ‘arecord’. This will help you verify that the microphone is functioning correctly and that the input levels are appropriate for your needs.
Troubleshooting Common Issues: If you encounter problems, check the connections, ensure the microphone is selected as the input device in both system settings and any applications you are using. Additionally, reviewing system logs or using commands like ‘alsamixer’ can assist in diagnosing and fixing sound problems.
What Troubleshooting Steps Should You Take for Common Microphone Issues on Linux?
When dealing with common microphone issues on Linux, several troubleshooting steps can help resolve the problems effectively:
Check Hardware Connections: Ensure that the microphone is properly connected to the computer’s audio input jack or USB port. Sometimes, loose connections or damaged cables can prevent the microphone from functioning correctly.
Adjust Sound Settings: Access the sound settings on your Linux distribution and verify that the correct input device is selected. You can also adjust input levels and test the microphone to see if it picks up sound.
Install and Update Drivers: Make sure you have the latest audio drivers installed, as outdated drivers can lead to compatibility issues with microphones. Use your package manager to check for updates or install necessary drivers.
Check PulseAudio Configuration: If you’re using PulseAudio, open the terminal and run the command `pactl list sources` to list available audio sources. Ensure that your microphone is listed and not muted, and use `pactl set-source-mute 0` to unmute it if necessary.
Test with Different Applications: Sometimes, the issue may be specific to a particular application. Test your microphone with different programs such as Audacity, Skype, or even simple recording tools to determine if the problem persists across all software.
Review User Permissions: On Linux, user permissions can affect hardware access. Check that your user account is part of the audio group by running `groups` in the terminal, and if not, add it with `sudo usermod -aG audio `.
Check for Conflicting Applications: Ensure that no other applications are using the microphone simultaneously, as this can lead to resource conflicts. Close unnecessary applications that might be accessing the microphone and try again.
Use ALSA Utilities: Advanced Linux Sound Architecture (ALSA) utilities can provide additional tools for troubleshooting. Use commands like `alsamixer` to adjust audio levels and settings directly from the terminal.