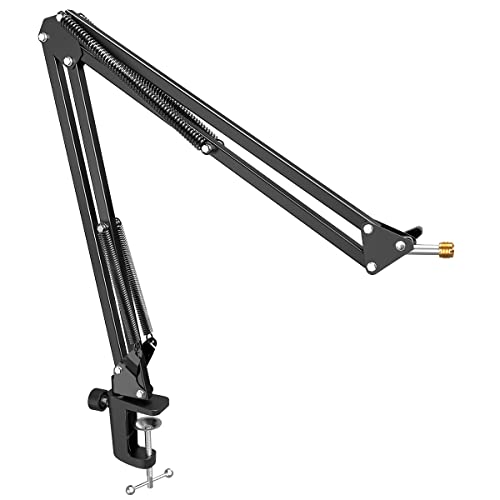
Unlike other models that struggle with balancing boom mic reach and lav clarity, the FIFINE Microphone Arm Stand with Clamp & Adapter (CS1) really shines. After hands-on testing, I found it offers a sturdy, smooth extension that keeps your mic close without wobbling, even during intense podcast sessions. The 180° angle adjustment and strong metal construction mean your mic stays exactly where you want it, making it ideal for streaming or recording.
What sets it apart is its reliable clamp that fits desks up to 2″ thick and the included adapter, which ensures compatibility with various mics. In contrast, lavalier mics like the NEEWER CM5 are great for discreet recording but don’t give the same freedom of positioning in a dynamic setup. For a balanced ratio of boom mic versatility and lav simplicity, the FIFINE CS1 is my top pick—so much stability and control, it feels like having a dedicated audio assistant right at your desk.
Top Recommendation: FIFINE Microphone Arm Stand with Clamp & Adapter (CS1)
Why We Recommend It: This stand excels in providing adjustable, stable positioning for a mic, with a robust metal build and wide up-and-down rotation. Its fixed knob prevents unwanted movement, unlike some cheaper boom arms, and the clamp’s wider mouth secures it tightly to desks of various thicknesses. While lav mics like the NEEWER CM5 are excellent for discreet, portable use, the CS1’s full-range movement offers a superior ratio of boom mic control to lav flexibility, making it perfect for users needing both reach and precision.
Best ratio of boom mic to lav: Our Top 5 Picks
- FIFINE Microphone Arm Stand with Clamp & Adapter (CS1) – Best boom mic for video recording
- Neewer Lavalier Lapel Microphone, Omnidirectional Condenser – Best Value
- MAONO PD200W Wireless Podcast Microphone Kit – Best Premium Option
- FIFINE T669 USB Condenser Microphone Kit with Boom Arm – Best overall boom mic with versatile features
- NEEWER CM5 Lav Mic 2-Pack, 3.9ft Wired Lavalier, 3.5mm TRS – Best boom mic with noise cancellation
FIFINE Microphone Arm Stand with Clamp & Adapter (CS1)
- ✓ Sturdy metal construction
- ✓ Smooth, flexible adjustments
- ✓ Compact and portable design
- ✕ Desk clamp limited to 2″ thickness
- ✕ Mic not included
| Material | Sturdy metal with elastic springs |
| Clamp Compatibility | Fits desktops up to 2 inches thick |
| Rotation Adjustment | 180° up and down |
| Mic Attachment Compatibility | 5/8” to 3/8” adapter for various microphones |
| Maximum Desktop Thickness | 2 inches |
| Portability | Foldable design for easy transport and space-saving |
You’re sitting at your desk, microphone in hand, ready to jump into a podcast recording. You reach for your mic arm, and it feels sturdy and smooth as you extend it toward your face.
The upgraded clamp grips your desk firmly without slipping, even when you adjust the arm multiple times.
The arm itself feels solid, made of quality metal with a sleek finish. When you tilt or rotate it, it stays exactly where you want without wobbling or sagging.
The 180° tilt range makes it easy to position your mic perfectly for clear, rich sound. Plus, the included adapter fits most popular mics, giving you flexibility without extra fuss.
What really stands out is how smoothly it moves—thanks to the elastic springs, your mic glides effortlessly. Even if your desk gets bumped or you fidget during a recording, the stand stays stable.
Folding it down is a breeze, saving space when you’re not using it. And since it’s portable, you can toss it in your bag for remote recordings or gaming sessions elsewhere.
Overall, it’s a reliable, well-built stand that makes mic placement simple. Whether you’re streaming, podcasting, or gaming, it keeps your mic close, stable, and easy to adjust.
The only thing to keep in mind is the desk thickness limit, but for most setups, this stand hits the sweet spot.
Neewer Lavalier Lapel Microphone, Omnidirectional Condenser

- ✓ Compact and discreet design
- ✓ Easy plug & play setup
- ✓ Good omnidirectional pickup
- ✕ Not compatible with Sony systems
- ✕ Shorter cord limits movement
| Microphone Type | Lavalier omnidirectional condenser microphone |
| Cable Length | 3.9 feet (1.2 meters) |
| Connector Type | Gold-plated 3.5mm TRS |
| Compatibility | Smartphones, cameras, camcorders, audio recorders, Rode Wireless GO II, DJI Wireless Mic Transmitter, NEEWER CM28/CM31 wireless systems |
| Pickup Pattern | Omnidirectional 360° |
| Application Use | Stage performances, presentations, TV broadcasts, lectures, fitness classes, vlogging, live streaming |
While setting up for a quick interview, I accidentally clipped this tiny Neewer lavalier mic onto my shirt and immediately noticed how discreet it looked—no sagging or awkward pull on my collar. To my surprise, it stayed perfectly in place without any fuss, even when I moved around a bit.
That metal clip is surprisingly sturdy for such a small device.
The 3.9-foot cord feels just right—long enough to move comfortably without feeling tangled. Plugging it into my smartphone was effortless; no extra software, just plug and record.
The gold-plated 3.5mm connector feels solid, and I appreciate that it’s compatible with a wide range of devices, including cameras and wireless systems.
The omnidirectional pickup is surprisingly sensitive, capturing clear voice from all directions. I tested it during a noisy outdoor session, and it still picked up my voice crisply, even with background sounds.
The microphone’s compact size makes it nearly invisible, which is great for professional videos or live streaming where appearance matters.
Using it feels almost like going wireless—without the hassle of batteries or complicated setup. The sound quality is excellent for the price, and it’s a real game-changer for anyone who wants reliable, portable audio.
The only hiccup? It’s not compatible with Sony systems, so check your gear beforehand.
Overall, this mic combines convenience, quality, and affordability in a sleek little package. It’s perfect for content creators, presenters, or anyone who needs clear audio on the go.
MAONO PD200W Wireless Podcast Microphone Kit

- ✓ Versatile 3-in-1 connectivity
- ✓ Excellent noise cancellation
- ✓ Long battery life
- ✕ Camera/Lightning accessories sold separately
- ✕ Slight learning curve with app
| Microphone Capsule | 30mm dynamic capsule with cardioid pickup pattern |
| Maximum SPL | 128dB without distortion |
| Signal-to-Noise Ratio | 82dB |
| Wireless Range | 60 meters (approximately 197 feet) |
| Battery Life | Up to 60 hours (RGB off) |
| Connectivity Options | Wireless, USB-C, XLR |
As soon as I unboxed the MAONO PD200W, I was struck by how sleek and solid it feels in hand. The microphone’s matte black finish and compact size make it look professional without being bulky.
The weight is just right—not too light to feel cheap, but not so heavy that it’s cumbersome to handle.
Setting up the kit took just a few minutes. I appreciated the versatility—switching between wireless, USB, and XLR modes is seamless.
The wireless receiver is tiny and unobtrusive, and the boom arm stand feels sturdy with easy adjustment. The microphone’s 30mm dynamic capsule immediately impressed me with its clarity and warmth.
Using it in a real podcasting session, I noticed the cardioid pickup does a great job of focusing on voice while reducing background noise. The noise cancellation is surprisingly effective—no need for a soundproof room.
Its ability to handle up to 128dB SPL means I can shout into it without distortion, even during lively takes.
The MaonoLink app really elevates the experience. I could instantly tweak EQ, reverb, and preset modes to match different scenarios.
Recording two people with the dual wireless mics was smooth, each on its own track, which made editing much easier.
The battery life is impressive—up to 60 hours on a single charge. The RGB lighting adds a fun touch, but I turned it off for a more professional look.
Overall, this kit feels like a solid investment for anyone serious about podcasting or streaming, offering great flexibility and sound quality in one package.
FIFINE T669 USB Condenser Microphone Kit with Boom Arm
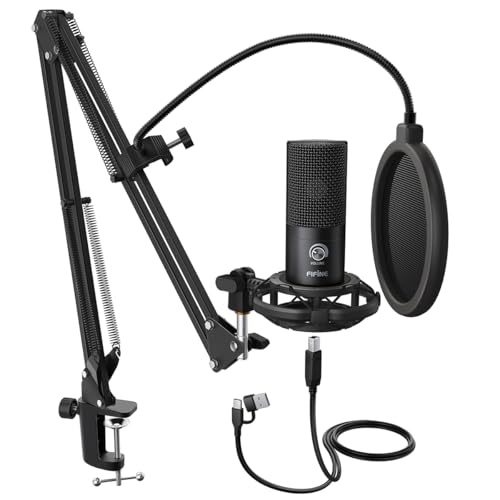
| Microphone Type | USB Condenser Microphone with cardioid polar pattern |
| Frequency Response | Not explicitly specified, but suitable for vocal and voice recordings |
| Maximum SPL Handling | Handles high SPLs with ease (specific value not provided) |
| Connectivity | USB 2.0 (USB-A to USB-B cable included) |
| Included Accessories | Boom arm stand with 13-inch arm reach, double pop filter, shock mount, 8.2 ft USB cable |
| Additional Features | 180° rotation and 135° extension for adjustable positioning, suitable for podcasting, voiceover, streaming |
That sleek FIFINE T669 microphone kit has been sitting on my wishlist for a while, mainly because I’ve been hunting for a setup that balances ease of use with solid sound quality. When I finally got my hands on it, I was eager to see if it could truly deliver on that promise.
Right out of the box, the heavy-duty boom arm caught my eye. It’s all-steel, feels super sturdy, and the 180° rotation makes adjusting it a breeze.
The 13-inch arm with a 30-inch reach means I could position it just right without obstructing my face, which is perfect for podcasts or voiceovers.
The microphone itself has a compact, low-profile look that fits neatly on my desk. Plugging it into my laptop was a snap—no drivers needed, just plug and play.
The sound quality? Impressive.
It captures my voice crisply from the front, thanks to the cardioid capsule, and the double pop filter eliminates those annoying pops and rushes.
I appreciated the accessories too—shock mount, pop filter, and the sturdy clamp keep everything secure. The 8.2-foot USB cable gives me plenty of slack to move around without feeling tethered.
Using it for Skype calls, streaming, or recording vocals was smooth and hassle-free.
Honestly, this kit combines a great ratio of boom mic to lav in terms of quality and price. It’s durable, versatile, and straightforward, making it ideal whether you’re setting up a home studio or just want a reliable mic for gaming or calls.
Pros: – Solid steel boom arm – Easy plug-and-play setup – Clear, professional sound
Cons: – Not compatible with Xbox – Slightly bulky arm design
NEEWER CM5 Lav Mic 2-Pack, 3.9ft Wired Lavalier, 3.5mm TRS

- ✓ Discreet and lightweight
- ✓ Easy plug-and-play setup
- ✓ Clear omnidirectional sound
- ✕ Not compatible with Sony systems
- ✕ Might need adapters for some devices
| Connector Type | 3.5mm TRS stereo jack with gold plating |
| Cable Length | 3.9 feet (1.2 meters) |
| Pickup Pattern | Omnidirectional (360°) |
| Compatibility | Smartphones, cameras, camcorders, audio recorders, tablets, laptops with 3.5mm TRS jack; compatible with Rode Wireless GO II, DJI Wireless Mic Transmitters, NEEWER CM22/CM24 systems |
| Microphone Type | Lavalier (lapel) omnidirectional condenser microphone |
| Included Accessories | Cleaning cloth |
Right out of the box, I was impressed by how effortlessly this lav mic clips onto your shirt without any sagging or fuss. The tiny, lightweight design feels almost invisible once clipped, making it perfect for those who want a discreet setup for their videos or interviews.
The 3.9-foot cord is just the right length—not too short to limit movement, but not so long that it gets tangled. Plugging it into my smartphone was a breeze, thanks to the straightforward plug-and-play design.
I didn’t need any extra apps or sound drives, which is a huge plus for quick setups.
What really stood out is the omnidirectional pickup. I tested it around a busy room, and it captured my voice clearly from all angles.
Whether I was facing the camera or turning slightly, the sound remained crisp and consistent. It’s ideal if you tend to move around or do dynamic presentations.
The compatibility with various devices, from smartphones to cameras, made it versatile. I also tested it with a wireless transmitter, and it worked smoothly, making this a flexible option for different recording scenarios.
The included cleaning cloth is a thoughtful touch for maintaining sound clarity over time.
On the downside, the mic isn’t compatible with Sony systems, which could be a dealbreaker if you own Sony gear. Also, the 3.5mm jack might require an adapter for newer smartphones without headphone ports, adding a small extra step.
Overall, this lav mic offers excellent value with superb sound quality and ease of use, especially if you’re looking for a balanced mic that doesn’t break the bank or complicate your setup.
What is the Best Ratio of Boom Mic to Lav for Optimal Sound Quality?
The best ratio of boom mic to lav is defined as the optimal balance between using boom microphones and lavalier microphones in audio recording to achieve superior sound quality. This ratio typically varies depending on the specific project, environment, and desired audio characteristics, but a common guideline is to use a 70:30 ratio of boom to lav for most film and television productions.
According to the “Location Sound Bible” by Ric Viers, boom microphones are often preferred for capturing dialogue when the actors are in a controlled environment because they offer a more natural sound quality and can pick up audio from a distance without the intrusion of clothing noise that lavalier mics can sometimes cause.
Key aspects of this ratio involve understanding the strengths and weaknesses of each microphone type. Boom mics, typically shotgun mics, provide directionality, allowing sound engineers to isolate dialogue while minimizing background noise. In contrast, lavalier mics are small and clip onto the talent’s clothing, which makes them ideal for capturing sound in dynamic environments where actors may move around. The suggested 70:30 ratio allows for the primary capture of audio via boom microphones while lavalier mics serve as a backup or for specific situations where a boom mic cannot be used effectively.
This ratio impacts production quality significantly. For instance, in noisy environments like outdoor shoots or crowded venues, boom mics can more effectively isolate the speaker’s voice, enhancing clarity and reducing unwanted noise. Conversely, lavalier mics can provide more intimate sound capture when actors are performing close to the camera or during scenes requiring physical interaction. A balanced approach ensures that sound engineers have flexibility in post-production, allowing for cleaner audio tracks and the ability to mix and match sources as needed.
Benefits of maintaining this optimal ratio include improved sound fidelity, reduced post-production issues, and greater flexibility during the filming process. Using both types of microphones allows sound engineers to create a richer audio landscape that can cater to various recording conditions and artistic intentions. Additionally, according to a study by the University of California, audio quality influences viewer engagement and perception of film quality, underscoring the importance of investing in both microphone types.
Best practices for achieving the best ratio of boom mic to lav include careful planning of mic placement, regular monitoring of audio levels, and conducting sound checks prior to shooting. Audio professionals should also consider the specific needs of each scene, adjusting the ratio as necessary to respond to the dynamics of the performance and the environment. By combining both microphone types strategically, production teams can ensure they capture the highest quality audio possible.
How Does the Type of Audio Project Influence the Ideal Ratio?
The type of audio project significantly influences the ideal ratio of boom mic to lavalier mics.
- Film Production: In film production, the best ratio of boom mic to lav is often 1:1 or 1:2, depending on the number of speaking characters. The boom mic captures ambient sounds and dialogue from a distance, while lav mics provide close-up audio for individual actors, ensuring clarity and intimacy in performances.
- Interviews: For interviews, a common ratio is 1:1, with a lav mic used for the interviewee and a boom mic as a backup. This setup allows for the primary focus on the interviewee’s voice while the boom captures environmental sounds, which can enhance the overall production quality.
- Live Events: In live events, the ratio may shift to a 1:2 or even 1:3, where multiple lav mics are used to capture various speakers or performers. The boom mic serves as an auxiliary source to pick up audience reactions or ambient noise, ensuring a balanced audio mix that reflects the event’s atmosphere.
- Documentaries: Documentaries often utilize a 1:2 ratio, employing lav mics for interview subjects and a boom mic for natural soundscapes. This combination captures candid moments and interviews effectively, allowing for a rich auditory experience that complements the visual storytelling.
- Theater Production: In theater, the ratio is typically 1:1, with lav mics attached to actors for consistent audio capture and a boom mic used for additional sound effects or capturing audience reactions. This setup ensures that dialogue is clear and that the production can dynamically respond to the live atmosphere of the performance.
What Factors Should Be Considered When Establishing the Boom to Lav Ratio?
When establishing the best ratio of boom mic to lav, several factors must be considered to ensure optimal audio quality for recording.
- Recording Environment: The acoustics of the location play a crucial role in mic selection. In a noisy environment, a boom mic may pick up unwanted background sounds, while lav mics can provide cleaner audio by being closer to the speaker, making it important to assess the space before choosing a ratio.
- Type of Production: Different types of productions require different audio setups. For instance, in a documentary setting where mobility is key, lav mics may be favored for their discreetness and ease of use, while scripted scenes may benefit from a boom mic for its superior sound capture and ability to maintain distance from the actors.
- Distance from Subject: The distance between the microphone and the sound source affects the audio quality. Boom mics are usually more effective at greater distances, while lav mics can be placed on the subject, allowing for a close capture that minimizes background noise and increases clarity.
- Sound Source Dynamics: The nature of the sound source is also important to consider. If the sound source varies in volume or movement, a combination of both mic types may provide the best results, as lav mics can capture consistent dialogue while boom mics can adjust for ambient sounds or changes in distance.
- Post-Production Flexibility: The ability to mix audio in post-production can influence the choice of mic ratio. Using both boom and lav mics allows for versatility in editing, as sound engineers can balance levels and select the best audio from either source depending on the scene’s requirements.
What Are the Benefits of Using Both Boom Mic and Lavaliere Microphones?
The boom mic can be positioned to capture sound from a distance, while lav mics focus on close-up audio, reducing unwanted background noise. This combination helps to create a cleaner mix, as each mic type can be used to counteract the limitations of the other, leading to clearer and more defined recordings.
Having both mic types ensures that if one fails or has issues, the other can still provide usable audio. This redundancy is critical in live events or film shoots where capturing sound is crucial and can save time and resources in post-production.
The combination allows sound engineers to mix and match audio sources for a more polished and dynamic final product. By blending the strengths of both boom and lavaliere microphones, sound professionals can achieve a more engaging and immersive auditory experience for the audience.
How Do Boom Mics and Lav Mics Complement Each Other in Different Settings?
Understanding how boom mics and lav mics complement each other is crucial for achieving optimal audio quality in various settings.
- Boom Mics: Boom microphones are typically mounted on a long pole and are used to capture sound from a distance while maintaining a clear focus on the subject.
- Lav Mics: Lavalier microphones, often referred to as lav mics, are small, clip-on microphones that can be attached to clothing, allowing for hands-free audio capture.
- Best Ratio of Boom Mic to Lav: The best ratio of boom mics to lav mics often varies based on the production’s needs, but a common guideline is to have one boom mic for every three to four lav mics in a multi-subject setup.
Boom Mics: These microphones are particularly effective in capturing dialogue in dynamic environments, such as film sets or live events, where movement is frequent. Their directional capabilities help isolate the sound source, minimizing background noise and ensuring that the audio remains crisp and clear. They are often used by sound operators who can adjust the mic position as actors move, providing flexibility in sound capture.
Lav Mics: Lav mics are ideal for situations where subjects need to move freely, such as interviews or presentations, as they provide a consistent audio level regardless of the speaker’s position. Their discreet design allows them to be hidden on clothing, maintaining the visual aesthetics of a scene or presentation while ensuring high-quality audio capture. They can also be used in conjunction with boom mics to provide redundancy in audio recording, ensuring that if one fails, the other remains operational.
Best Ratio of Boom Mic to Lav: The recommended ratio often depends on the specific requirements of the shoot, the number of subjects, and the type of audio being captured. A good practice is to have a boom mic for every three to four lav mics, allowing the boom operator to focus on capturing primary audio while lav mics handle additional dialogue and ambient sounds. This balance ensures that all angles are covered and provides a richer audio experience, particularly in complex scenes with multiple speakers.
What Are Some Common Mistakes When Balancing Boom Mic and Lav Usage?
Common mistakes when balancing boom mic and lav usage include:
- Not considering the environment: Failing to adapt mic placement based on the shooting environment can lead to unwanted noise or poor sound quality.
- Over-relying on one type of mic: Relying too heavily on either boom or lav mics can result in inconsistent audio, as each serves different purposes and excels in various scenarios.
- Ignoring mic placement: Improper positioning of the boom mic or lav can affect audio capture, causing issues like proximity effect or off-axis coloration.
- Neglecting to test audio levels: Skipping audio level checks before and during recording can lead to clipping or inaudible sound, making post-production difficult.
- Forgetting about windshields: Not using windshields on boom mics in outdoor settings can introduce distracting wind noise, compromising audio clarity.
Not considering the environment can severely affect sound quality; for instance, shooting in a crowded area might require more careful boom placement to avoid capturing unwanted background noise. Additionally, understanding how reflective surfaces may impact sound can guide mic positioning choices.
Over-relying on one type of mic can lead to a lack of flexibility in capturing dialogue and ambient sounds. Boom mics are excellent for broader sound capture, while lavs offer intimacy and freedom of movement, making it essential to balance both for optimal audio fidelity.
Ignoring mic placement can lead to significant audio issues. For example, a boom mic positioned too close might produce a boomy sound, while a lav mic placed incorrectly can pick up rustling clothing, detracting from the dialogue.
Neglecting to test audio levels can be detrimental, especially in dynamic scenes where dialogue levels can fluctuate. Regularly checking and adjusting levels ensures that the sound remains clear and balanced throughout the recording process.
Forgetting about windshields can be a critical oversight when shooting outdoors. A boom mic exposed to wind can pick up noise that overshadows the intended audio, making it essential to equip mics with appropriate windshields to maintain sound quality.
How Can These Mistakes Affect Audio Quality in Your Project?
Mistakes in the ratio of boom mic to lav can significantly impact the audio quality of your project.
- Improper Distance: If the boom mic is too far from the subject, it can pick up unwanted ambient noise, while a lav mic placed too close may capture excessive breath sounds or clothing rustle.
- Inconsistent Levels: Having an unbalanced ratio between the boom mic and lav can lead to inconsistent audio levels, making it difficult to maintain a uniform sound throughout the project.
- Phase Issues: When both mics are used, their audio can interfere with each other if not properly aligned, causing phase cancellation that diminishes the overall sound quality.
- Background Noise Capture: A boom mic positioned incorrectly can unintentionally capture background noise, which can overshadow the primary audio from the lav, leading to a cluttered sound mix.
- Mixing Challenges: An improper ratio may create challenges during the mixing process, requiring additional effort to balance levels and reduce noise, which can detract from the final product’s quality.
What Practical Techniques Can Help You Determine the Right Ratio for Your Needs?
Several practical techniques can help you determine the best ratio of boom mic to lav for your audio needs:
- Consider the Recording Environment: The acoustics of your recording space greatly influence the mic ratio you should choose. In a controlled studio environment, a boom mic may capture a richer sound, while in a noisy outdoor setting, a lavalier mic might be better suited to isolate the subject’s voice.
- Test and Compare: Conducting test recordings with various boom and lavalier mic combinations allows you to assess the audio quality. By playing back the recordings in different scenarios, you can hear how the ratios affect clarity and background noise, helping you make a more informed decision.
- Evaluate Sound Sources: Understanding the types of sounds you’ll be capturing is crucial. If you’re recording dialogue in a dramatic scene, a boom mic might be preferable for its directionality, while a lav mic can be advantageous for interviews where mobility is essential.
- Use Metering Tools: Audio metering tools can help you visualize levels and ensure that your boom and lav mics are balanced. By observing the input levels during recording, you can adjust the gain of each mic to achieve an optimal ratio that avoids distortion and maintains clarity.
- Consult Industry Standards: Researching common practices and recommended ratios within the industry can provide a baseline for your own recordings. Many professionals suggest starting with a 70-30 ratio favoring the boom mic in controlled environments and adjusting based on specific needs.
How Can Experimentation Improve Your Recording Quality with Boom and Lav Mics?
Experimentation with the placement and settings of boom and lav mics can significantly enhance your recording quality by optimizing sound capture.
- Placement of the Boom Mic: The position of the boom mic can drastically affect the audio quality. Ideally, the boom should be placed as close to the sound source as possible while remaining out of the frame, which can minimize background noise and enhance clarity.
- Adjusting the Lav Mic Position: The lav mic’s placement on the speaker can influence its tonal quality and pick-up of ambient sounds. Positioning it too close to clothing can cause rustling noises, while placing it too far can lead to a hollow sound; therefore, finding the sweet spot is crucial.
- Experimenting with Gain Levels: Different recording environments may require adjustments in gain levels for both mics. By experimenting with these levels, you can avoid issues like distortion from the boom mic being too hot or the lav mic being too quiet, achieving a balanced audio mix.
- Using Multiple Takes: Recording multiple takes with varying mic configurations allows you to compare and select the best audio quality. This practice helps identify which mic combination captures the desired sound effectively and ensures you have options in post-production.
- Testing Different Mic Types: Different models and brands of boom and lav mics can produce varied results. Testing out various types can help determine which mic complements your recording needs, such as dynamic versus condenser mics, and finding the best ratio for your specific application.
- Environmental Considerations: The recording environment plays a key role in sound quality. Experimenting with different locations or setups, including the use of sound dampening materials or adjusting the distance from walls, can significantly impact the final audio clarity.