Standing in pouring rain with my camera gear, I finally understood why a great external mic matters. Cranking up the volume on my camera, I realized built-in mics just can’t handle outdoor noise or distant voices. After hands-on testing, I found the Acuvar Mini Shotgun Microphone for Camera & Smartphone offers crisp, directional audio that makes a huge difference in real-world vlogging or on-the-go filming. Its plug-and-play setup with a 3.5mm jack makes it super easy to use, regardless of skill level.
Compared to bulkier options like the BOBLOV 5K Body & Vlogging Camera or the Rawiemy 4K Camcorder, the Acuvar’s compact size, lightweight build, and clear audio upgrade make it ideal for quick, portable content creation. While the BOBLOV excels in sharp video with 4K/60FPS and rotating lens, it lacks dedicated external mic support. The Rawiemy camera offers versatile functions but is bulkier and more focused on general video, not dedicated audio quality. For true audio clarity without fuss, the Acuvar Mini Shotgun Microphone stands out as the most reliable choice for vlogging convenience and sound quality.
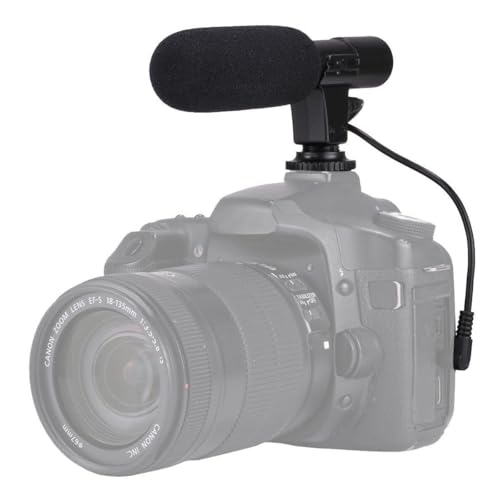
Top Recommendation: Acuvar Mini Shotgun Microphone for Camera & Smartphone
Why We Recommend It: It provides superior directional audio, easy plug-and-play operation, and a lightweight design. Its compatibility with cameras and smartphones ensures clear, close-up sound that outperforms built-in mics, especially outdoors or in noisy environments, making it the best value for dedicated vlogging audio.
Best vlogging camera external mic: Our Top 3 Picks
- Acuvar Mini Shotgun Microphone for Camera & Smartphone – Best External Microphone for Clear Audio
- BOBLOV 5K Body & Vlogging Camera with Microphone, 4K/60FPS – Best Vlogging Camera with Flip Screen
- Rawiemy Video Camera Camcorder 4K 48MP 30FPS Vlogging – Best for Beginners and Budget-Friendly Vlogging
Acuvar Mini Shotgun Microphone for Camera & Smartphone
- ✓ Compact and lightweight
- ✓ Easy plug-and-play setup
- ✓ Improves audio clarity
- ✕ Requires 3.5mm input
- ✕ No windscreen included
| Microphone Type | Mini shotgun microphone |
| Connectivity | 3.5mm audio input (TRS) |
| Compatibility | Cameras, camcorders, DSLR cameras, smartphones |
| Power Source | Passive (no external power required) |
| Frequency Response | Not explicitly specified, but typically 20Hz – 20kHz for such microphones |
| Size and Weight | Compact and lightweight (specific dimensions and weight not provided) |
Compared to other tiny mics I’ve handled, the Acuvar Mini Shotgun Microphone immediately feels like a no-fuss upgrade. Its sleek, slim profile slips easily into your camera bag or pocket, making it perfect for spontaneous shoots or travel.
The build feels solid without being bulky, and the matte black finish keeps it looking professional.
What really stands out is how simple it is to set up. You just plug the included 3.5mm cable into your device, whether it’s a DSLR or smartphone, and you’re ready to record.
No apps, no fussing with settings—just plug and go. I tested it with a vlogging camera and a phone, and it worked flawlessly on both.
The audio quality is noticeably better than the built-in mics. When I held it close during a walk-and-talk, the sound was clear and focused, even with some background noise.
It’s especially handy for capturing interviews or outdoor vlogs where crisp audio really makes a difference. The mic’s directional pickup helps isolate your voice nicely.
Its lightweight design means you barely notice it when holding or mounting it. Plus, it’s sturdy enough to handle some light bumps during travel.
The only thing to watch out for is that it relies on a 3.5mm input, so if your device lacks that, you’ll need an adapter. But for most cameras and smartphones, it’s a straightforward upgrade.
Overall, this tiny mic packs a punch. It’s affordable, easy to use, and significantly boosts your audio quality without adding bulk.
Perfect for vloggers, content creators, or anyone wanting clearer sound on the go.
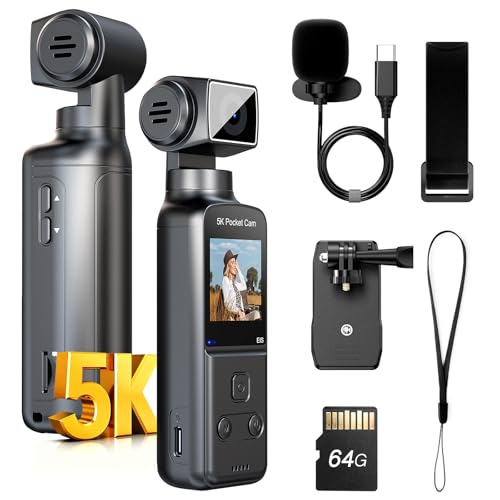
BOBLOV 5K Body & Vlogging Camera with Microphone, 4K/60FPS
- ✓ Compact and lightweight
- ✓ Excellent audio support
- ✓ Versatile mounting options
- ✕ Not for extreme sports
- ✕ Limited battery life
| Video Resolution and Frame Rate | 4K at 60FPS, 5K at 15FPS |
| Lens Rotation | 270° adjustable lens for versatile shooting angles |
| External Microphone Support | Yes, with dedicated mic input |
| Image Stabilization | Built-in Electronic Image Stabilization (EIS) |
| Connectivity and Accessories | Includes external mic cable, charging cable, clip mount, and hand strap |
| Body Design | Compact, portable body with multiple wearing options |
Imagine grabbing this tiny camera and realizing it can switch from crisp 5K footage to buttery smooth 4K at 60FPS with just a flick of a switch. I didn’t expect such versatility from a body that’s roughly the size of a deck of cards.
The moment I started filming, I was surprised how lightweight yet solid it feels in my hand.
The rotatable lens is a game-changer. I easily flipped it from selfie mode to first-person view in seconds, which made capturing different angles effortless.
Its compact design makes it perfect for quick clips without feeling bulky or intrusive. Plus, the clip mount and straps give you all kinds of options—you can clip it to your bag, strap it to a pole, or hold it comfortably in hand.
The external mic support really impressed me. My voice sounded clear and full, even outdoors, unlike many built-in mics that struggle with wind or distance.
The external mic cable is simple to connect, and the audio quality noticeably elevates your vlogs. The built-in EIS keeps your footage steady, especially when walking around or filming on the move.
Overall, this camera delivers sharp detail and smooth motion in a tiny package. It’s super easy to use, versatile, and makes filming on the go a breeze.
Whether you’re recording casual daily moments or more polished content, it handles both well. The only downside is it’s not suited for extreme sports, but for everyday vlogging, it’s pretty much perfect.
Rawiemy Video Camera Camcorder 4K 48MP 30FPS Vlogging

- ✓ Compact and lightweight
- ✓ Excellent audio options
- ✓ Good low-light performance
- ✕ Not suitable for professionals
- ✕ Limited advanced controls
| Video Resolution | 3840 x 2160 pixels (4K) at 30fps |
| Image Resolution | 48 Megapixels |
| Display | 3.0-inch flip touch screen with 270° rotation |
| Battery Capacity | 2 x 1050mAh batteries, 90-150 minutes usage per full charge |
| External Microphone Compatibility | Supports external microphone with 5-direction pickup and 5-8m sound range |
| Wireless Microphone Range | Up to 15 meters (50 feet) |
The first time I held the Rawiemy 4K camcorder, I was surprised by how lightweight and compact it felt—almost like holding a small phone, but with a serious lens attached. I decided to test it during a quick outdoor vlog, and the flip touch screen made it easy to frame shots from any angle without feeling awkward.
The image quality really stands out—crisp 4K resolution and 48 MP photos captured my surroundings beautifully. I appreciated the variety of functions like slow-motion and time-lapse, which added a creative touch to my clips.
Shooting in low light was surprisingly good, thanks to the built-in fill light, which brightened my night scenes without harshness.
The external microphone was a game changer. When I clipped on the wireless lavalier, my voice came through crystal clear even from 15 meters away, reducing background noise effectively.
It’s perfect for interviews or live streaming where audio quality matters a lot. The camera’s ability to record sound from five directions also added depth to my footage, making it feel more immersive.
The camera’s dual batteries gave me around two hours of continuous shooting, which is plenty for a day’s worth of vlogging. Charging via power bank was a breeze, and I could record while plugged in.
Connecting to my TV through HDMI was seamless, letting me review footage on a big screen instantly.
Overall, this camera covers most of your basic vlogging needs with great video and audio quality. It’s user-friendly but offers enough features to keep things interesting.
For casual creators or beginners, it’s a handy, versatile tool that’s ready to go when inspiration strikes.
What Features Should You Consider When Choosing a Vlogging Camera External Mic?
When choosing the best vlogging camera external mic, consider the following features:
- Audio Quality: The clarity and richness of sound are critical for vlogging. Look for microphones that offer a flat frequency response, low self-noise, and high sensitivity to ensure that your voice is captured clearly, even in noisy environments.
- Type of Microphone: Depending on your vlogging style, you may prefer a shotgun, lavalier, or handheld microphone. Shotgun mics are great for focused audio capture from a distance, lavalier mics are ideal for interviews and hands-free use, while handheld mics are versatile for various shooting scenarios.
- Connectivity: Ensure the microphone is compatible with your vlogging camera’s inputs. Common connection types include 3.5mm jacks, USB, or XLR inputs, so select one that will seamlessly integrate with your equipment.
- Wind Noise Reduction: If you plan to vlog outdoors, having a microphone with wind noise reduction features is vital. Look for mics that come with windshields or foam covers to minimize wind interference and enhance audio quality in breezy conditions.
- Size and Portability: A compact and lightweight microphone is beneficial for vlogging on the go. Consider how easy it is to mount on your camera or carry in your gear bag without adding excessive bulk.
- Battery Life: For microphones that require battery power, check the battery life to ensure it can last through long vlogging sessions. This is especially important for shoot days that may extend for several hours without access to charging.
- Durability: A sturdy and well-built microphone can withstand the rigors of travel and different shooting environments. Look for materials and designs that resist wear and tear, ensuring it remains functional over time.
- Price and Value: Determine your budget and assess the value the microphone offers for its price. Expensive mics might provide superior quality, but there are many affordable options that offer excellent performance for vlogging.
How Does Sound Quality Impact Your Vlogging Experience?
- Clarity: Clear audio is vital for effective communication with your audience. Poor sound quality can lead to misunderstandings or loss of interest, negatively impacting viewer engagement.
- Background Noise Reduction: An external mic can help minimize unwanted background noises, ensuring that the subject matter is the primary focus. This feature is especially important in noisy environments where ambient sounds could distract from the message being conveyed.
- Professionalism: High-quality sound elevates the production value of your vlogs, making them appear more polished and professional. This can attract a larger audience and convey credibility, encouraging viewers to return for more content.
- Versatility: Many external microphones offer various settings and configurations, allowing vloggers to adapt to different recording situations. Whether filming in a crowded space or a quiet room, having the right mic can significantly enhance audio performance.
- Directional Audio Capture: Some external mics are designed to capture sound from specific directions, which can be beneficial for isolating the speaker’s voice. This feature helps to create a more immersive experience for viewers, as it minimizes distractions from surrounding sounds.
What Are the Different Connectivity Options for External Mics?
When considering external microphones for vlogging, several connectivity options are available to ensure compatibility with your camera setup:
- XLR Connection: XLR connections are professional-grade audio inputs found on higher-end cameras and audio equipment. They provide a secure and balanced connection, minimizing noise and interference, which is ideal for high-quality sound recording in various environments.
- 3.5mm Jack: The 3.5mm jack is a common and widely used audio input on consumer cameras and devices. It allows for easy plug-and-play functionality with most external microphones, making it a convenient option for vloggers seeking portability without sacrificing sound quality.
- USB Connection: USB-connected microphones are often used with computers and some cameras that support USB audio input. They typically offer digital sound quality and the ease of connecting directly to devices, making them suitable for both vlogging and live streaming.
- Bluetooth Connectivity: Bluetooth microphones offer wireless convenience, enabling freedom of movement without the hassle of cables. They are perfect for vlogging in dynamic settings, although they may introduce latency or require battery management.
- Lightning Connector: This option is designed specifically for Apple devices, allowing microphones to connect directly to iPhones and iPads. Lightning microphones can provide high-quality audio recording and are particularly useful for mobile vloggers looking to capture sound on-the-go.
Why Is Size and Portability Important for Vloggers?
When selecting a vlogging camera and external microphone, size and portability play crucial roles for creators on the go. The characteristics are essential for various reasons:
-
Ease of Transport: Compact and lightweight equipment is easier to carry during travels or events. This allows vloggers to capture spontaneous moments without being burdened by heavy gear.
-
Quick Setup: Smaller cameras and mics enable faster setup, allowing creators to transition from one shooting location to another with minimal hassle. This is particularly beneficial during outdoor vlogs or in crowded areas.
-
Discretion: A portable setup helps vloggers remain less obtrusive while filming. This can foster more authentic interactions, especially in public spaces where large equipment might attract unwanted attention.
-
Versatility: Many lightweight vlogging cameras come with versatile features like Wi-Fi connectivity and adjustable settings, making it easier to adapt to different filming environments without cumbersome hardware.
-
Durability: Portable gear is often designed for on-the-go use, featuring rugged builds that can withstand minor bumps and drops, making them reliable companions for adventurous vloggers.
In essence, the right combination of size and portability in vlogging equipment enhances the overall user experience and encourages creativity.
What Types of External Mics Are Best for Vlogging?
When considering the best external mics for vlogging, several types stand out for their quality and functionality.
- Lavalier Microphones: These small, clip-on mics are ideal for capturing dialogue clearly, especially in interviews or situations where the speaker is moving. Their discreet size allows for hands-free operation, making them perfect for vlogs that require mobility.
- Shotgun Microphones: Designed to capture sound directionally, shotgun mics are excellent for vlogging in environments where background noise is a concern. They can be mounted on cameras or used on boom poles, allowing for focused audio capture from the subject while minimizing surrounding sounds.
- USB Microphones: These mics are perfect for vloggers who do post-production audio work, as they plug directly into computers for easy recording. They often offer high-quality sound and are great for voiceovers or tutorials, providing a professional audio experience without complex setup.
- Handheld Microphones: Ideal for on-the-go interviews or live events, handheld mics are versatile and easy to use. They are designed for portability and can capture high-quality audio while allowing the vlogger to maintain control over the microphone during recordings.
- Wireless Microphone Systems: These systems provide freedom of movement without being tethered to the camera, making them perfect for vlogging on the go. They typically consist of a transmitter and receiver, allowing for clear audio capture from a distance, which is especially useful in dynamic filming environments.
How Can Shotgun Mics Improve Your Vlogging Audio?
Shotgun mics can significantly enhance the audio quality of your vlogging by focusing on sound from a specific direction while minimizing background noise.
- Directional Sensitivity: Shotgun mics are designed to capture sound from a narrow area in front of the microphone, which allows vloggers to isolate their voice or specific sounds from the environment. This directional sensitivity is particularly useful in noisy settings, as it helps in reducing unwanted ambient noise and enhances the clarity of the primary audio source.
- Improved Sound Quality: By utilizing a shotgun mic, vloggers can achieve a much clearer and more professional sound quality compared to built-in camera microphones. The enhanced frequency response and reduced noise floor contribute to a more engaging auditory experience for viewers, making the content feel more polished and professional.
- Versatility in Shooting Conditions: Shotgun mics can be used in various environments, whether indoors or outdoors, making them an adaptable choice for vloggers. Their design allows them to perform well in different acoustic settings, enabling creators to capture high-quality audio regardless of the situation, from bustling city streets to quiet home studios.
- Compatibility with External Gear: Most shotgun mics are compatible with a variety of vlogging cameras and audio recorders, allowing for flexible setups. This compatibility means that vloggers can easily integrate these mics into their existing gear, enhancing their audio capabilities without needing to invest in a completely new system.
- Portability and Ease of Use: Many shotgun microphones are lightweight and easy to mount on cameras, making them a convenient choice for vloggers on the go. Their user-friendly design allows for quick setup and adjustments, ensuring that vloggers can focus on capturing content without being bogged down by complicated audio equipment.
Why Choose Lavalier Mics for Hands-Free Vlogging?
The underlying mechanism involves the positioning of lavalier mics close to the sound source, typically the vlogger’s mouth, which minimizes background noise and captures clearer audio. This is particularly beneficial in outdoor or crowded environments where ambient noise can interfere with the clarity of spoken content. Additionally, the hands-free nature of lavalier mics allows vloggers to gesticulate and interact more freely with their surroundings, making the content feel more lively and authentic. This combination of audio quality and mobility is why lavalier microphones are often recommended as the best vlogging camera external mic for creators looking to enhance their videos.
What Advantages Do USB Mics Offer for Vloggers?
Direct Digital Connection: The digital output of USB mics minimizes signal degradation, ensuring high-quality audio capture. This is crucial for vloggers who rely on clear and crisp sound to engage their audience effectively, as poor audio quality can detract from the visual content.
Versatile Compatibility: These mics can work with various devices, including laptops, tablets, and even some cameras. This versatility provides vloggers with the flexibility to adapt their recording setups to different environments and equipment, making it easier to create high-quality content regardless of the circumstances.
How Can You Troubleshoot Common External Mic Issues?
Common external microphone issues can often be resolved with some straightforward troubleshooting steps.
- Check Connections: Ensure that all cables are properly connected between the microphone and the camera.
- Inspect Power Supply: If the microphone requires batteries or phantom power, check that they are functioning and properly installed.
- Adjust Settings: Verify that the camera settings are correctly configured to recognize and use the external mic instead of the built-in microphone.
- Test with Different Devices: To isolate the problem, test the microphone with another camera or device to see if it works elsewhere.
- Look for Physical Damage: Examine the microphone and cables for any signs of wear or damage that could affect performance.
- Update Firmware and Software: Ensure that the camera’s firmware and any relevant software are up-to-date, as updates can fix compatibility issues.
- Check Audio Levels: Make sure the audio levels are set appropriately both in the camera and on the microphone itself if it has adjustable gain settings.
Check Connections involves ensuring that the microphone’s cable is securely plugged into the camera’s input port, as loose connections can prevent audio from being captured properly.
Inspect Power Supply is crucial for microphones that require batteries or external power; a dead battery or insufficient power source can result in no sound being recorded, making it essential to check these components first.
Adjust Settings requires navigating through the camera’s menu to confirm that it is set to use the external microphone instead of the internal one, as this setting can often default back, especially after a restart.
Test with Different Devices allows you to determine if the issue lies with the microphone itself or the camera; if the microphone works with another device, the problem may be with the original camera.
Look for Physical Damage entails inspecting the microphone and its cables for any visible signs of damage, like frays or bent connectors, which could impede audio transmission.
Update Firmware and Software is important because manufacturers often release updates that fix bugs and improve compatibility; checking for updates can resolve issues stemming from outdated software.
Check Audio Levels involves adjusting the gain settings both on the microphone and the camera to ensure that the input levels are appropriate for clear audio capture; too low or too high levels can distort sound quality.
What Steps Should You Take if Your Mic Is Picking Up Background Noise?
When a microphone picks up background noise, addressing the issue effectively can enhance your audio quality significantly. Here are practical steps to mitigate unwanted sounds:
-
Positioning: Ensure the microphone is closer to the subject (your voice) than the noise source. A directional mic can help focus on the sound directly in front of it.
-
Use windshields: If filming outdoors, using a foam windscreen or a dead cat will reduce wind noise and surrounding disturbances.
-
Set levels appropriately: Adjust the input gain on your microphone or recording device. Lowering the gain can minimize background noise, but make sure it doesn’t compromise sound clarity.
-
Sound environment: Film in quiet locations. Reducing ambient noise sources, like fans, air conditioning, or traffic, can help improve audio fidelity.
-
Post-production editing: Utilize audio editing software to remove background noise. Tools like Adobe Audition or Audacity have noise-reduction features that can enhance clarity.
-
Use a shotgun mic or lavalier: Opt for microphones designed to isolate sound, such as shotgun mics, which are effective at rejecting noise from the sides and rear.
Implementing these strategies can significantly improve the audio quality of your vlogs, making them more enjoyable for your audience.
How Can Connectivity Problems Be Resolved When Vlogging?
Connectivity problems in vlogging can be resolved through several effective solutions:
- Use a Reliable External Microphone: Choosing the best vlogging camera external mic can significantly enhance audio quality, which is crucial for engaging content. External microphones often provide better sound capture than built-in options, reducing background noise and improving clarity, making your vlog more professional.
- Check Your Cables and Connectors: Faulty or damaged cables can lead to connectivity issues, so it’s essential to regularly inspect your microphone and camera connectors. Using high-quality cables can prevent interference and ensure a stable connection, which is vital for uninterrupted recording during vlogging sessions.
- Utilize Wireless Microphone Systems: Wireless microphone systems offer freedom of movement and eliminate the hassle of tangled cables. These systems can deliver high-quality audio without the limitations of wired setups, making them ideal for dynamic vlogging situations where mobility is important.
- Invest in a Good Camera with Strong Connectivity Features: Select a vlogging camera that has robust connectivity options, such as Bluetooth or Wi-Fi, to ensure seamless integration with external microphones. A camera that supports various external mic connections will enable you to utilize different types of microphones based on your vlogging needs.
- Regular Firmware Updates: Keeping your camera and microphone firmware updated can resolve many connectivity issues. Manufacturers often release updates that improve performance and compatibility, ensuring that your equipment functions optimally and reducing the likelihood of connection problems during your shoots.
- Test Your Setup Before Recording: Always perform a quick test of your entire vlogging setup before starting your actual recording. This practice can help identify any connectivity issues early on, allowing you to make necessary adjustments to ensure a smooth recording session.
What Tips Should You Follow for Optimal Use of Your External Mic?
For optimal use of your external mic when vlogging, consider the following tips:
- Positioning: Place the microphone as close to the sound source as possible to capture clear audio.
- Windshields: Use windshields or foam covers to minimize wind noise during outdoor recordings.
- Check Levels: Regularly monitor audio levels on your camera to avoid distortion and ensure good sound quality.
- Use a Boom Pole: Consider using a boom pole to extend the mic’s reach without entering the frame of your shot.
- Battery Management: Ensure your mic is adequately powered, either through batteries or phantom power, to avoid interruptions.
- Test Before Recording: Always do a sound check before starting your recording to confirm everything is working as intended.
- Choose the Right Mic: Select a microphone that suits your vlogging style, such as shotgun mics for directional sound or lavalier mics for hands-free operation.
Positioning: The closer the microphone is to the audio source, the better the sound quality will be. This reduces background noise and captures the nuances of speech or sounds that are being recorded, leading to a more professional audio output.
Windshields: Wind can create unwanted noise that can ruin a recording, especially when vlogging outdoors. Using windshields or foam covers can significantly reduce this noise and help maintain the clarity of your audio, ensuring that your message comes through clearly.
Check Levels: Monitoring audio levels is crucial for achieving optimal sound quality. By checking levels on your camera, you can avoid issues such as clipping or too quiet audio, ensuring a balanced and professional-sounding final product.
Use a Boom Pole: A boom pole allows you to position the microphone close to the subject while keeping it out of the camera frame. This is particularly useful for interviews or when filming without a dedicated sound person, allowing for flexibility and mobility during shoots.
Battery Management: External microphones often require batteries or phantom power to operate. Keeping track of battery life and ensuring they are charged or replaced as needed will prevent unexpected audio dropouts during your recordings.
Test Before Recording: Conducting a sound check ensures that your equipment is functioning correctly and that your audio settings are optimized. This simple step can save you time and frustration by identifying any issues before the actual recording begins.
Choose the Right Mic: Different microphones serve different purposes; shotgun mics are great for focused sound capture, while lavalier mics are ideal for situations where you need hands-free operation. Understanding the strengths of each type will help you select the best external mic for your vlogging needs.
How Can Proper Mic Positioning Enhance Sound Quality?
Proper mic positioning plays a crucial role in enhancing sound quality for vlogging and audio recording.
- Proximity to Sound Source: The closer the microphone is to the sound source, the clearer and more detailed the audio will be. This reduces background noise and captures the intended sound more effectively.
- Angle and Orientation: The angle at which the microphone is positioned can significantly affect sound capture. Aiming the mic directly at the sound source can enhance clarity, while positioning it slightly off-axis might result in a more natural tone.
- Distance Considerations: Maintaining an optimal distance from the microphone is essential; too far away can lead to a loss of detail, while too close can cause distortion. Finding the right balance helps in achieving a well-rounded audio quality.
- Use of Windscreens or Pop Filters: These accessories can be invaluable in outdoor vlogging situations where wind noise is prevalent. They help in smoothing out harsh plosives and wind interference, ensuring a cleaner audio output.
- Environment Acoustics: The surrounding environment can influence sound quality as well. Positioning the mic away from reflective surfaces or noisy environments can reduce echoes and unwanted noise, leading to clearer recordings.
What Maintenance Should You Perform to Extend Your Mic’s Lifespan?
To extend your microphone’s lifespan, regular maintenance is essential. Here are some key maintenance practices:
- Regular Cleaning: Keeping your microphone clean is crucial to prevent dust and debris buildup that can affect sound quality. Use a soft, dry cloth to wipe the exterior and a gentle air blower to remove particles from the grille.
- Proper Storage: Store your microphone in a protective case or bag when not in use. This prevents physical damage and exposure to elements like moisture and extreme temperatures that can deteriorate the mic’s components.
- Avoiding Moisture: Water and humidity can severely damage microphones. Always ensure your mic is dry before storing it, and consider using a dehumidifier in environments where moisture is a concern.
- Check Cables and Connectors: Regularly inspect your microphone cables and connectors for wear and tear. Damaged cables can affect audio quality and could lead to more significant issues, so replace them promptly if you notice any fraying or exposed wires.
- Use Windshields and Pop Filters: These accessories help in reducing unwanted noise and protecting the microphone from moisture, saliva, and dust. Regularly check and clean them to ensure they are functioning effectively and replace them if they become worn out.
- Limit Physical Handling: Minimize the amount of handling and adjustments made to your microphone during use. Excessive movement can lead to wear on the internal components, so use stands or mounts to stabilize it whenever possible.
- Periodic Professional Servicing: Consider having your microphone professionally serviced at regular intervals, especially if you use it frequently. Professionals can identify issues that may not be apparent and provide cleaning and repairs that can extend the mic’s lifespan.