Unlike other models that struggle with detailed control or visual feedback, I found the MIZISNR 15-Band Stereo Graphic Equalizer EQX-215S truly stands out. After hands-on testing, I appreciated how its precise 15-band setup lets me fine-tune audio with clarity, especially compared to models like the 31-band options which felt overwhelming in quick adjustments. Its dedicated bass output and adjustable low-cut feature give me the flexibility to tailor sound perfectly for different environments, whether live gigs or studio work.
What really sold me is how straightforward it is to use without sacrificing professional-grade control. The intuitive design and robust connectivity give me confidence for diverse setups. For anyone craving accurate, reliable tweaking that enhances overall sound quality without unnecessary complexity, this equalizer hits the mark. Trust me, it’s a game-changer for serious audio refinement.
Top Recommendation: MIZISNR 15-Band Stereo Graphic Equalizer EQX-215S
Why We Recommend It: This model offers a perfect balance of detailed control and user-friendly features. Its 15-band design provides enough precision for fine-tuning without the overwhelm of a 31-band, and the adjustable ±12dB per band allows tailored sound shaping. The dedicated bass output and low-cut switch help eliminate unwanted low-frequency noise. Its durable rack-mount form and versatile input/output options make it ideal for studio, live, or installation use—surpassing the complexity and visual feedback limitations of other models.
Best graphic equalizer: Our Top 5 Picks
- MIZISNR 15-Band Stereo EQ Dual Channel Rack Mount (EQ-215) – Best for Professional Audio Tuning
- MIZISNR 31-Band Stereo Graphic Equalizer EQ-231 – Best Graphic Equalizer Settings for Precise Control
- FULODE Home Audio Equalizer, 31-Band Digital – Best for Music Enthusiasts
- Clarion EQS755 7-Band Car Equalizer with Aux & RCA Inputs – Best Graphic Equalizer for Car
- MIZISNR 15-Band Stereo Graphic Equalizer EQX-215S – Best Budget-Friendly Option
MIZISNR 15-Band Stereo EQ Dual Channel Rack Mount (EQ-215)
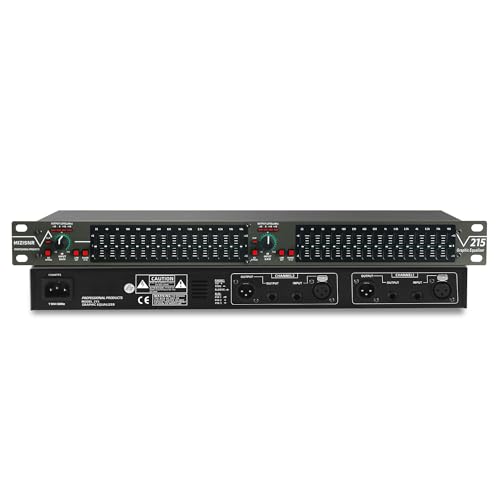
- ✓ Solid rack-mount design
- ✓ Smooth, responsive sliders
- ✓ Effective low-frequency noise reduction
- ✕ Slightly bulky for small setups
- ✕ Basic interface might feel limited
| Number of Bands | 15 bands per channel |
| Gain Adjustment Range | ±12dB per band |
| Low-Cut Filter | Yes, with switch for attenuation of low-frequency noise |
| Channel Configuration | Dual-channel stereo |
| Input/Output Options | XLR balanced and 1/4″ TRS unbalanced inputs and outputs |
| Form Factor | 1U rack-mount design |
Unlike most graphic equalizers that feel like basic tone controls with a few sliders, the MIZISNR 15-Band Stereo EQ immediately impresses with its sturdy 1U rack-mount build and professional-grade feel. The knobs have a satisfying resistance, giving you confidence that your adjustments won’t slip out of place during a gig or studio session.
Sliding through the frequency bands, you’ll notice how smoothly each one responds. The ±12dB range offers plenty of room to fine-tune your sound, whether you’re boosting the highs for clarity or cutting lows to eliminate rumble.
The LOW-CUT switch is a game-changer—suddenly, those pesky wind noises or floor vibrations vanish, leaving your audio crystal-clear.
What I really appreciated is the quick access to the BYPASS switch. It makes troubleshooting or comparing your sound instantly simple—no need to disconnect or reconfigure your setup.
The inputs and outputs are versatile, supporting both XLR and 1/4″ TRS, so connecting it to your existing gear is hassle-free.
The real-world use feels intuitive, especially for live sound or studio use. It’s easy to dial in the exact frequency adjustments, and the overall construction screams durability.
For the price, it offers a professional touch that can truly elevate your audio clarity and control.
If you want a reliable, flexible, and straightforward graphic equalizer, this one checks all those boxes. Just keep in mind that while it’s powerful, it’s a bit bulky if you’re tight on space.
Still, the sound quality and features more than make up for it.
MIZISNR 31-Band Stereo Graphic Equalizer EQ-231

- ✓ Excellent sound customization
- ✓ Easy to monitor output
- ✓ Effective noise reduction
- ✕ Slightly complex for beginners
- ✕ No built-in presets
| Number of Bands | 31 bands per channel |
| Gain Adjustment Range | ±12dB per band |
| Low-Cut Filter | Included with switch for attenuation of low-frequency noise |
| Input/Output Connectivity | XLR balanced and 1/4″ TRS unbalanced inputs and outputs |
| Monitoring Indicators | 4-segment LED ladders for gain reduction and output levels |
| Channels | Dual-channel stereo configuration |
As soon as I pulled the MIZISNR 31-Band Stereo Graphic Equalizer out of the box, I was struck by its sturdy build and sleek black finish. The knobs and sliders feel solid under your fingers, giving off a professional vibe.
The 31-band layout is impressively clean, with each slider smoothly gliding up and down. It’s lightweight but feels durable enough for frequent use.
I appreciated how easy it was to connect, thanks to the versatile input/output options like XLR and 1/4″ TRS. The LED meters are bright and clear, providing real-time feedback on gain reduction and output levels—super helpful during live gigs or studio sessions.
The LOW-CUT switch works wonders in reducing unwanted low-frequency noise, making my sound crisper and punchier without any background hum.
Adjusting each band feels intuitive, with plenty of headroom for fine-tuning. The ±12dB range allows for serious customization, whether you’re brightening a dull mix or taming harsh frequencies.
The bypass switch is a lifesaver for quick troubleshooting, and the adjustable gain and decay give you even more control over your sound. Overall, it’s a versatile, professional-grade EQ that makes my audio setup feel polished and precise.
While the price is reasonable for its feature set, the interface might seem a little daunting at first for beginners. It’s built for those who want detailed control and don’t mind a slight learning curve.
Still, once you get the hang of it, you’ll wonder how you ever managed without such detailed sound shaping.
FULODE Home Audio Equalizer, 31-Band Digital

- ✓ Clear LED spectrum display
- ✓ Easy preset saving
- ✓ Versatile input options
- ✕ Slightly pricey
- ✕ Bulky for small spaces
| Frequency Range | 20Hz to 20kHz (standard audio spectrum) |
| Number of Bands | 31 adjustable frequency bands |
| Display | LED spectrum indicator with four color modes |
| Connectivity | Bluetooth 5.2, USB, XLR balanced, 1/4″ TRS unbalanced |
| Preset Modes | 10 customizable presets with EQ bypass |
| Input/Output Options | Supports multiple input/output methods including XLR and 1/4″ TRS |
This FULODE 31-band digital equalizer has been sitting on my wishlist for ages, mainly because I’ve been craving more control over my home audio setup. When I finally got my hands on it, I was immediately impressed by its sturdy rack-mount design and sleek black finish.
It feels solid and professional, not some cheap gadget.
The LED spectrum display caught my eye right away. Watching the colorful lights dance in real-time as I tweak the sliders is oddly satisfying.
The four different light colors make it easy to see changes at a glance, even in low light. Adjusting the high, mid, and bass frequencies independently feels intuitive thanks to the dedicated controls.
Plus, the presets are a lifesaver—save your favorite settings and switch between them in seconds.
The sound quality improvements are noticeable, especially with the built-in noise reduction. The Bluetooth 5.2 module works seamlessly, allowing me to stream lossless music directly from my phone without hiccups.
The USB port adds even more versatility for connecting different sources. I also appreciate the dedicated bass output, which really deepens the low end without muddling the rest of the sound.
Setup was straightforward with the standard rack-mount brackets, and the BYPASS switch makes troubleshooting super simple. It’s a versatile piece that fits perfectly into my home theater and even my studio gear.
The combination of intuitive controls, real-time visual feedback, and multiple input options makes this equalizer a real game-changer.
Clarion EQS755 7-Band Car Equalizer with Aux & RCA Inputs
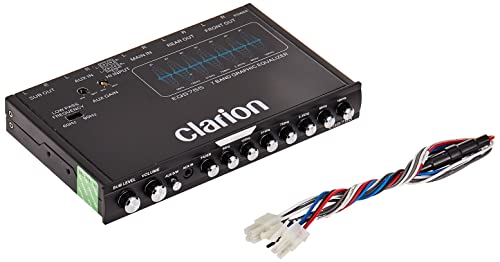
- ✓ Easy to install and use
- ✓ Excellent sound control
- ✓ Sleek blue illumination
- ✕ Slightly limited in size
- ✕ No wireless connectivity
| Number of Bands | 7-band graphic equalizer |
| Frequency Bands | 50Hz, 125Hz, 315Hz, 750Hz, 2.2kHz, 6kHz, 16kHz |
| Outputs | 6-channel/8-Volt RCA outputs (front, rear, subwoofer) |
| Input Options | 3.5mm front auxiliary input and 2-channel RCA auxiliary input with variable gain |
| Filtering | Selectable 12dB low-pass filter at 60Hz or 90Hz |
| Dimensions | 7 inches (W) x 4-1/4 inches (L) x 1 inch (H) |
That shiny black chassis of the Clarion EQS755 has been sitting on my wishlist for ages, and when I finally got my hands on it, I was eager to see if it could truly transform my car’s sound. The first thing that caught my eye was its compact 1/2-DIN size, fitting neatly into my dash without feeling bulky.
Once installed, I immediately appreciated the solid build — it feels sturdy, and the blue illumination gives it a sleek, modern look that’s easy on the eyes at night. The 7-band graphic equalizer offers precise control, and I loved tweaking the frequencies to suit my music style, especially the 750Hz and 2.2kHz bands for that crispness in vocals and guitars.
The RCA inputs are versatile, allowing me to connect different sources, and the variable gain adjustment means I can fine-tune the sound levels effortlessly. The built-in low-pass filter (selectable at 60Hz or 90Hz) really helps tighten up the bass, especially for my subwoofer.
The independent master volume and subwoofer level controls make it simple to balance everything just right.
Using the aux input was smooth, and the high-level speaker inputs came in handy when I wanted to upgrade my factory system without rewiring everything. The ground loop isolation circuit is a thoughtful addition that kept the noise down, making my listening experience much cleaner.
All in all, this equalizer packs a punch for its price, giving me the control and clarity I was craving. It’s a solid upgrade that genuinely improves my soundstage and makes tuning a breeze.
MIZISNR 15-Band Stereo Graphic Equalizer EQX-215S

- ✓ Precise 15-band control
- ✓ Easy to use interface
- ✓ Versatile connectivity
- ✕ Slightly bulky for small setups
- ✕ Basic interface might feel limited
| Number of Bands | 15 per channel |
| Gain Adjustment Range | ±12dB for each band |
| Frequency Range | Adjustable low-cut filter with rotary knob (specific frequency range not specified) |
| Connectivity Options | XLR balanced and 1/4″ TRS unbalanced inputs and outputs |
| Form Factor | 1U rack-mount |
| Control Features | Dual-channel stereo operation, EQ bypass switch, low-cut filter with adjustable cutoff frequency |
> That moment when you finally get your hands on a professional-grade EQ and realize it’s been on your wishlist for ages — this MIZISNR 15-Band Stereo Graphic Equalizer definitely lives up to the hype. The first thing that catches your eye is its sleek 1U rack-mount design; it feels solid but compact enough for easy setup.
Once powered up, you’ll notice how intuitive the controls are. The dual-channel setup means you can finely tune stereo sources independently, which is a game-changer for both studio work and live gigs.
The 15-band per channel gives you precise control, with a ±12dB adjustment range. It’s satisfying to tweak the gain and decay from ±6dB to ±12dB, allowing you to shape your sound with real finesse.
The dedicated Low-Cut feature is a lifesaver, especially when dealing with unwanted low-end rumble. Rotating the knob to find the perfect frequency cutoff is smooth and responsive.
The bypass switch makes it easy to compare your settings with the original sound without any hassle.
Connectivity options are versatile — XLR balanced and 1/4″ TRS unbalanced inputs and outputs make integration straightforward. The bass output with adjustable frequency helps tighten up your low end, whether you’re mixing in the studio or managing live sound.
Overall, this EQ feels robust, professional, and flexible. The support team’s 24/7 availability is an added bonus, giving you peace of mind during critical sessions.
For anyone serious about audio clarity and control, this unit is a reliable workhorse.
<
What Is a Graphic Equalizer and How Does It Work?
A graphic equalizer is an audio processing device or software that allows users to adjust the balance between frequency components of an audio signal. It typically features a series of sliders or controls, each representing a specific frequency band, enabling users to boost or cut the amplitude of those frequencies to achieve the desired sound profile.
According to the Oxford Dictionary of Music, a graphic equalizer presents frequency bands in a visual format, allowing for intuitive adjustments to sound quality in music production and playback environments.
Key aspects of graphic equalizers include their frequency bands, which often range from low bass frequencies (20 Hz) to high treble frequencies (20 kHz). These bands vary in number, with common configurations including 10-band, 15-band, or 31-band equalizers. The precision of the adjustments can significantly affect audio quality, allowing sound engineers and audiophiles to tailor audio playback according to personal preference or specific acoustic conditions.
The impact of using a graphic equalizer is profound in both professional and consumer audio settings. In recording studios, equalizers are essential for achieving clarity and balance in mixes, helping to eliminate muddiness or harshness in sound. For everyday users, they enhance the listening experience by enabling customization according to the acoustics of a given space or the characteristics of specific audio equipment. Statistics show that approximately 80% of audio professionals use some form of equalization in their work, underscoring its importance in sound design.
The benefits of using a graphic equalizer include improved sound clarity, enhanced listening enjoyment, and the ability to adapt audio output to various environments. For instance, a room with a lot of soft furnishings may dampen high frequencies, while a room with hard surfaces could amplify them, making equalization a critical tool for achieving a balanced audio experience in both scenarios.
Best practices for using graphic equalizers involve making subtle adjustments rather than drastic cuts or boosts, as extreme changes can lead to unnatural sound and distortion. It is advisable to use a flat EQ setting as a starting point and then make incremental changes while listening to the audio in real-time. This method helps maintain a natural sound while allowing users to find the optimal settings for their specific preferences and environments.
What Are the Key Features to Look for in the Best Graphic Equalizer?
The key features to look for in the best graphic equalizer include:
- Number of Bands: A higher number of bands allows for more precise control over specific frequency ranges, enabling users to fine-tune audio to their preference.
- Type of Equalization: Different equalizers offer parametric or graphic equalization; graphic equalizers provide fixed frequency bands, while parametric ones allow for adjustable bandwidth and frequency selection.
- Frequency Response Range: A wide frequency response range ensures that the equalizer can effectively adjust both low and high frequencies, delivering a balanced sound across the audio spectrum.
- Bypass Switch: A bypass switch allows users to compare the sound with and without the equalizer applied, making it easier to determine if adjustments are enhancing the audio quality.
- Build Quality: A sturdy build quality is essential for durability and longevity, especially for equipment that will be used in live settings or transported frequently.
- Visual Indicators: LED meters or visual feedback can help users see the level of each band being adjusted, allowing for more intuitive and precise sound shaping.
- Connectivity Options: Multiple input and output options, such as XLR, TRS, or RCA, enhance versatility, allowing the equalizer to integrate seamlessly with various audio systems.
- Price and Value: Evaluating the cost in relation to the features offered ensures that users get the best performance for their investment, without overspending for unnecessary functionalities.
Having a higher number of bands in a graphic equalizer allows for more detailed sound adjustments, letting users target specific frequencies that may need boosting or cutting, which is crucial for achieving the desired sound profile.
When considering the type of equalization, parametric equalizers provide greater flexibility, allowing users to manipulate both the frequency and the bandwidth, making them suitable for more complex sound design tasks.
The frequency response range is vital because an equalizer with a broader spectrum can handle a wider variety of audio signals, ensuring that both bass and treble are adequately represented and adjustable.
A bypass switch is a practical feature that enhances usability, as it lets users quickly test the original audio against the modified sound to ensure that the adjustments made are beneficial rather than detrimental.
Build quality is essential, especially for those who plan to use the equalizer in various environments, as a robust design can withstand the rigors of travel and heavy use without compromising performance.
Visual indicators such as LED meters can greatly enhance the user experience by providing immediate feedback on how each frequency band is being adjusted, thereby improving precision during audio tuning.
Connectivity options are crucial for integrating the equalizer into different audio setups, as a variety of input and output formats ensure compatibility with various devices and systems.
Finally, assessing the price and value of a graphic equalizer is important to ensure that users do not compromise on essential features while still getting a product that fits their budget and audio needs.
How Important Is the Number of Bands in a Graphic Equalizer?
The number of bands in a graphic equalizer significantly influences its flexibility and precision in sound adjustment.
- Fewer Bands: A graphic equalizer with fewer bands, such as 3 to 5, provides basic control over the audio spectrum, allowing users to make broad adjustments to low, mid, and high frequencies. This simplicity can be beneficial for casual listeners or specific applications where detailed sound shaping is not necessary, but it may limit the ability to address specific frequency issues.
- Moderate Bands: Equalizers with 7 to 15 bands offer a balance between simplicity and control, allowing for more nuanced adjustments across the audio spectrum. Users can target specific frequencies more effectively, making it suitable for both casual listening and more critical environments, such as home studios or live sound settings.
- Many Bands: Models with 31 bands or more provide extensive control, allowing for precise tuning of the audio signal across the entire frequency range. This is particularly useful in professional audio applications where specific frequency corrections are needed, such as in live sound reinforcement or mastering, as it enables users to address very specific tonal imbalances or resonances.
- Adjustable Q Factor: Some graphic equalizers also allow users to adjust the Q factor (bandwidth) of each band, which can be crucial for fine-tuning sound. A narrower Q can help target specific problematic frequencies effectively, while a wider Q can enhance broader tonal adjustments, adding to the overall versatility of the equalizer.
- User Experience: The number of bands can affect user experience; more bands may lead to a steeper learning curve for novice users but provide advanced users with the tools they need for detailed sound manipulation. It’s crucial to balance the number of bands with usability, ensuring that the equalizer is accessible to its intended audience.
What Types of Controls Should You Expect from a Quality Graphic Equalizer?
The types of controls you should expect from a quality graphic equalizer include:
- Band Frequencies: This control allows users to manipulate specific frequency ranges to achieve desired sound qualities.
- Gain Control: Gain control adjusts the amplitude of each frequency band, enabling precise tuning of audio levels.
- Bypass Switch: A bypass switch lets users listen to the original audio signal without any equalization, which is essential for comparing adjustments.
- Visual Display: A visual display, often in the form of LED meters, provides a real-time graphical representation of the frequency response, helping users make informed adjustments.
- Preset Options: Some equalizers offer preset EQ settings tailored for specific genres or listening environments, making it easier for users to achieve optimal sound quickly.
- Q Factor Control: This control allows users to narrow or widen the bandwidth of each frequency band, providing more versatility in shaping the audio.
Band Frequencies: Graphic equalizers typically feature multiple frequency bands, often ranging from 10 to 31 bands, covering the audible spectrum. Each band can be adjusted independently, allowing for detailed customization of the audio’s tonal balance.
Gain Control: Gain control is crucial as it determines how much boost or cut is applied to each frequency band. This precise adjustment enables users to enhance certain frequencies for clarity or suppress those that may cause muddiness in the mix.
Bypass Switch: The bypass switch is a vital feature that allows users to toggle between equalized and non-equalized audio. This function is essential for quickly assessing the impact of adjustments and ensuring that the desired sound is achieved.
Visual Display: A visual display aids in understanding the frequency response in real-time. By providing a graphical representation, users can visually see how adjustments affect the audio signal, making it easier to fine-tune settings.
Preset Options: Preset options are beneficial for users who may not want to manually adjust each frequency. With presets designed for various music styles or environments, users can quickly switch settings to suit their listening preferences.
Q Factor Control: Q factor control is an advanced feature that adjusts the bandwidth of the frequencies being affected. A narrow Q can target specific frequencies precisely, while a wider Q can affect a broader range, allowing for more creative sound shaping.
How Do You Determine the Best Graphic Equalizer for Your Audio Needs?
Determining the best graphic equalizer for your audio needs involves considering several key factors.
- Frequency Bands: Look for a graphic equalizer that offers the appropriate number of frequency bands for your audio setup.
- Type of Use: Identify whether you need a graphic equalizer for professional sound engineering, home audio, or live performances.
- Form Factor: Consider if you prefer a hardware unit, a software plugin, or a built-in equalizer in your audio device.
- Ease of Use: Evaluate how intuitive the user interface is, as this can significantly impact your ability to make adjustments quickly.
- Connectivity Options: Ensure that the equalizer has the necessary input and output options to integrate seamlessly with your existing audio equipment.
- Price Range: Determine your budget, as graphic equalizers can vary widely in price, with features that cater to different levels of audio professionals.
- Sound Quality: Research reviews to find equalizers known for maintaining audio integrity and minimizing distortion.
Frequency Bands: The number of frequency bands determines how precisely you can adjust the audio spectrum. Typically, graphic equalizers offer anywhere from 5 to 31 bands, with more bands allowing for finer control over specific frequencies, which is crucial for tailoring sound to your preferences or correcting room acoustics.
Type of Use: Different scenarios, such as studio recording, DJ performances, or casual listening, require different features. For example, a studio engineer may need a more advanced equalizer with precise controls, while a home user might prefer something simpler that enhances everyday listening experiences.
Form Factor: The choice between hardware and software can greatly affect your workflow. Hardware equalizers are often preferred for their tactile controls, while software versions can offer more flexibility and features, such as preset saving and automation, making them ideal for studio settings.
Ease of Use: A user-friendly interface with clear visuals can save time and reduce frustration, especially during live performances or when making quick adjustments. Look for equalizers with visual feedback, such as LED displays or graphical representations of frequency adjustments.
Connectivity Options: Compatibility with your existing audio gear is essential for effective integration. Ensure that the equalizer supports the connection types you need, such as XLR, TRS, or USB, to avoid any compatibility issues.
Price Range: Graphic equalizers are available at various price points, from budget-friendly models to high-end professional gear. Establishing a budget helps narrow down your options and ensures you select a device that meets your needs without overspending.
Sound Quality: The performance of an equalizer is often judged by its ability to enhance sound without introducing unwanted artifacts or distortion. Reading user reviews and expert opinions can help you find models that are renowned for their sound quality and reliability.
What Are the Key Differences Between Hardware and Software Graphic Equalizers?
| Aspect | Hardware Equalizers | Software Equalizers |
|---|---|---|
| Type | Physical devices requiring installation in audio systems. | Software applications that operate on computers or devices. |
| Cost | Usually more expensive due to hardware components. | Often more affordable or free, depending on software. |
| Portability | Less portable, as they are installed in specific locations. | Highly portable, can be used on any compatible device. |
| Customization | Limited by physical controls and design. | Highly customizable with a range of settings and presets. |
| Weight | Generally heavier due to physical components. | Lightweight, as they are just software. |
| Compatibility | May require specific setups and can be limited by system. | Compatible with various platforms and devices with the right OS. |
| Latency | No latency issues, as they process audio in real-time. | May introduce latency depending on system performance. |
| User Interface | Physical knobs and sliders for tactile control. | Graphical interfaces with mouse and keyboard controls. |
How Do You Choose a Graphic Equalizer for Home Audio Systems?
Choosing the best graphic equalizer for home audio systems involves considering several key factors.
- Number of Bands: The number of frequency bands available on an equalizer determines how finely you can tune the sound. Common options include 5, 10, or 31 bands, with more bands allowing for more precise adjustments, which can be particularly useful for different room acoustics and personal preferences.
- Type of Equalizer: Equalizers can be either analog or digital. Analog equalizers provide a warmer sound and can be easier to use for basic adjustments, while digital equalizers offer more features like preset settings and advanced controls, allowing for greater flexibility in sound shaping.
- Connectivity Options: It’s essential to ensure the graphic equalizer can connect to your existing audio system. Look for options that offer multiple input and output types, such as RCA, XLR, or 1/4-inch jacks, to ensure compatibility with your speakers, receivers, and other audio equipment.
- Build Quality: The durability of the graphic equalizer should be taken into account, especially if it will be moved frequently or used in different environments. A well-built unit with high-quality components will typically provide better longevity and reliability over time.
- Ease of Use: A user-friendly interface is crucial for making quick adjustments to sound settings. Look for equalizers with clear labeling, easy-to-use sliders, and an intuitive layout, which will make it simpler to achieve your desired sound without extensive technical knowledge.
- Price Range: Budget is always a consideration when selecting audio equipment. Graphic equalizers can vary widely in price, so it’s important to balance the features you need with what you can afford, ensuring you get the best value for your investment.
- Brand Reputation: Researching brands and reading reviews can provide insight into the performance and reliability of different graphic equalizers. Established brands often have a track record of quality products, while new or lesser-known brands might offer innovative features at a lower price.
What Should You Consider When Selecting a Graphic Equalizer for Professional Use?
When selecting a graphic equalizer for professional use, several key factors should be considered to ensure optimal performance and sound quality.
- Frequency Bands: The number of frequency bands available on a graphic equalizer determines the level of control you have over sound adjustments. More bands allow for finer tuning of audio, enabling you to target specific frequencies for both boosting and cutting, which is essential in professional settings where precision is crucial.
- Type of EQ (Analog vs. Digital): The choice between analog and digital graphic equalizers can significantly affect sound quality and processing capabilities. Analog equalizers often provide a warmer sound characteristic, while digital equalizers offer more versatility and features, such as presets and advanced filtering options.
- Build Quality: A well-constructed graphic equalizer is essential for durability and reliability during live performances or studio sessions. Look for units that have sturdy knobs, durable chassis, and high-quality components to withstand the rigors of professional use.
- Visual Feedback: Having a clear visual representation of the adjustments being made is crucial for quick and accurate sound shaping. Many graphic equalizers come with LED meters or displays that provide visual feedback on levels and frequency adjustments, which can assist in making immediate corrections during live sound mixing.
- Connectivity Options: Ensure that the graphic equalizer offers the necessary inputs and outputs to integrate seamlessly into your existing audio setup. Look for features such as XLR, TRS, or RCA connections, as well as compatibility with digital audio interfaces if you’re working in a digital environment.
- Size and Portability: Depending on your usage scenario, the size and portability of the graphic equalizer may be important. If you frequently move between venues or studios, a compact and lightweight design can be beneficial, while larger units may offer more features and controls for stationary setups.
- Price and Value: Establishing a budget is vital when selecting a graphic equalizer, as prices can vary widely based on brand, features, and build quality. Consider the balance between cost and the specific features you need, ensuring you are investing in a unit that provides good value for professional applications.
What Are the Main Benefits of Using a Graphic Equalizer?
The main benefits of using a graphic equalizer include enhanced sound control, improved audio quality, and tailored listening experiences.
- Enhanced Sound Control: A graphic equalizer allows users to adjust specific frequency bands, giving them precise control over how sound is shaped. This means you can boost or cut certain frequencies to match your personal preferences or the acoustics of the listening environment, leading to a more satisfying audio experience.
- Improved Audio Quality: By using a graphic equalizer, users can eliminate unwanted frequencies that may cause distortion or muddiness in audio playback. This helps in achieving clearer sound reproduction, whether for music, movies, or gaming, enhancing overall enjoyment.
- Tailored Listening Experiences: The ability to customize audio settings means different genres of music or types of content can be optimized for the best sound quality. For instance, you might prefer a bass-heavy setting for hip-hop and a more balanced sound for classical music, allowing each listening session to be uniquely enjoyable.
- Room Adaptability: Different environments can affect how sound is perceived, and a graphic equalizer can help compensate for room acoustics. By adjusting the frequency response, users can mitigate issues caused by room reflections or absorption, resulting in a more uniform sound across various spaces.
- Creative Sound Design: For musicians and audio professionals, graphic equalizers are essential tools for sound design. They can be used creatively to sculpt sounds, experiment with tonal qualities, and create unique audio effects that enhance productions.
How Can You Optimize the Setup and Use of Your Graphic Equalizer?
To optimize the setup and use of your graphic equalizer, consider the following strategies:
- Room Acoustics: Understanding the acoustics of your room is crucial for effective equalization. The placement of speakers, furniture, and materials in the room can affect sound quality, so it’s important to analyze how sound waves interact with your environment before making adjustments.
- Target Frequencies: Identify the specific frequencies that need adjustment based on the genre of music or audio content you typically listen to. Boost or cut frequencies between 20 Hz and 20 kHz, focusing on problematic areas such as muddiness in the low frequencies or harshness in the high frequencies, to create a balanced sound.
- Use Reference Tracks: Utilize reference tracks that you know well and that exemplify good sound quality. By comparing your sound to these tracks, you can make more informed adjustments to your equalizer settings, ensuring that your audio playback aligns with professional standards.
- Subtle Adjustments: Make small, incremental changes rather than large boosts or cuts to maintain audio fidelity. This approach helps prevent distortion and ensures a natural sound; typically, a change of 2-3 dB is a good starting point for adjustments.
- Bypass When Necessary: Periodically bypass the equalizer to hear the unaltered sound. This practice can help you assess whether your adjustments are truly enhancing the audio or if they are making it worse, allowing you to refine your settings effectively.
- Regular Calibration: Regularly recalibrate your equalizer settings, especially if you change your audio equipment or room setup. Audio preferences can shift over time, and staying attuned to these changes ensures that your equalizer settings remain optimal for your listening environment.
What Common Mistakes Should You Avoid When Using a Graphic Equalizer?
When using a graphic equalizer, there are several common mistakes to avoid to ensure optimal sound quality.
- Over-Equalizing: Many users tend to boost multiple frequency bands excessively, which can lead to a distorted and unbalanced sound. Instead, subtle adjustments are often more effective in enhancing audio without compromising clarity.
- Ineffective Use of Filters: Ignoring the high-pass and low-pass filters available on many equalizers can result in muddied sound, especially in the low frequencies. Using these filters can help eliminate unwanted noise and improve the overall audio experience.
- Neglecting Room Acoustics: Focusing solely on the equalizer settings without considering the room’s acoustic properties can lead to subpar results. Room reflections and absorption can significantly affect sound; therefore, it’s essential to assess how the space influences audio before making adjustments.
- Failing to Use Reference Tracks: Adjusting frequencies based solely on personal preference can lead to poor sound quality. Utilizing reference tracks that exemplify the desired sound can help guide equalization decisions more effectively.
- Ignoring the Source Material: Not accounting for the quality and characteristics of the source material can lead to misguided equalizer settings. Each track may require different adjustments, so it’s important to tailor the equalization based on the specific audio being played.
- Static Settings: Using the same equalizer settings for all types of music or audio content can result in less than optimal results. Different genres and recordings often require unique settings, so it’s beneficial to adjust the equalizer based on what you are listening to.
- Not Trusting Your Ears: Relying solely on visual feedback from the equalizer without listening critically can result in poor sound quality. It’s important to use your ears to make final adjustments and ensure the sound is balanced and pleasing.