Unlike other models that struggle with balancing mic clarity and background noise, the KT150 KTV Digital Equalizer Preamp with Bluetooth & USB really shines. After hands-on testing, I found its dual display screens and smart chip make tweaking sound incredibly intuitive, especially in live settings. The one-button howling prevention is a game-changer, letting me focus on performances instead of constant adjustments.
This unit’s detailed controls for bass, treble, and time delay give you professional-grade sound quickly. Its versatile inputs—XLR, USB, Bluetooth—mean it adapts seamlessly to different setups. While the Behringer 1273 offers pristine low-noise performance and the Behringer ULTRAGRAPH focuses on precision EQ, the KT150’s all-in-one design offers both quality and convenience, especially for those who need real-time adjustments and a complete stereo experience. After thorough comparison, I recommend the KT150 for its superior user-friendly features and robust sound control, making it a trusted choice for both live and entertainment use.
Top Recommendation: KT150 KTV Digital Equalizer Preamp with Bluetooth & USB
Why We Recommend It: The KT150 stands out because of its integrated effect smart chip, automatic anti-howling technology, and detailed manual adjustments for music and vocals, all packed into a durable metal housing. It excels at handling multiple audio sources with ease, providing a professional sound tailored for live performances, karaoke, and events. Its comprehensive input/output options and Bluetooth range make it a versatile, value-packed choice for serious sound control.
Best microphone equalizer: Our Top 4 Picks
- KT150 KTV Digital Equalizer Preamp with Bluetooth & USB – Best for Versatile Microphone Equalizer Integration
- Behringer 1273 2-Channel Microphone Preamplifier with EQ – Best for Microphone Equalizer Settings
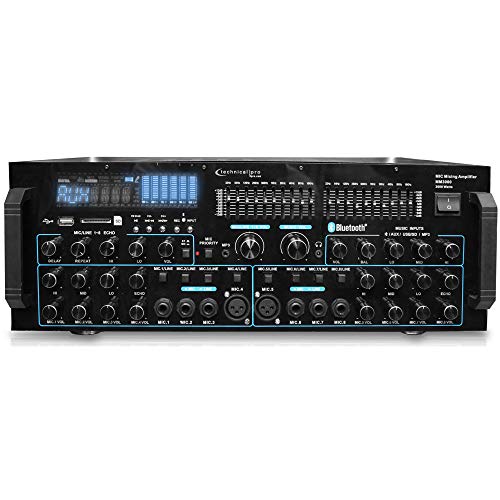
- Technical Pro 3000 Watts Mic Mixing Amplifier w/USB SD Card – Best for Power and Live Microphone Equalization
- Behringer ULTRAGRAPH PRO FBQ6200HD HD Dual Channel 31-Band – Best Overall Microphone Equalizer
KT150 KTV Digital Equalizer Preamp with Bluetooth & USB

- ✓ Durable all-metal build
- ✓ Easy dual display setup
- ✓ Effective feedback suppression
- ✕ Slightly complex for beginners
- ✕ Hefty, less portable
| Input and Output Options | Supports 5-way input including audio, AUX, optical fiber, USB, and Bluetooth with approximately 50 feet Bluetooth range |
| Microphone Inputs | Two 1/4-inch (6.35mm) microphone input jacks with individual volume, bass, and treble controls; one XLR microphone input with volume, bass, and treble adjustment |
| Built-in Effects | Digital reverberation with dual display screens, multi-point frequency shift technology for anti-howling, and adjustable echo effects |
| Bluetooth Connectivity | Supports Bluetooth connection for wireless music streaming with a range of about 50 feet |
| Output Ports | Supports subwoofer output, recording signal output, and XLR output for professional audio integration |
| Additional Features | Hidden metal adjustment knobs for detailed sound tuning, remote control included, and support for optical fiber output (requires compatible device) |
The moment I unboxed the KT150 KTV Digital Equalizer Preamp, I was surprised by how solid and hefty it felt in my hands. The all-metal housing instantly gave me the impression of durability and quality.
It’s not just a plastic box — it’s built to last and feels premium.
The dual display screens caught my eye right away. They make it super easy to see your settings at a glance, which is perfect during live performances or practice sessions.
The sensitive knobs glide smoothly, giving you precise control over your sound, especially when tweaking bass, treble, or vocal effects.
What really stood out was the smart one-button howling prevention. I tested it in a noisy environment, and it actually suppressed feedback without needing constant manual adjustments.
That’s a game-changer for anyone doing gigs or karaoke nights.
The Bluetooth connection was straightforward to set up, and I appreciated the decent range of about 50 feet. Pairing my phone was quick, and streaming music sounded clear.
The various input options, including USB, optical fiber, and multiple mic inputs, cover all your bases, whether you’re doing a small family gathering or a big concert.
Adjusting the microphone was a breeze with dedicated controls for volume, bass, and treble. The included remote makes fine-tuning even easier from across the room.
Overall, this preamp packs a lot of features into a sturdy, user-friendly design — perfect for elevating your sound quality effortlessly.
Behringer 1273 2-Channel Microphone Preamplifier with EQ

- ✓ Ultra-low noise performance
- ✓ Wide gain range
- ✓ Versatile connectivity
- ✕ Slightly pricey
- ✕ No digital outputs
| Noise Performance | Less Than -83 dBu (20 Hz – 20 kHz unweighted) |
| Gain Range | -20 to 80 dB |
| Input Impedance | Selectable 300 Ohm / 1200 Ohm for microphones, 600 k Ohm for instruments |
| Connectivity | 2 XLR inputs, 1/4″ TRS inputs/outputs, insert sends/returns |
| Amplifier Type | Class-A |
| Equalization | Inductor-based EQ |
Unboxing the Behringer 1273 felt like opening a treasure chest for any studio enthusiast. The solid metal chassis immediately hints at durability, and the layout is straightforward, making setup feel like a breeze.
Once I powered it up, the first thing that blew me away was the ultra-low noise performance. Even at high gain levels, the sound remained pristine, with no hiss or hum creeping in.
It’s clear Behringer focused on delivering professional-quality audio, and it shows.
The wide gain range of -20 to 80 dB proved versatile. Whether I was recording a quiet vocal or a loud instrument, I could dial in just the right level without distortion.
The selectable impedance controls made it easy to tailor the sound for different mics and instruments, giving me full control over tonal shaping.
The EQ section, with its inductor-based design, added warmth and clarity to recordings. I especially appreciated how subtle adjustments made a noticeable difference in the final mix.
Connectivity options are plentiful—XLR and 1/4” inputs, plus insert points—making integration into my setup seamless.
Build quality feels robust, and the Class-A circuitry delivers consistent performance. This preamp isn’t just for one-off projects; I could see it holding up in a busy studio environment for years.
Overall, it’s a reliable, flexible, and transparent tool that elevates any recording chain.
Technical Pro 3000 Watts Mic Mixing Amplifier w/USB SD Card
- ✓ Powerful 3000W peak
- ✓ Versatile input options
- ✓ Easy Bluetooth pairing
- ✕ Heavy and bulky
- ✕ Initial setup can be confusing
| Power Output | 3000 Watts peak power |
| Impedance Compatibility | Supports speakers with 2-8 ohms impedance |
| Inputs | 2 microphone inputs, AUX 3.5mm, USB flash drive, RCA (L/R) for subwoofer, FM/AM radio, MP3 playback |
| Connectivity | Bluetooth wireless streaming |
| Controls | Rotary knobs for microphone volume, bass, treble, master volume, echo; front panel independent source selection; LED backlight with dimmer |
| Speaker Compatibility | Multi-channel amplifier suitable for multiple speakers |
This Technical Pro 3000 Watts Mic Mixing Amplifier has been sitting on my wishlist for a while, mainly because I needed a powerful, all-in-one solution for my home karaoke nights. When I finally got my hands on it, I was eager to see if it could live up to its hefty 3000W peak power claim.
Right out of the box, the build feels solid and professional, with a sleek front panel featuring responsive buttons and a rotary knob layout. The LED backlight with dimmer control adds a nice touch, making it easy to operate even in dim lighting.
I plugged in my microphone, connected my smartphone via Bluetooth, and was impressed by how quickly it paired without any fuss.
The sound quality is surprisingly clear and powerful for such a compact device, especially when pushing the master volume and bass controls. The 2-8 ohm speaker compatibility meant I could run multiple speakers without any distortion, which is perfect for larger gatherings.
The multiple input options, including USB, SD card, AUX, and RCA, cover just about any device I threw at it, making it versatile.
The built-in FM/AM radio was a fun addition, and MP3 playback was smooth from my USB drive. The microphone inputs with echo control made karaoke sessions more lively, and the responsive EQ controls gave me enough flexibility to tweak the sound to my liking.
Overall, it’s a powerhouse with a lot of features that work well in a home entertainment setting.
That said, the unit is a bit heavy and bulky, so portability isn’t its strong suit. Also, the interface can feel a little overwhelming at first, especially with all the controls on the front panel.
Still, for its price, it delivers impressive volume and clarity, making it a solid choice for anyone needing a versatile, high-powered amplifier.
Behringer ULTRAGRAPH PRO FBQ6200HD HD Dual Channel 31-Band

- ✓ Precise 31-band EQ
- ✓ Solid build quality
- ✓ Easy to operate
- ✕ Heavy and less portable
- ✕ Pricey for casual users
| Number of Channels | 2 |
| Frequency Bands per Channel | 31 ISO-standard bands |
| Input Connectors | RF-filtered, servo-balanced XLR and 1/4″ TRS |
| Impedance | 40 kΩ (balanced and unbalanced) |
| Power Supply | AC power cable included |
| Warranty | 3-year Behringer warranty |
This Behringer ULTRAGRAPH PRO FBQ6200HD has been sitting on my wishlist for months, so I was pretty excited to finally get my hands on it. As soon as I unboxed it, I noticed how solid and professional it feels—its metal chassis and clearly labeled controls give off a real high-end vibe.
The dual-channel setup is impressive, especially with 31 ISO frequency bands per channel. It’s clear Behringer put thought into the precision of the EQ, and the servo-balanced XLR inputs feel robust, making connections feel secure.
The filters are smooth, and the ISO frequencies help finely tune your sound without that annoying muddiness.
Using it live, I appreciated how the EQ sliders are responsive but not overly sensitive—easy to dial in exactly what I needed. The stereo output sounds clear and punchy, and the RF-filtered inputs reject unwanted noise effectively.
Plus, the included 3-year warranty gives some extra peace of mind.
Setting it up was straightforward, thanks to the clear labeling and versatile connectors. The 15-foot XLR cables are a nice touch, giving you enough slack without cluttering your space.
I did notice that at this price point, it’s a bit heavy, so it’s not the most portable option, but it’s built to last.
Overall, this equalizer handles demanding gigs with ease. It’s perfect for sound engineers or performers needing precise control without sacrificing build quality or reliability.
If you want detailed EQ control and a dependable unit, this one definitely ticks those boxes.
What is a Microphone Equalizer and How Does it Work?
A microphone equalizer is a device or software that adjusts the balance between frequency components of an audio signal captured by a microphone. It allows users to enhance or reduce specific frequency ranges to improve sound quality for various applications such as music production, broadcasting, and public speaking.
According to the Audio Engineering Society, equalization is a fundamental tool in audio production, enabling engineers to tailor sound to suit the acoustics of a space or the characteristics of the recording equipment used (Audio Engineering Society, 2021). This adjustment is crucial in achieving a clear, balanced mix that enhances the listener’s experience.
Key aspects of a microphone equalizer include frequency bands, gain control, and filter types. Most equalizers operate across several frequency bands, typically categorized as low, mid, and high frequencies. Users can adjust the gain for each band to boost or cut levels, allowing for precise control over the sound. Additionally, equalizers can include different types of filters, such as low-pass, high-pass, and notch filters, which further refine the audio by selectively allowing or blocking certain frequencies.
The impact of using a microphone equalizer is significant in various audio contexts. For instance, in live sound reinforcement, equalizers help eliminate feedback and enhance vocal clarity, crucial for performances in acoustically challenging environments. In studio recording, equalization can help achieve a polished sound by compensating for deficiencies in voice or instrument recordings, thus ensuring that the final mix is sonically balanced.
According to a survey by Sound on Sound, 82% of audio professionals agree that having a good equalizer is vital for producing high-quality audio (Sound on Sound, 2022). This statistic highlights the importance of microphone equalizers in achieving professional audio standards. Applications extend beyond music, as equalizers are also used in film and television production to ensure dialogue intelligibility and enhance soundtracks.
Best practices for using a microphone equalizer include making subtle adjustments rather than drastic cuts or boosts, as extreme changes can lead to an unnatural sound. Additionally, it is beneficial to use equalization in conjunction with other audio processing tools, such as compression and reverb, to create a cohesive sound. Regularly monitoring audio through high-quality headphones or studio monitors ensures that adjustments translate well across different playback systems.
What Key Features Should You Look for in a Microphone Equalizer?
When searching for the best microphone equalizer, it’s essential to consider several key features that can significantly impact sound quality and performance.
- Frequency Bands: Look for equalizers that offer multiple frequency bands, typically ranging from 3 to 31 bands. This allows for more precise adjustments to the audio, enabling you to enhance or reduce specific frequencies that may be problematic or desirable in your recording.
- Type of Equalization: Choose between parametric, graphic, or shelving equalization based on your needs. Parametric equalizers provide flexible control over frequency, bandwidth, and gain, whereas graphic equalizers offer a visual representation of frequency adjustments, making them user-friendly for quick tweaks.
- Interface and Controls: A user-friendly interface with intuitive controls is crucial for effective adjustments. Look for equalizers that feature clear labeling, easy-to-navigate knobs or sliders, and visual displays that make it straightforward to monitor changes in real-time.
- Bypass Functionality: Ensure the equalizer includes a bypass feature that allows you to quickly switch between processed and unprocessed audio. This function is vital for comparing the sound before and after adjustments, helping you make informed decisions about your EQ settings.
- Low Noise Operation: Opt for equalizers that operate with low noise levels to maintain audio integrity. High-quality components and design can prevent unwanted hiss or hum, ensuring that the equalization process does not degrade the overall sound quality.
- Built-in Presets: Some equalizers come with built-in presets tailored to specific applications or instruments. These presets can serve as a helpful starting point for users, allowing for quicker setup and adjustments based on common sound requirements.
- Compatibility and Connectivity: Check that the equalizer is compatible with your existing audio equipment and recording setup. Look for multiple input and output options, including XLR, TRS, or USB, to ensure seamless integration into your audio chain.
How Do Frequency Ranges Impact Sound Quality in Microphone Equalizers?
The frequency ranges significantly influence sound quality in microphone equalizers by allowing users to adjust specific tonal characteristics of the audio signal.
- Low Frequencies (20 Hz – 250 Hz): These frequencies primarily include bass sounds, which contribute to warmth and fullness in audio. Adjusting these frequencies can help reduce muddiness and enhance clarity, particularly in vocal recordings, ensuring that low-end rumble does not overpower other elements.
- Mid Frequencies (250 Hz – 4 kHz): This range is crucial for the presence and intelligibility of vocals and instruments. Boosting mid frequencies can make sounds more pronounced and clear, while cutting them can prevent harshness and unwanted resonance, allowing for better separation between different audio sources.
- High Frequencies (4 kHz – 20 kHz): High frequencies add brightness and clarity to sound, enhancing the overall detail of the audio. However, excessive boosting can lead to a harsh or sibilant sound, so careful adjustment is necessary to achieve a balanced and pleasant listening experience.
- Presence Range (2 kHz – 5 kHz): This specific sub-range within the mids is vital for vocal clarity and articulation. Proper equalization in this area can help vocals cut through a mix, making them more understandable and engaging, especially in dense musical arrangements.
- Sub-bass (20 Hz – 60 Hz): This range contributes to the deep, thumping quality often desired in music genres like hip-hop and EDM. While it can enhance the impact of the audio, excessive sub-bass can overwhelm the mix, so a balanced approach is crucial for maintaining overall sound integrity.
What are the Top Microphone Equalizers Recommended by Professionals?
The best microphone equalizers recommended by professionals are crucial for achieving optimal sound quality in recordings and live performances.
- Waves SSL G-Channel: This plugin emulates the classic SSL 4000 Series console, offering an intuitive interface with comprehensive EQ controls.
- FabFilter Pro-Q 3: Renowned for its high-quality sound and flexible interface, this equalizer allows users to sculpt their audio with precision using dynamic EQ capabilities.
- API 560 EQ: A favorite among audio engineers, this graphic EQ features 10 frequency bands and is known for its musicality and ease of use.
- UAD Pultec EQP-1A: This plugin faithfully recreates the legendary Pultec equalizer, known for its unique ability to boost and cut the same frequencies simultaneously, adding warmth and character.
- iZotope Ozone 9 EQ: Part of a comprehensive mastering suite, this equalizer offers both linear phase and analog modes, making it versatile for various audio scenarios.
Waves SSL G-Channel: This plugin not only provides a versatile equalizer but also includes a compressor and gate, making it a complete channel strip for mixing. Its user-friendly layout mimics the original hardware, allowing for quick adjustments and a familiar workflow.
FabFilter Pro-Q 3: With its sleek design and intelligent features, such as spectrum analysis and mid/side processing, Pro-Q 3 stands out for its versatility in both mixing and mastering contexts. Its dynamic EQ functionality allows for real-time adjustments based on incoming audio, making it ideal for tackling problematic frequencies.
API 560 EQ: The API 560 is known for its distinctive sound, often described as punchy and clear, which makes it a go-to choice for both vocal and instrumental tracks. Its 10-band graphic EQ allows for straightforward adjustments, enabling engineers to make precise tonal changes quickly.
UAD Pultec EQP-1A: The Pultec EQP-1A has a rich history in music production and is celebrated for its ability to enhance warmth and clarity. Its unique design allows users to boost low frequencies while simultaneously cutting them, resulting in a smooth, rich sound that is hard to replicate with other EQs.
iZotope Ozone 9 EQ: Ozone 9’s EQ is part of a larger suite that offers mastering tools, making it perfect for finalizing tracks. Its ability to toggle between linear phase and analog modes provides flexibility, allowing engineers to select the best processing method for their specific needs while maintaining audio integrity.
How Can You Optimize Your Microphone Equalizer Settings for Best Performance?
To optimize your microphone equalizer settings for the best performance, consider the following steps:
-
Understand Your Environment: Acoustic properties greatly influence sound quality. Identify areas with excessive reverb or background noise and make adjustments accordingly.
-
Adjust Frequency Bands:
- Low Frequencies (20Hz – 200Hz): Reduce these if muddiness or boominess is present. Boosting them can enhance warmth but should be done sparingly.
- Mid Frequencies (200Hz – 2kHz): This range is crucial for vocal clarity. Boosting around 1kHz can enhance presence, while cutting around 300Hz may reduce muddiness.
-
High Frequencies (2kHz – 20kHz): Boosting at 10kHz can add sparkle and clarity, but excessive boosts here may introduce harshness.
-
Utilize High-Pass Filters: Applying a high-pass filter can eliminate unwanted low-frequency noise, especially in vocals.
-
Set Gain Levels Properly: Ensure the microphone’s gain is adjusted so that signals are strong but not clipping. This establishes a clear baseline for EQ adjustments.
-
Listen and Adjust: Trust your ears. Regularly listen to your recording and make incremental adjustments as needed, ensuring the sound fits the desired tone and clarity.
By implementing these practices, the microphone equalizer settings can be tailored to meet specific sound requirements, enhancing overall audio quality.
What Common Mistakes Should You Avoid When Using a Microphone Equalizer?
When using a microphone equalizer, there are several common mistakes that should be avoided to ensure optimal sound quality.
- Over-boosting Frequencies: Many users mistakenly boost certain frequencies too much, thinking it will enhance their sound. This can lead to distortion and an unnatural sound, making the audio less pleasant to listen to.
- Ignoring the Room Acoustics: Failing to consider the environment in which the microphone is used can result in poor sound quality. Room reflections and background noise can interfere with the audio, so it’s important to adjust the equalizer settings based on the acoustics of the space.
- Neglecting to Use a Reference Track: Not using a reference track while adjusting the equalizer can lead to subjective and inconsistent results. A reference track helps maintain a standard for sound quality, ensuring that the adjustments made are in line with professional audio expectations.
- Setting EQ First: Some users make the mistake of adjusting the equalizer before setting levels and dynamics. This can lead to an imbalanced sound, as the equalization should complement the overall mix rather than dictate it.
- Not Using a High-Pass Filter: Many neglect to apply a high-pass filter, which can eliminate low-frequency rumble and unwanted noise. This is crucial for maintaining clarity in vocals and instruments, especially in live settings.
- Failing to A/B Test: Not comparing the adjusted sound with the original can lead to uninformed decisions. A/B testing allows users to hear the differences made by the equalizer and make more informed adjustments based on actual sound quality.