When I first held the Podcast Equipment Bundle Live Sound Card Audio Mixer, I was surprised by how solid it felt—compact but packed with controls that respond smoothly. As I tested it, the dual 3.5mm microphone inputs, along with the XLR options, made balancing levels easy, even in real-time. The built-in noise reduction and tone adjustments truly help keep audio crisp and professional, removing the guesswork from achieving ideal recording levels.
What stands out is how user-friendly it is, with dedicated knobs for treble, mid, bass, and pitch, making quick adjustments simple. Whether you’re streaming, podcasting, or recording vocals, this all-in-one setup elevates your sound without needing extra gear. After comparing it to alternatives, this product’s combination of versatile connectivity and hands-on control makes it a clear winner for those serious about getting the best levels for recording and mixing audio.
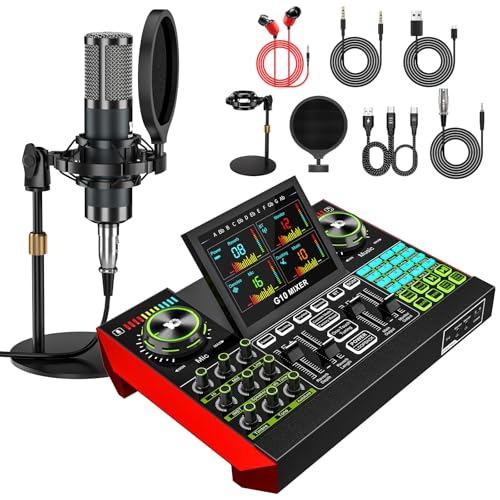
Top Recommendation: Podcast Equipment Bundle Live Sound Card Audio Mixer, 3.5mm
Why We Recommend It: This bundle offers professional-grade features like dual microphone inputs, noise reduction, multiple tone controls, and a simple yet effective interface. Its ability to connect seamlessly to smartphones, computers, and instruments makes it highly versatile. The built-in sound effects and voice changer are perfect for creators seeking immediate impact. Compared to others, it provides a comprehensive, easy-to-use solution at a reasonable price, making it the best choice for achieving optimal recording and mixing levels.
Best levels for recording and mixing audio: Our Top 2 Picks
- Podcast Equipment Bundle Live Sound Card Audio Mixer, 3.5mm – Best Value
- Podcast Microphone & Sound Card Bundle with BM800 Microphone – Best Premium Option
Podcast Equipment Bundle Live Sound Card Audio Mixer, 3.5mm
- ✓ Easy to set up and use
- ✓ Versatile connectivity options
- ✓ Excellent sound quality
- ✕ Slightly bulky for small desks
- ✕ Limited advanced features
| Microphone Type | P15 condenser microphone with cardioid polar pattern |
| Microphone Frequency Response | Not explicitly specified, but suitable for voice and broadcast recording |
| Audio Interface Inputs | Dual 3.5mm microphone inputs, XLR, 6.5mm instrument input |
| Sound Effects and Tone Controls | 12 electronic tone levels, 16 sound effects, 3 tone adjustment knobs (treble, midrange, bass), pitch control knob |
| Connectivity | USB connection to PC, OTG connection to mobile devices, supports smartphones, computers, speakers, headphones, guitars |
| Headphone Monitoring Output | 1/4 inch (6.35mm) headphone jack |
Imagine plugging everything in and immediately noticing how robust and professional this setup feels—surprisingly without the hefty price tag. That was my first thought when I unpacked this bundle.
The P15 microphone has a solid build, with a sleek matte finish and a sturdy stand that stays put even when you’re adjusting your voice mid-sentence.
The G10 audio mixer instantly caught my eye with its compact, all-in-one design. Its multiple inputs—XLR, 6.5mm, and dual 3.5mm—make connecting everything from my smartphone to my guitar feel seamless.
Plus, the built-in sound effects and voice changer turned my basic stream into a fun, engaging broadcast in seconds.
Using the mixer was refreshingly straightforward. The knobs for treble, mid, bass, and pitch are intuitive, making fine-tuning a breeze.
The noise reduction and electronic tone levels genuinely help clean up my audio, especially when I’m streaming in a noisy environment.
The P15 microphone’s cardioid pattern isolates my voice well, and the windscreen reduces pops perfectly. I was impressed how clear and professional my recordings sounded, even without external soundproofing.
Connecting the whole setup to my phone or PC was smooth, thanks to the included cables and simple interface.
Overall, this bundle feels thoughtfully designed for content creators. It’s versatile, easy to operate, and produces high-quality sound that elevates your recordings.
Whether you’re podcasting, gaming, or creating short videos, it covers all the bases without overwhelming you with complexity.
Podcast Microphone & Sound Card Bundle with BM800 Microphone

- ✓ Versatile sound effects
- ✓ Easy-to-use interface
- ✓ Excellent sound clarity
- ✕ Slightly complex setup
- ✕ Limited to specific features
| Microphone Compatibility | Supports XLR with phantom power, 6.35mm dynamic mic, 3.5mm mic and headset mic inputs |
| Preamp Quality | Built-in high-quality preamps with support for phantom power |
| Audio Processing | Dual DSP processors with DENOISE function |
| Display | 4.5-inch high-definition dot-matrix LCD with 6 adjustable angles |
| Voice Mode Storage | Supports saving up to 19 different voice modes for quick switching |
| Effects and Controls | 5 reverb modes, adjustable reverb length/depth, 12-step auto-tune, tone controls (treble, mid, bass), pitch changer, sidechain, dry/wet recording, loopback switch |
Unlike most podcast and DJ setups I’ve come across, this G10 bundle immediately caught my eye with its sleek 4.5-inch adjustable LCD display. It’s not just a basic mic and sound card—it’s a full control center, packed with features that make live streaming and recording feel almost effortless.
The build quality feels solid, with a user-friendly slope control panel that’s easy to navigate even during a live broadcast. The colorful spectrum display is surprisingly immersive, giving you real-time visuals of your music and voice levels, which helps keep everything balanced without guesswork.
What really makes this stand out are the numerous preset reverb modes and voice effects. I played around with the 12-step auto-tune and pitch changer, and it’s impressive how smooth the transitions are.
Plus, saving up to 19 voice modes means you can quickly switch between different sound profiles for gaming, podcasting, or streaming—no more tedious adjustments mid-session.
The built-in pre-amps and support for phantom power mean your BM800 microphone sounds crisp and professional. The dual DSP processors and denoise function noticeably cut down background noise, making your voice clearer even in noisy environments.
Handling multiple inputs was a breeze, with support for dynamic mics, headset mics, and even a 3.5mm microphone—perfect for multi-person setups or collaborations. The interface is intuitive enough that I didn’t need to keep consulting the manual, and the sound quality exceeded my expectations at this price point.
Overall, this bundle offers a comprehensive solution that combines ease of use with powerful features. Whether you’re streaming, podcasting, or DJing, it’s capable of elevating your audio game without overwhelming you with complexity.
What Are the Best Recording Levels to Optimize Audio Quality?
Gain staging involves managing the levels at each point in the audio signal chain, from recording to mixing. Proper gain staging ensures that signals are strong enough to avoid noise while not so high that they cause distortion, leading to a cleaner and more professional sound.
How Do You Determine the Best Mixing Levels in Audio Production?
Determining the best levels for recording and mixing audio is essential for achieving high-quality sound and preventing distortion.
- Metering Tools: Utilizing metering tools such as peak meters and RMS meters helps to visually represent audio levels during recording and mixing. Peak meters indicate the maximum level of audio signals, ensuring they do not exceed 0 dBFS to avoid clipping, while RMS meters provide an average level that reflects the perceived loudness of the audio.
- Headroom: Maintaining adequate headroom is crucial in audio production, typically around 6-12 dB below 0 dBFS during recording. This buffer allows for unexpected peaks and dynamic range in the audio signal, preventing distortion and allowing for better mixing flexibility.
- Monitoring Levels: Setting appropriate monitoring levels is vital for accurately assessing the mix. Listening at a consistent and moderate volume helps in making better mixing decisions, as loud monitoring can lead to ear fatigue and poor judgment regarding balance and dynamics.
- Reference Tracks: Using reference tracks from professional mixes provides a benchmark for setting levels. By comparing your mix to these tracks, you can gauge the loudness and tonal balance, ensuring your levels align with industry standards.
- Dynamic Range: Understanding the dynamic range of your audio is important for achieving clarity and impact. Aim for a mix that has a wide dynamic range, with quieter parts being distinguishable from louder sections, which can be managed by adjusting levels, compression, and automation.
- Gain Staging: Proper gain staging throughout the recording and mixing process ensures that each element in the signal chain is at an optimal level. This reduces the risk of distortion and allows for a clearer overall mix, as each stage contributes to the final output without unnecessary noise or loss of quality.
What Role Does Headroom Play in Achieving Ideal Mixing Levels?
Headroom is crucial in achieving ideal mixing levels in audio production, as it prevents distortion and allows for dynamic range.
- Definition of Headroom: Headroom refers to the amount of space between the peak level of an audio signal and the maximum level that can be recorded or reproduced without distortion.
- Significance in Mixing: Adequate headroom is essential during mixing as it allows for dynamic peaks without clipping, ensuring a clean and professional sound.
- Recommended Levels: The best levels for recording and mixing audio typically suggest keeping peaks around -6 dB to -3 dB, providing ample headroom for any unexpected spikes.
- Impact on Dynamics: Having sufficient headroom can help maintain the dynamic range of a track, allowing for expressive performances without losing detail or clarity.
- Effects on Mastering: In the mastering stage, appropriate headroom is vital as it enables the mastering engineer to apply compression and limiting without introducing unwanted distortion.
Headroom plays a pivotal role in audio production by ensuring that signals can be processed without distortion, maintaining the integrity of the sound throughout the recording and mixing phases. Understanding and managing headroom effectively leads to a more polished and professional final product.
What Are Common Mistakes When Setting Levels for Recording?
Common mistakes when setting levels for recording include:
- Recording Too Hot: This occurs when the audio levels are set too high, causing distortion and clipping. When levels exceed 0 dBFS, the audio signal can become compromised, leading to an undesirable sound that is difficult to fix in post-production.
- Recording Too Low: Setting levels too low can result in a weak signal that lacks clarity and presence. This often leads to increased noise during the mixing process, as engineers may need to boost the gain, inadvertently amplifying any background noise present in the recording.
- Ignoring Headroom: Failing to leave adequate headroom can lead to problems during mixing and mastering. It is essential to maintain a buffer of around -6 dBFS to -12 dBFS to ensure that any peaks during recording do not lead to distortion and allow for adjustments in the mixing stage.
- Overlooking Meter Calibration: Not properly calibrating your levels to the appropriate metering standards can result in inconsistent recordings. Different DAWs and audio interfaces may use varying reference levels, so it’s important to ensure your meters are set to the correct scale to avoid confusion.
- Neglecting the Monitoring Environment: Poor acoustics in the recording space can mislead the engineer when setting levels. If the environment is too noisy or has inadequate treatment, it can cause misinterpretation of the true sound, leading to improper level settings that affect the final mix.
- Not Considering Dynamic Range: Overlooking the dynamic range of the source material can lead to misjudged levels. It’s crucial to consider how the dynamics of an instrument or vocal performance will impact the overall mix, as some signals may need more level adjustment than others to maintain balance.
- Failing to Use Reference Tracks: Not comparing recordings with professionally mixed tracks can lead to inaccurate level settings. Reference tracks provide a benchmark to gauge your levels during recording and mixing, helping to achieve a more polished sound.
How Can You Accurately Measure and Monitor Audio Levels?
Calibration of Monitors: Proper calibration of studio monitors ensures that what you hear reflects the actual sound being produced. This process involves adjusting the monitor’s output levels to match the environment’s acoustics, allowing for a more accurate representation of the audio being mixed. By regularly calibrating your monitors, you can maintain consistent audio levels, which is vital for professional mixing.
Reference Tracks: Comparing your mix to professionally produced tracks in a similar genre can help you determine the best levels for your audio. These reference tracks serve as a standard, allowing you to adjust your levels to ensure your mix competes well sonically. By analyzing the loudness, dynamics, and tonal balance of reference tracks, you can make informed decisions on how to balance your own mix.
Headphone Monitoring: Using high-quality headphones provides a clear and detailed view of the audio, enabling precise adjustments. This method is particularly useful in untreated rooms where external noise and reflections can distort the sound. Headphones allow for a focused listening experience, making it easier to detect subtle changes in levels that may not be apparent through studio monitors.
Which Tools Are Best for Ensuring Optimal Audio Levels?
To ensure optimal audio levels during recording and mixing, several tools can be utilized:
- Audio Level Meters: These are essential tools that provide visual feedback on audio levels in real-time.
- Dynamic Range Compressors: Compressors are used to control the dynamic range of audio signals, ensuring that the loudest and softest parts are balanced.
- Peak and RMS Meters: These meters help distinguish between peak and root mean square levels, allowing for better management of audio signals.
- DAW (Digital Audio Workstation): A DAW is crucial for recording, editing, and mixing audio, providing built-in tools for level monitoring.
- Headphones and Studio Monitors: High-quality headphones and monitors allow for accurate listening, which is vital for assessing audio levels during mixing.
Audio Level Meters: These meters, often found in both hardware and software formats, visually represent the audio signal’s level. They help sound engineers identify if the audio is peaking (too loud) or too quiet, allowing for adjustments to maintain optimal levels without distortion.
Dynamic Range Compressors: Compressors reduce the volume of the loudest parts of an audio signal while boosting the quieter parts, thus controlling dynamic range. This tool is essential for maintaining a consistent volume level throughout a recording, making the mix more polished and professional.
Peak and RMS Meters: Peak meters display the maximum level of an audio signal, while RMS meters provide an average level over time. Using both types allows sound engineers to ensure that the audio levels are well-balanced, avoiding clipping and maintaining a full, rich sound.
DAW (Digital Audio Workstation): A DAW provides a comprehensive environment for recording, editing, and mixing audio. Most DAWs come equipped with various metering tools and plugins that assist in monitoring levels, giving users the flexibility to achieve the best sound possible.
Headphones and Studio Monitors: Investing in high-quality headphones and studio monitors is crucial for accurate sound reproduction. They enable sound engineers to hear the nuances in audio, ensuring that levels are appropriate and that the final mix translates well across different playback systems.
What Best Practices Should You Follow When Adjusting Levels in a DAW?
When adjusting levels in a DAW for recording and mixing audio, it’s essential to follow best practices to ensure optimal sound quality and avoid distortion.
- Maintain Headroom: Always leave sufficient headroom (generally around -6 dB) to prevent clipping during recording and mixing. This allows for unexpected peaks in audio levels without causing distortion.
- Use Metering Tools: Utilize metering tools like VU meters and peak meters to accurately gauge levels. These tools help you visualize the dynamics of your audio and ensure that levels are balanced correctly across different tracks.
- Avoid Overcompression: While compression can help control dynamics, overcompressing can squash the audio and reduce its overall impact. Use compression judiciously to maintain the natural character of the sound while keeping levels consistent.
- Set Proper Input Levels: During recording, aim for input levels that peak around -12 dB to -6 dB. This range provides a good balance, capturing the audio clearly without distortion and allowing for post-processing adjustments.
- Balance Track Levels: Ensure that the levels of individual tracks are balanced in relation to one another. This involves adjusting faders so that no single element overwhelms the mix, allowing each instrument and vocal to be clearly heard.
- Utilize Automation: Use automation to dynamically adjust levels throughout your mix. This technique allows you to highlight certain elements at specific moments, enhancing the overall listening experience without permanently altering the mix balance.
- Monitor in Context: Always listen to levels in the context of the full mix rather than soloing tracks. This gives a better understanding of how the levels interact and ensures that each element sits well within the overall soundscape.